Hak5 Rubber Ducky
Summary
This documentation is about the USB Rubber Ducky, a keystroke injection tool. It will explain USB Rubber Ducky basics, show available tools for writing and encoding/decoding scripts, how to update firmware and finally deploy a keystroke injection attack.
Requirements
- This device is operating system independent but you will need a pc with an internet connection and a USB A port.
Description
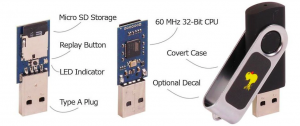
USB Rubber Ducky, is a keyboard injection tool, mainly used from penetration testers and system administrators. The Rubber Ducky comes disguised with an innocent USB flash drive chassis, to aid in social engineering. But under the hood hides a 60 MHz 32-bit AT32UC3B1256 CPU with 256K onboard flash, and a micro SD card storage to host the payload, which is ready to deploy with over 9000 characters per minute, once connected into an USB slot.
The device where Rubber Ducky is connected, recognizes it as a USB Keyboard. But it is also possible to change the PID/VID (Product ID/Vendor ID), so Rubber Ducky can claim to be any USB Human Interface Device (HID). The payload, is written in Ducky Script, which is a very simple scripting language. Its syntax consists of just a few keywords, so everyone can directly start developing their own ducky scripts.
Package Content
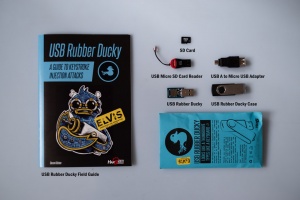
If you purchase the USB Rubber Ducky form Hak5 you will find this content:
- USB Rubber Ducky
- 128 MB micro SD Card
- The casing of the USB Rubber Ducky
- USB micro SD Card reader
- USB A female to micro USB male adapter
- USB Rubber Ducky field guide
The USB micro SD Card reader to transfer the encoded the program onto the micro SD Card. The USB A female to micro USB male adapter allows to use the USB Rubber Ducky on mobile devices.
Rubber Ducky Basics
Before diving into the world of keystroke injection attacks, a reader should be familiar with the following terms:
Payload
The payload tells USB Rubber Ducky what keystroke sequence shall be injected, once connected into a USB jack. Payloads are written in a language called Ducky Script.
Ducky Script
Ducky Script is the script language, in which payloads are written. Ducky Scripts are pure text, so any ascii based text editor can be used. The syntax is very easy, each command (all capital letters) resides on a new line with options to follow. See here a list of commands and their functions.
Duck Encoder
Since Rubber Ducky is not able to interpret text files natively, the scripts need to be encoded into a binary keystroke injection file. There are many tools out there and they come in different flavors, as a browser app, a cli program or with a VB GUI. They all work the same, and produce an inject.bin file. There are also decoder tools available to reverse the process and produce ducky scripts from binary files.
inject.bin
The inject.bin file is the compiled version of the ducky script. This file is then transferred on to a micro SD card and placed in Rubber Ducky's SD card reader, in order to be read and processed by the firmware.
Firmware
Rubber Ducky's source code is open, so many different firmware alternatives exist. Depending on the attack strategy a specialized firmware will be used. Tools to flash firmware are also covered later in this article.
Attack Workflow
No matter what kind of device the chosen target will be, the workflow will be similar for all devices.
Research
Since Rubber Ducky acts as a simple preprogrammed input device, an attack is more likely to be successful, the more detailed information is gathered during reconnaissance phase, using social engineering and open source intelligence gathering techniques. Once you know details about the used hardware and software running on it, try to rebuild the setup in bare metal or in a virtual environment, to test and optimize payload.
Write
Writing ducky scripts always starts with trying out the payload by typing it directly into the test machine using the keyboard, and make step by step notes how you completed some tasks. Once all the necessary keystroke and shortcut combinations are found to complete the attack, the actual writing of the ducky script can start. But keep in mind that all machines vary in performance, especially when dealing with GUI elements. So be sure to add enough delay in the script, so the victim hosts has time enough to follow the keystrokes. A payload generator for multiple OS platforms can be found here.
Encode
Once the ducky script is completed, it's time to convert the human readable file into the binary formatted inject.bin file. Place the inject.bin file to the root folder of your micro SD card. There is an online Encoder IDE which can be found on ducktoolkit.com. Or download an offline version from here. In case you need to convert back the binary file to ascii, use this tool.
Test and Optimization
Once the tests on the test platform succeeded, it's time to optimize the code in sense of speed (number of keystrokes and delays) and discreetness (to make the attack stealthier).
Deploy
- Deploy the encoded script on the USB Rubber Ducky by Pasting the inject.bin file onto the micro SD Card.
- Use the USB Rubber Ducky and watch it type
Alternatives
Device to be used with this documentation Maybe another device to be used with this documentation
Prevent Keystroke Injection
- A course where this documentation was used (2017, 2018)
- Another one (2018)

