Difference between revisions of "CryptoAuthentication SOIC Xplained Pro Starter Kit (DM320109)"
Jump to navigation
Jump to search
| (15 intermediate revisions by the same user not shown) | |||
| Line 1: | Line 1: | ||
== Summary == | == Summary == | ||
This documentation describes the usage of the CryptoAuthentication SOIC Xplained Pro Starter Kit (DM320109) | This documentation describes the usage of the CryptoAuthentication SOIC Xplained Pro Starter Kit (DM320109) | ||
| Line 20: | Line 19: | ||
=== Implementation of ATSHA204A === | |||
An example implementation for the ATSHA204A can be found under Philly's Tutorial ATSHA204A - A Full Tutorial [https://phillystutorials.blogspot.com/2019/07/atsha204a-full-tutorial.html] | |||
The example program implements: | |||
* Device Details like serial number, device number, lock config | |||
* Locking the configuration, OTP and Data Zone | |||
* HMAC challenge | |||
* GenDig example | |||
* Read encrypted slots | |||
* Creating diversified keys for challenges | |||
* CheckMac | |||
* DeriveKey | |||
Usage: | Usage: | ||
* | * The program code can be found on Phil's website: [https://github.com/PhillyNJ/SAMD21/tree/master/examples/atsha204a DemoProject] | ||
* Open a terminal | * Download the code and open it in Microchip Studio, build it and flash it onto your DM320109 board | ||
* Terminal | * To flash the code connect your DM320109 board with the USB cable at the USB EDBG port and your PC | ||
* Open a terminal program like TeraTerm [https://tera-term.de.softonic.com/ Tera Term Download] | |||
Data | * Terminal / Tera Term port setup: | ||
Port according to your device manager e.g. COM3 | |||
Speed 9600 | |||
Data 8 bit | |||
Parity none | Parity none | ||
* Press the | Stop bits 1 bit | ||
* | Flow control none | ||
* Press then the reset button on your DM320109 board and in the Tera Term terminal the menu of the program will appear | |||
[[File:ATSHA204Menu.png]] | |||
* You can navigate through the different implementations via the menu | |||
* To get details like serial number about the device select (01). If your ATSHA204A is connected correctly, you should see similar information as follows: | |||
[[File:ATSHA204DeviceDetails.png]] | |||
* To configure the device, write all the keys to the slots and lock the device, you have to follow the below steps: | |||
* Step 1 - configure the device - command (03) Personalize Device | |||
* Step 2 - lock the configuration zone - command (04) | |||
* Step 3 - write to the OTP zone - command (05) | |||
* Step 4 - write the keys - command (06) | |||
* Step 5 - lock OTP and data zones - command (07) | |||
* Step 6 - read OTP zones - command (08) | |||
* Step 7 - run deriveKey for slot 5 - command (AB) | |||
* Step 8 - run deriveKey (Key Roll) for slot 4 - command (AE) | |||
* Step 9 - validate key - command (AA) | |||
* When selecting (02) you get the slot configuration which is saved in bytes 20 - 51 within the 88 bytes configuration zone. There you have 16 slots of each 2 bytes containing the access restriction values for the slots in the data zone | |||
[[File:ATSHA204SlotConfiguration.png]] | |||
* To interpret the slot configuration as displayed above the overview below will give useful information. More details can be found in the ATSHA204A data sheet. | |||
[[File: | [[File:ATSHA204ConfigurationZone.png]] | ||
* If bit 6 is set to 1, then a slot which is secret allows encrypted read to access. Reading these slots returns the encrypted data which the host then has to decrypt by the read key defined in the slot configuration of the slot being read. Selecting command (A2) reads the encrypted slots as shown below: | |||
[ | [[File:ATSHA204EncryptRead.png]] | ||
== User Guides == | * For an HMAC challenge use the command (A0) of the menu. This will perform an HMAC challenge against slot 3 and 12. Both are derived from the root key. This examples compares the HMAC digest generated on the client and an HMAC on the host using all possible modes (start mode / update mode / finalize mode). | ||
* [ | [[File:ATSHA204HMAC.png]] | ||
* [ | * ATSHA204a also supports key rolling to prevent repeated use of the same key value. After a certain number of uses of the current key value gets replaced with the SHA-256 digest of itself combined with some offset e.g. a constant, a serial number or model number. This is implemented by using the DeriveKey command. Selecting AE will perform a rolling key operation on key 4. Further details can be found in Philly's Tutorial. | ||
== User Guides and Data Sheets == | |||
* [http://ww1.microchip.com/downloads/en/DeviceDoc/DM320109-CryptoAuthentication-Xplained-Pro-Starter-Kit-Users-Guide-DS50002774A.pdf CryptoAuthentication Xplained Pro Starter Kit User Guide] | |||
* [http://ww1.microchip.com/downloads/en/DeviceDoc/ATSHA204A-Data-Sheet-40002025A.pdf ATSHA204A Data Sheet] | |||
== Used Software and Hardware == | |||
The links for the used software Microchip Studio and the used hardware CryptoAuthentication SOIC Xplained Pro Starter Kit (DM320109) and its microchips can be found at the beginning of this article under "requirements" and "description". | |||
== Courses == | == Courses == | ||
| Line 80: | Line 96: | ||
Implementation: | Implementation: | ||
* https:// | * https://phillystutorials.blogspot.com/2019/07/atsha204a-full-tutorial.html | ||
Cryptographic | Hash and Cryptographic Algorithms: | ||
* https:// | * https://www.tutorialspoint.com/cryptography/cryptography_hash_functions.htm | ||
* | * https://www.tutorialspoint.com/cryptography/advanced_encryption_standard.htm | ||
* https://www.geeksforgeeks.org/implementation-diffie-hellman-algorithm/ | * https://www.geeksforgeeks.org/implementation-diffie-hellman-algorithm/ | ||
[[Category:Documentation]] | [[Category:Documentation]] | ||
Latest revision as of 18:48, 18 November 2021
Summary
This documentation describes the usage of the CryptoAuthentication SOIC Xplained Pro Starter Kit (DM320109)
Requirements
Description
The CryptoAuthentication SOIC Xplained Pro Starter Kit (DM320109) consists of:
- ATSAMD21-XPRO
- AT88CKSCKTSOIC-XPRO
- 3 ATECC608A (Elliptic Curve Diffie Hellman, Elliptic Curve Digital Signature Algorithm, SHA-256 & HMAC, AES-128)
- 3 ATECC508A (Elliptic Curve Diffie Hellman, Elliptic Curve Digital Signature Algorithm, SHA-256 & HMAC)
- 3 ATAES132A (AES-128)
- 3 ATSHA204A (SHA-256 with MAC)
Implementation of ATSHA204A
An example implementation for the ATSHA204A can be found under Philly's Tutorial ATSHA204A - A Full Tutorial [1]
The example program implements:
- Device Details like serial number, device number, lock config
- Locking the configuration, OTP and Data Zone
- HMAC challenge
- GenDig example
- Read encrypted slots
- Creating diversified keys for challenges
- CheckMac
- DeriveKey
Usage:
- The program code can be found on Phil's website: DemoProject
- Download the code and open it in Microchip Studio, build it and flash it onto your DM320109 board
- To flash the code connect your DM320109 board with the USB cable at the USB EDBG port and your PC
- Open a terminal program like TeraTerm Tera Term Download
- Terminal / Tera Term port setup:
  Port          according to your device manager e.g. COM3
  Speed         9600
  Data          8 bit
  Parity        none
  Stop bits     1 bit
  Flow control  none
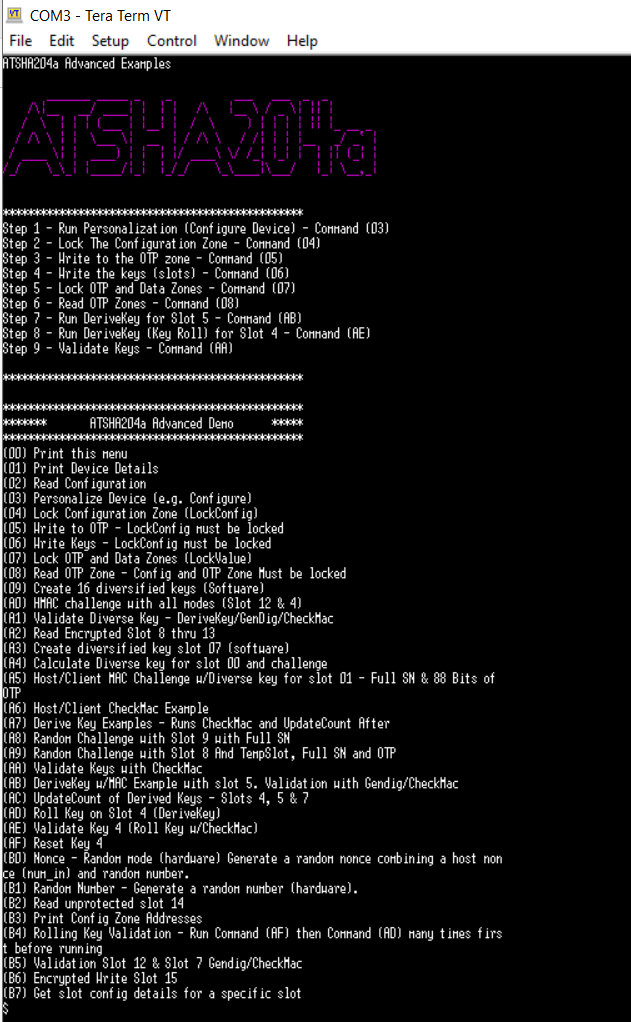
- Press then the reset button on your DM320109 board and in the Tera Term terminal the menu of the program will appear
- You can navigate through the different implementations via the menu
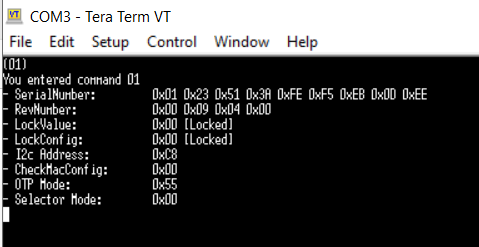
- To get details like serial number about the device select (01). If your ATSHA204A is connected correctly, you should see similar information as follows:
- To configure the device, write all the keys to the slots and lock the device, you have to follow the below steps:
- Step 1 - configure the device - command (03) Personalize Device
- Step 2 - lock the configuration zone - command (04)
- Step 3 - write to the OTP zone - command (05)
- Step 4 - write the keys - command (06)
- Step 5 - lock OTP and data zones - command (07)
- Step 6 - read OTP zones - command (08)
- Step 7 - run deriveKey for slot 5 - command (AB)
- Step 8 - run deriveKey (Key Roll) for slot 4 - command (AE)
- Step 9 - validate key - command (AA)
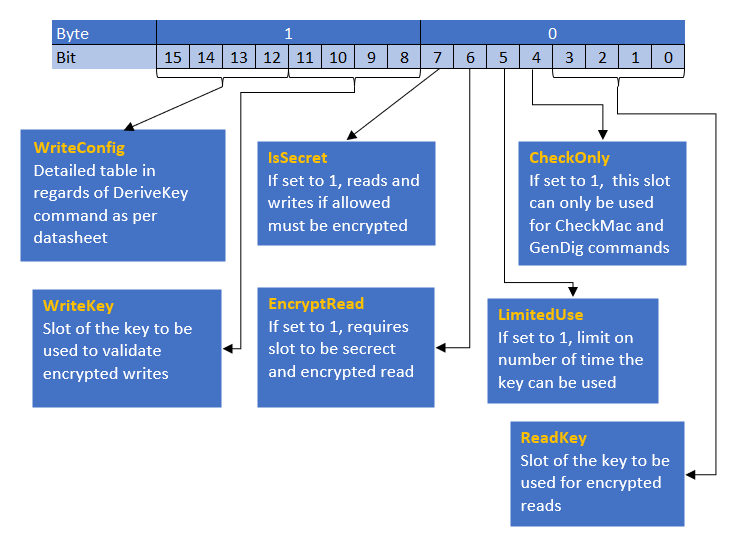
- When selecting (02) you get the slot configuration which is saved in bytes 20 - 51 within the 88 bytes configuration zone. There you have 16 slots of each 2 bytes containing the access restriction values for the slots in the data zone
- To interpret the slot configuration as displayed above the overview below will give useful information. More details can be found in the ATSHA204A data sheet.
- If bit 6 is set to 1, then a slot which is secret allows encrypted read to access. Reading these slots returns the encrypted data which the host then has to decrypt by the read key defined in the slot configuration of the slot being read. Selecting command (A2) reads the encrypted slots as shown below:
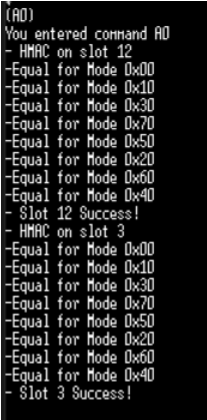
- For an HMAC challenge use the command (A0) of the menu. This will perform an HMAC challenge against slot 3 and 12. Both are derived from the root key. This examples compares the HMAC digest generated on the client and an HMAC on the host using all possible modes (start mode / update mode / finalize mode).
- ATSHA204a also supports key rolling to prevent repeated use of the same key value. After a certain number of uses of the current key value gets replaced with the SHA-256 digest of itself combined with some offset e.g. a constant, a serial number or model number. This is implemented by using the DeriveKey command. Selecting AE will perform a rolling key operation on key 4. Further details can be found in Philly's Tutorial.
User Guides and Data Sheets
Used Software and Hardware
The links for the used software Microchip Studio and the used hardware CryptoAuthentication SOIC Xplained Pro Starter Kit (DM320109) and its microchips can be found at the beginning of this article under "requirements" and "description".
Courses
References
Implementation:
Hash and Cryptographic Algorithms:


