Dns2tcp
Summary
Since this is a tool used in Post Exploitation phase, this document will assume that access on the victim machine has already been gained. Configuration on both endpoints are necessary to use this tool.
Dns2tcp is a tool used in order to send TCP packets over DNS traffic and consists of two components - a server tool and a client tool. The server contains a list of ressources, which are defined inside a configuration file. Each of these resources is either a local or remote service, which is waiting for a TCP connection. The client listens to the predetermined TCP port and redirects every incoming connection over DNS to the endservice. In this way, a restrictive firewall, which allows dns traffic, can be evaded.
In order to make full use of this tool, a NS record for a subdomain is needed, which has to point to the address of the server.
Example of a NS entry:
subdomain IN NS domain.mydomain.at
Server side configuration
In this example, a file called dns2tcpdrc is created via cat. The server will listen to all IP-addresses, by setting the listen variable as "0.0.0.0". The port must be 53 as this is the default port for DNS. The domain subdomain.mydomain.at is the subdomain configured beforehand. The resource ssh is used, but other services can also be used.
The end file should look similar to the example below:
cat >.dns2tcpdrc <<END
listen = 0.0.0.0
port = 53
user=nobody
domain = subdomain.mydomain.at
resources = ssh:127.0.0.1:22
END
The server can now be started by using the command:
dns2tcpd -F [-d 1/2/3] -f .dns2tcpdrc
The flag -F causes the tool to work in the foreground while -f is used in order to set the configuration file. The flag -d can be optionally used in order to set the debug level with 3 being the highest debug level, thus showing the most information.
Client side configuration
Another configuration file needs to be created on the client machine. It is important to set the same domain and resource as it has been declared in the configuration file on the server side. The local_port declared is necessary for the last step.[1]
Client configuration file example:
cat >.dns2tcprc <<END
domain = subdomain.mydomain.at
resource = ssh
local_port = 2222
END
Testing
Check for available resources:
dns2tcpc -z subdomain.mydomain.at [server-IP]
If no available resources are shown, a mistake has been made in the previous configuration. In this case, retrying with the debug level set to a higher level and adding debug_level = 3 to the configuration file might help in order to find the cause of the error.[2]
Browser Setup
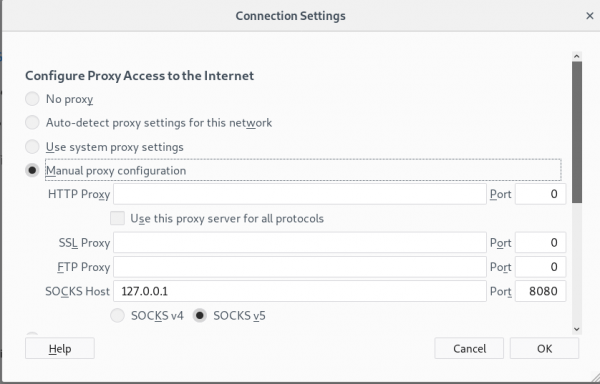
With dns2tcp access to the internet can be gained despite the firewall blocking traffic. In order to make use of this, the browser's Network Proxy needs to be edited in the settings. The Proxy Access needs to configured as "Manual proxy configuration" and the SOCKS Host needs to have the IP-adress 127.0.0.1. The port has to be set to an open, unused port.
Example settings in firefox using port 8080:
Execution
Start the client:
dns2tcpc -f .dns2tcprc [server-IP] [-d 1/2/3]
Open a new terminal and connect to the remote host via ssh using the local_port from the client's configuration file and the SOCKS-port set in the browser configuration:
[server-user]@127.0.0.1 -p [local_port] -D [SOCKS-port]
When opening the web browser now, one is free to access the internet, while many DNS packets are sent between the server and client at a fast rate.[1]

