Difference between revisions of "ESP-RFID"
| (16 intermediate revisions by the same user not shown) | |||
| Line 10: | Line 10: | ||
* a firmware flashing tool of your choice (on Windows not required) | * a firmware flashing tool of your choice (on Windows not required) | ||
* any necessary drivers that are needed for the microcontroller board of you choosing | * any necessary drivers that are needed for the microcontroller board of you choosing | ||
* PICC RFID-tags equal to the amount of users | |||
== Description == | == Description == | ||
| Line 84: | Line 85: | ||
Join the wireless network and access the address http://192.168.4.1. | Join the wireless network and access the address http://192.168.4.1. | ||
==== Settings ==== | |||
After accessing the interface you will be prompted to enter the adminstrator password which is admin after the initial setup. | After accessing the interface you will be prompted to enter the adminstrator password which is admin after the initial setup. | ||
| Line 89: | Line 92: | ||
The next step should be changeing the admin password as well as changing the network settings. | The next step should be changeing the admin password as well as changing the network settings. | ||
[[File:Wireless settings.png]] | [[File:Wireless settings.png|500px|Wireless settings.png]] | ||
[[File:ESP-RFID General settings.png|500px|ESP-RFID General settings.png]] | |||
==== Adding Users ==== | |||
To add users go to the Users page in the Webinterface. Here you can add users manually or by scanning a RFID-tag. Each user as Label or Username and a UID which is saved on the RFID-tag. Administrators can also revoke access from this interface. | |||
[[File:ESP-RFID Users.png|600px]] | |||
After adding a user they can get access via their RFID-tag. | |||
== Security Concerns == | == Security Concerns == | ||
| Line 97: | Line 110: | ||
== Used Hardware == | == Used Hardware == | ||
*NodeMCU Lolin V3 Module ESP8266 ESP-12F | |||
*MFRC522 RFID reader | |||
== References == | == References == | ||
Latest revision as of 11:10, 30 January 2023
Summary
Introduction to the ESP-RFID access control system
Requirements
- a ESP8266 microcontroller board with at least 4 MBytes flash memory or the official relay board
- a RC522, PN532, Wiegand, or RDM6300 RFID reader
- ESP-RFID firmware from GitHub
- a firmware flashing tool of your choice (on Windows not required)
- any necessary drivers that are needed for the microcontroller board of you choosing
- PICC RFID-tags equal to the amount of users
Description
The ESP-RFID is an open-source RFID access control system that uses ESP8266 microcontroller board and one of the required RFID readers that is able to unlock doors. The administrator of the system is able to add up to 1000 users to the access controll system.
Setup
First you have to physically connect the RFID reader with the ESP8266 microcontroller board.
The pin connection can be taken from the following table.
| ESP8266 | NodeMcu/WeMos | Wiegand | PN532 | MFRC522 | RDM6300 |
|---|---|---|---|---|---|
| GPIO-15 | D8 | SS | SDA/SS | ||
| GPIO-13 | D7 | D0 | MOSI | MOSI | |
| GPIO-12 | D6 | D1 | MISO | MISO | |
| GPIO-14 | D5 | SCK | SCK | TX | |
| GPIO-04 | D2 | ||||
| GPIO-05 | D1 |
After connecting the pins correctly between the ESP8266 microcontroller board and the RFID reader of your choosing you can flash the firmware on the ESP8266 microcontroller board.
For windows there is an ready made bat-file that can be used for flashing the firmware.
After the firmware has been flashed the system is ready to use and can be configured via the webinterface.
Webinterface
After the initial setup the ESP8266 microcontroller board broadcasts a wireless public network with an SSID like "esp-rfid-xxxxxx" where x stand for random numbers.
Join the wireless network and access the address http://192.168.4.1.
Settings
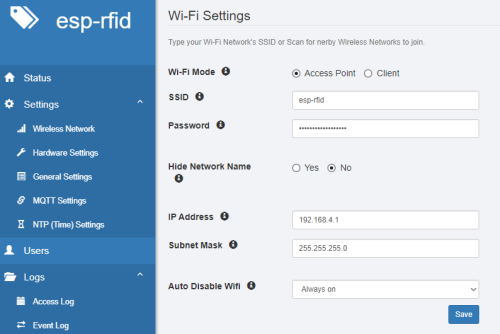
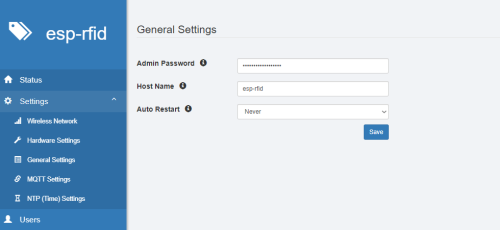
After accessing the interface you will be prompted to enter the adminstrator password which is admin after the initial setup.
The next step should be changeing the admin password as well as changing the network settings.
Adding Users
To add users go to the Users page in the Webinterface. Here you can add users manually or by scanning a RFID-tag. Each user as Label or Username and a UID which is saved on the RFID-tag. Administrators can also revoke access from this interface.
After adding a user they can get access via their RFID-tag.
Security Concerns
Due to the system only using the UID of a RFID-Tag for authentification the system is prone to copying & spoofing attacks. It should not be used when security is a major concern.
Used Hardware
- NodeMCU Lolin V3 Module ESP8266 ESP-12F
- MFRC522 RFID reader


