Difference between revisions of "Flipper Zero"
Jump to navigation
Jump to search
(added detail side) |
(Added update description) |
||
| Line 10: | Line 10: | ||
=== Setting up the Flipper Zero === | === Setting up the Flipper Zero === | ||
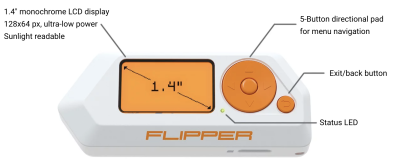
# Open the box containing the Flipper Zero and boot it by holding down the back | # Open the box containing the Flipper Zero and boot it by holding down the back button | ||
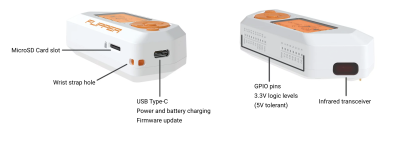
# To use the full potential of the Flipper Zero an Micro SD-Card is needed. Insert it into the right bottom of the flipper with the pins of the SD-Card facing upwards. | # To use the full potential of the Flipper Zero an Micro SD-Card is needed. Insert it into the right bottom of the flipper with the pins of the SD-Card facing upwards. | ||
# After successful installation of the Micro SD-Card, a little SD-Card symbol appears on the top left of the Flipper Zero GUI. | # After successful installation of the Micro SD-Card, a little SD-Card symbol appears on the top left of the Flipper Zero GUI. | ||
# Finally for the best experience the Firmware should be updated, this point is explained in more detail in the section "Firmware Update". | # Finally for the best experience the Firmware should be updated, this point is explained in more detail in the section "Firmware Update". | ||
=== Firmware Update === | |||
To update the device either connect the Flipper Zero to a PC via a USB-C cable or connect it to a mobile phone using Bluetooth and use the "Flipper" app. In this guide a PC is used for the firmware update. | |||
# First download qFlipper from the official Flipper Zero website https://flipperzero.one/update | |||
# After installation start the application and connect the Flipper Zero, it should show the connected device in the GUI. | |||
BILD | |||
# Next click the Update button to initiate the update process, this process can take a few minutes. | |||
BILD | |||
# After successfully updating the device, the qFlipper software shows the new version number and the Flipper Zero displays "Firmware update success". Now the device is ready to be used again. | |||
Revision as of 10:41, 10 February 2023
Summary
The Flipper Zero is a gadget for penetration testers, system administrators and tech enthusiasts created by Flipper Devices Inc. The device allows capturing and transmitting of various Sub-GHz signals, such as Garage Openers or NFC chips, as-well as Infrared signals. Furthermore the device can be used as a Bad USB Stick and offers iButton capabilities. Thanks to its small form factor it is a perfect device for covert operations.
Description
Setting up the Flipper Zero
- Open the box containing the Flipper Zero and boot it by holding down the back button
- To use the full potential of the Flipper Zero an Micro SD-Card is needed. Insert it into the right bottom of the flipper with the pins of the SD-Card facing upwards.
- After successful installation of the Micro SD-Card, a little SD-Card symbol appears on the top left of the Flipper Zero GUI.
- Finally for the best experience the Firmware should be updated, this point is explained in more detail in the section "Firmware Update".
Firmware Update
To update the device either connect the Flipper Zero to a PC via a USB-C cable or connect it to a mobile phone using Bluetooth and use the "Flipper" app. In this guide a PC is used for the firmware update.
- First download qFlipper from the official Flipper Zero website https://flipperzero.one/update
- After installation start the application and connect the Flipper Zero, it should show the connected device in the GUI.
BILD
- Next click the Update button to initiate the update process, this process can take a few minutes.
BILD
- After successfully updating the device, the qFlipper software shows the new version number and the Flipper Zero displays "Firmware update success". Now the device is ready to be used again.

