Difference between revisions of "Hak5 Plunder Bug"
| Line 6: | Line 6: | ||
== Description == | == Description == | ||
The Plunder Bug is an simplistic form of the [[Hak5 Packet Squirrel]]. It allows the user to | The Plunder Bug is an simplistic form of the [[Hak5 Packet Squirrel]]. It allows the user to tap network traffic and to access it for network scanning. | ||
=== Deployment === | === Deployment === | ||
Revision as of 11:18, 3 June 2020
Summary
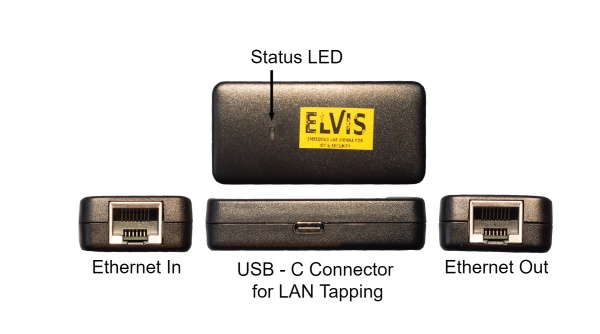
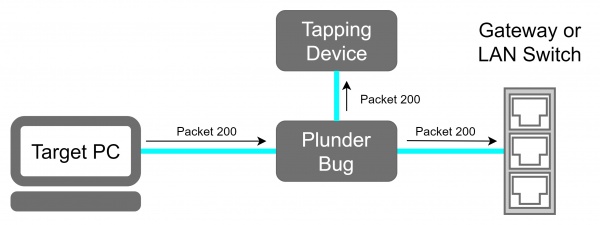
This device is an Pocket sized LAN tap. This device can bei used for passive eavesdropping and is small enough to be placed everywhere without being recognized.
Description
The Plunder Bug is an simplistic form of the Hak5 Packet Squirrel. It allows the user to tap network traffic and to access it for network scanning.
Deployment
- Connect the Ethernet port of the victim machine with one of the two Ethernet Ports of the Plunder Bug via an short Ethernet cable.
- Connect the other Ethernet port with the with the Ethernet cable which was previously plugged in the victim device.
- Power up the Plunder Bug by Connecting the USB-C female to USB-A male cable with an device which is under your control (preferably a raspberry pi with an battery shield).
Plunder Bug Modes
The Plunder Bug Allows us to run it in two modes "muted" and "unmuted". The Plunder Bug is mirroring all network traffic and sends it to the USB-C port, when its operating in the muted mode. The unmuted mode gives the USB-C device an IP address that the tapping device is able to connect to the internet or running network scans.
To change between the Plunder Bug modes downlaod the shell script from downloads.hak5.org: Usage:
- make it executable with
chmod +x ./plunderbug.sh - run the script as root or superuser:
./plunderbug.sh [options]

Options:
     --mute                 to use mute mode
     --unmute               to use unmuted mode
Sniffing Data
Local Access
If you can access the tapping device locally, open wire shark and use the ethernet interface which gets deployed from the Plunder Bug with the USB cable.
Remote Access
You can capture Sniffing Node
- Make sure that tcpdump and ssh-server is installed
Wireshark Machine
- Configure the SSH Remote capture Interface
- Server Tab:
- Enter IP
- Enter Port (usually 22)
- Server Tab:
- Enter Username & Password
- Capture Tab:
- Enter Capturing Interface into Remote Interface
Save TCP dumps
- Make sure tcpdump is installed
- Run tcpdump and log it into an file
sudo tcpdump > tcplog.pcap
Plunder Bug Usage Example
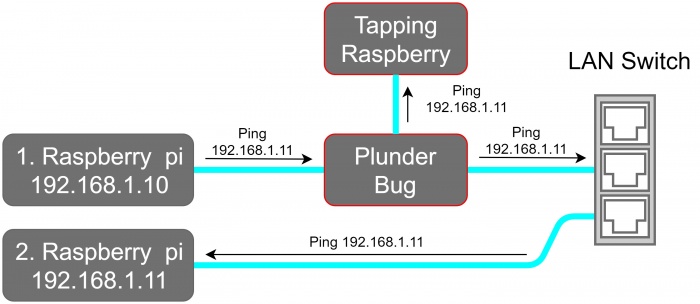
For this Example we placed the Plunder Bug in an test LAN Network which is shown in the network schematic.
In this example we first perform an network scan with nmap and than Sniffing data with wire shark.
1. Performing an Network scan
sudo nmap -sP 192.168.1.0/24 -e eth1
-sP option tries to resolve the hostname
-e eth1 defines the Plunder Bug as operating Interface
Output:
 Starting Nmap 7.70 ( https://nmap.org ) at 2020-06-03 11:57 CEST
 Nmap scan report for 192.168.1.1
 Host is up (0.0035s latency).
 MAC Address: 00:18:4D:8F:53:0E (Netgear)
 Nmap scan report for 192.168.1.10
 Host is up (0.00022s latency).
 MAC Address: DC:A6:32:7D:13:C7 (Unknown)
 Nmap scan report for 192.168.1.11
 Host is up (0.00028s latency).
 MAC Address: DC:A6:32:7D:0C:17 (Unknown)
 Nmap done: 256 IP addresses (3 hosts up) scanned in 20.53 seconds
The output shows that 3 Hosts are online:
- 192.168.1.1 The Netgear Router
- 192.168.1.10 Raspberry Pi 1
- 192.168.1.11 Raspberry Pi 2
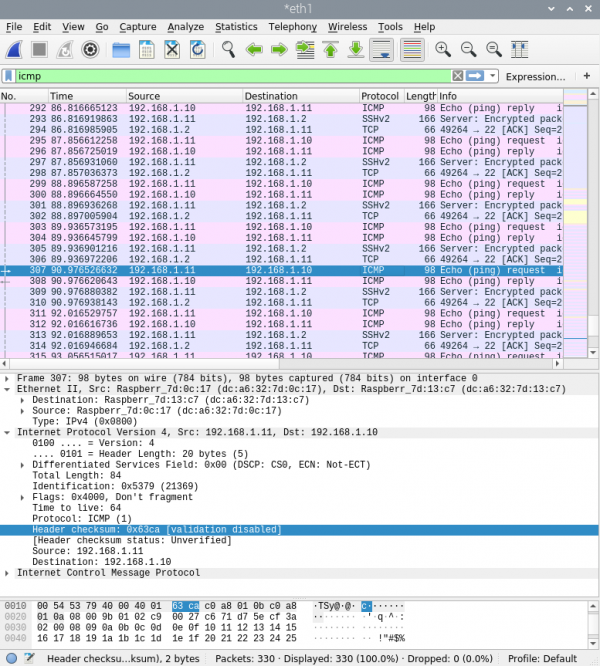
2. Sniff with Wireshark
Wireshark gives us the following output if we sniff at the Plunder Bug Ethernet interface


