Hak5 Plunder Bug
Summary
The Plunder Bug by Hak5 is a LAN Tap device enabling interception and eavesdropping of data communicated through an Ethernet link. Its use cases are diverse, as it could be used as a diagnostic tool supporting troubleshooting in a network. If used for malicious purposes, such as sniffing attacks, it might prove itself effective because of its small form factor and therefore increasing the likelihood of being recognized. It is very easy to use and works out-of-the-box but offers only limited configurability.
Description
The Plunder Bug can be viewed as a simpler version of a Hak5 Packet Squirrel. It allows the user to tap network traffic and to access it for network scanning.
Device
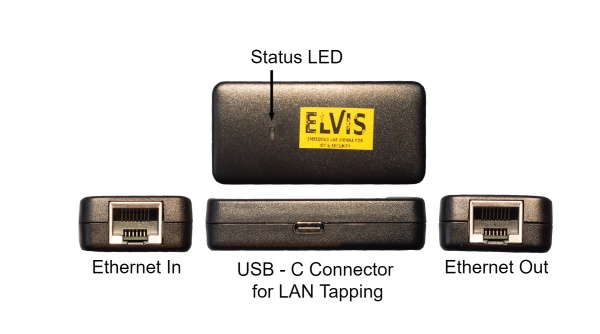
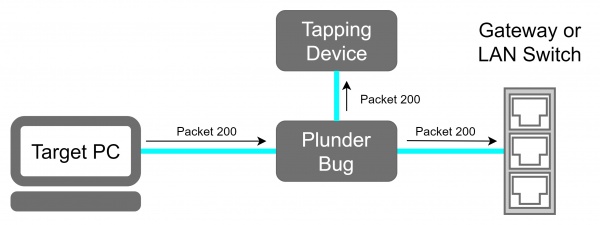
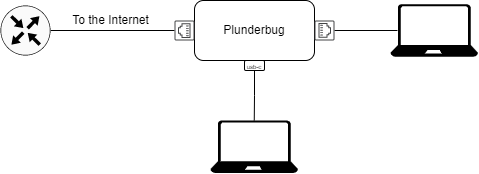
The device offers two Ethernet ports, each for one of the devices sharing a communication link that we want to sniff the traffic. A USB-C device is used for the attacker. Traffic coming through either of the Ethernet ports will get mirrored to the attacker.
Deployment
- Connect the Ethernet port of the victim machine with one of the two Ethernet Ports of the Plunder Bug with an short Ethernet cable.
- Connect the other Ethernet port with the with the Ethernet cable which was previously plugged in the victim device.
- Power up the Plunder Bug by Connecting the USB-C female to USB-A male cable with an device which is under your control (preferably a raspberry pi with an battery shield).
Plunder Bug Modes
The only configurable parameter for the Plunder Bug is to run it either in a "muted" and "unmuted" mode. The Plunder Bug mirrors all network traffic and sends it to the USB-C port when operating in the muted mode. The unmuted mode gives extra capabilities compared to the muted mode. In addition to passively listening to traffic, the USB-C port is used for sending frames out on the link, effectively making it a small portable switch. This mode would also allow one to perform network scans from the attacking device. According to specification in [1], the device is set to unmuted mode by default.
To change between the Plunder Bug modes download the shell script from downloads.hak5.org:
Shell script usage:
- make it executable with
chmod +x ./plunderbug.sh - run the script as root or superuser:
./plunderbug.sh [options]

Options:
     --mute                 to use mute mode
     --unmute               to use unmuted mode
Sniffing Data
The following will describe the necessary steps that are needed to sniff data from an Ethernet link.
Local Access
If you can access the tapping device locally, open Wireshark and select the Ethernet interface from the Plunder Bug that is connected via the USB cable. On some Mac and Linux systems the driver for the AX88772C chipset does not install automatically. To download the drivers and further instructions the following link is helpful[2].
Remote Access
Sniffing Node
- Make sure that tcpdump and ssh-server is installed
Wireshark Machine
- Configure the SSH Remote capture Interface
- Server Tab:
- Enter IP
- Enter Port (usually 22)
- Server Tab:
- Enter Username & Password
- Capture Tab:
- Enter Capturing Interface into Remote Interface
Save TCP dumps
- Make sure tcpdump is installed
- Run tcpdump and log it into a file
sudo tcpdump > tcplog.pcap
Plunder Bug Usage Example
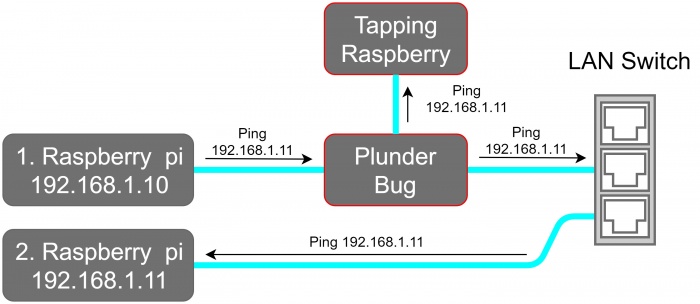
For this example, we placed the Plunder Bug in a test LAN Network as shown in the network schematic.
In this example, we first perform a network scan with nmap and then sniff data with Wireshark.
1. Performing a network scan
sudo nmap -sP 192.168.1.0/24 -e eth1
-sP option tries to resolve the hostname
-e eth1 defines the Plunder Bug as operating Interface
Output:
 Starting Nmap 7.70 ( https://nmap.org ) at 2020-06-03 11:57 CEST
 Nmap scan report for 192.168.1.1
 Host is up (0.0035s latency).
 MAC Address: 00:18:4D:8F:53:0E (Netgear)
 Nmap scan report for 192.168.1.10
 Host is up (0.00022s latency).
 MAC Address: DC:A6:32:7D:13:C7 (Unknown)
 Nmap scan report for 192.168.1.11
 Host is up (0.00028s latency).
 MAC Address: DC:A6:32:7D:0C:17 (Unknown)
 Nmap done: 256 IP addresses (3 hosts up) scanned in 20.53 seconds
The output shows that 3 Hosts are online:
- 192.168.1.1 The Netgear Router
- 192.168.1.10 Raspberry Pi 1
- 192.168.1.11 Raspberry Pi 2
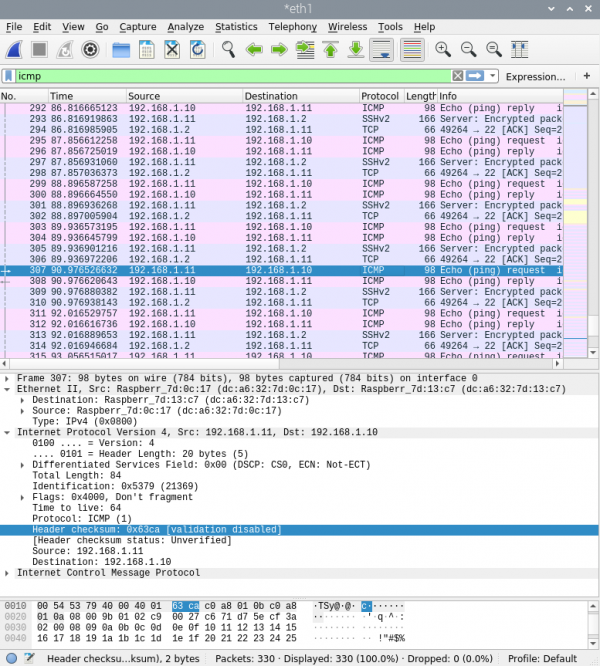
2. Sniff with Wireshark
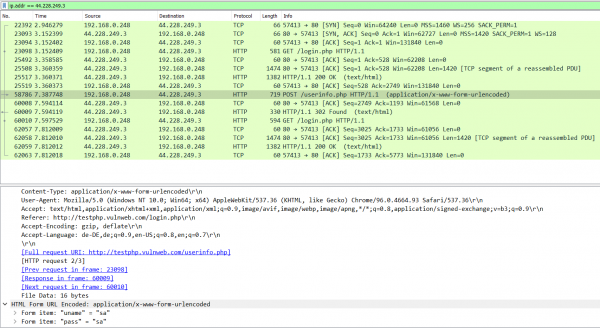
Wireshark gives us the following output if we sniff at the Plunder Bug Ethernet interface
3. Plunder Bug as a Switch
The Plunder Bug has two Ethernet ports and one USB-C port. One of the Ethernet port and the USB-C port can be used as ordinary ethernet ports, as long as the second Ethernet port has access to the Internet. It is important to note that the LAN interfaces are limited to 100 Mbit/s.
The only requirement for using the Plunder Bug as a Switch is to have the device in unmuted-mode, meaning the device connected via USB-C has the possibility to send packets through the Plunder Bug.
Prevent Packet Sniffing
It is nearly impossible to prevent sending mirrored packets to the attackers, but taking the ability away to read and understand the mirrored packets may achieve a more secure environment.
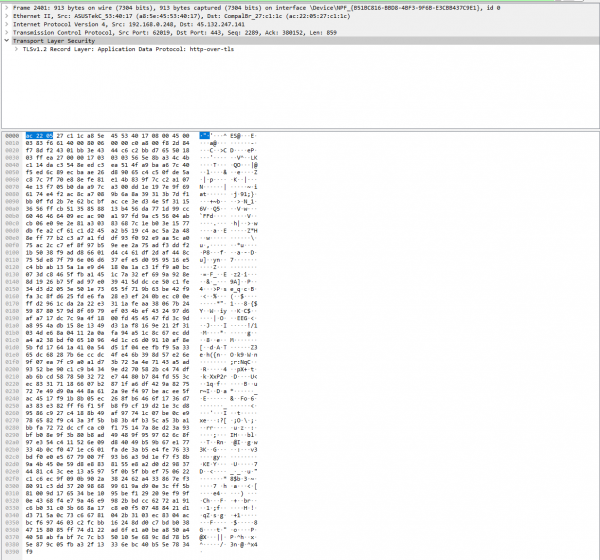
Above, an packet with HTTP got captured with the Plunder Bug. Now, the Attacker has the possibilty to read the account credentials for the "testphp.vulweb.com" website, since an insecure protocol was used: HTTP. HTTP does not encrypt the payload, but instead it sends out the Form in plain text. This can be prevented by using HTTPS, which encryptes the data, as on the picture below.
Also, the user has the possibility to use VPN to protect itself against packet sniffing, since every sent-out packet will be encrypted, therefore taking away the attacker's ability to read and understand the captured packages.
Plunder Bug Android App
As an attacker, to be more inconspicuous, it is possible to connect and sniff packets via an android mobile phone. The App "Plunder Bug - Smart LAN Tap" needs to be installed to fullfil this requirement, which can be found on the Google Play Store.
Prerequisites
- Have an Android Phone
- Android Phone needs to be rooted (since root permissions are needed)
- Install the Application "Plunder Bug"
- USB-C to USB-C Cable (since newest Android Phones have USB-C Ports)
Steps to sniff packets
- Setup the Environment
Setup the Environment for the Plunder Bug: Connect the Ethernet Port of the victim's machine with one of the Ethernet port of the Plunder Bug and use the previous plugged Ethernet cable to connect with the other Ethernet port of the Plunder Bug. Now, get the USB-C to USB-C cable and connect to the Android device.
- Start the App and record packets
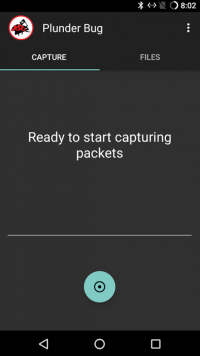
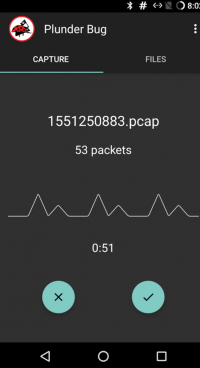
The app should recognize the plugged-in Plunder Bug and should give you the opportunity to start recording packets.
Start capturing the packets by clicking on the turquoise button below.
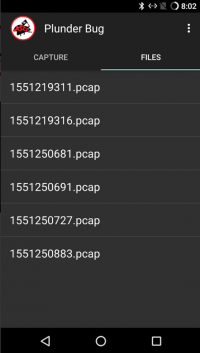
On the screen, some statistics can be found. It displayes the numbers of packets the Plunder Bug has captured and the time ellapsed since the packet recording has started. To stop recording the packets, press on the right button below to save the recored packets in a pcap file. The saved files can be found under the register "Files"
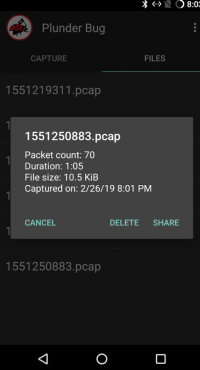
After clicking on the pcap file, the statistics can be found once again and the user has the opportunity to share the file. Normally, the user saves the pcap file to later view the captured packages on Wireshark (or on any other Application, which has the possibility to read pcap files).
Used Hardware
References
- https://docs.hak5.org/hc/en-us/categories/360001482953-Plunder-Bug
- S. Ansari, S. G. Rajeev and H. S. Chandrashekar, "Packet sniffing: a brief introduction," in IEEE Potentials, vol. 21, no. 5, pp. 17-19, Dec. 2002-Jan. 2003, doi: 10.1109/MP.2002.1166620.
