Difference between revisions of "Kali Linux VMware Installation"
Jump to navigation
Jump to search
VHorvathova (talk | contribs) |
VHorvathova (talk | contribs) |
||
| (9 intermediate revisions by the same user not shown) | |||
| Line 1: | Line 1: | ||
== Summary == | == Summary == | ||
In this documentation you will find the necessary steps to set up a Kali Linux Virtual Machine on VMware Workstation. | |||
== Requirements == | == Requirements == | ||
| Line 8: | Line 8: | ||
* VMware Workstation (15.5 is used in this tutorial) | * VMware Workstation (15.5 is used in this tutorial) | ||
== | == Steps == | ||
=== | === ISO file download === | ||
Download the newest Kali Linux | Download the newest Kali Linux ISO file from the official website. | ||
=== | === VMware setup === | ||
Open VMware Workstation and follow these configurations for a successful installation: | Open VMware Workstation and follow these configurations for a successful installation: | ||
* Click on < | * Click on <i>File</i> -> <i>New Virtual Machine</i>; a window with the configuration will pop up | ||
* Choose < | * Choose <i>Typical</i> as the type of configuration and click <i>Next></i> | ||
* | * Choose <i>Installer disc image file (iso)</i> and find path to the downloaded Kali ISO file, then click <i>Next></i> | ||
* | * As <i>Guest operating system</i> select Linux and set the <i>Version</i> to Debian 9.x 64-bit, then click <i>Next></i> | ||
* Set <i>Maximum Disk Size</i> to 40 GB and choose <i>Split virtual disk into multiple files</i>, then click <i>Next></i> and <i>Finish</i> | |||
Now you're all set for configuring the Kali Linux Installer: | |||
* Select <i>Graphical install</i> and set language and country preferences | |||
* Set hostname and if you want also the domain name, otherwise skip it | |||
* Set up users and passwords | |||
* As partitioning method for the disks choose <i>Guided - use entire disk</i> and then just confirm the disk | |||
* As partitioning scheme choose <i>All files in one operation (recommended for new users)</i> | |||
* Choose <i>Finish partitioning and write changes to disk</i>, and when prompted whether to write the changes to disks, just click <i>yes</i> | |||
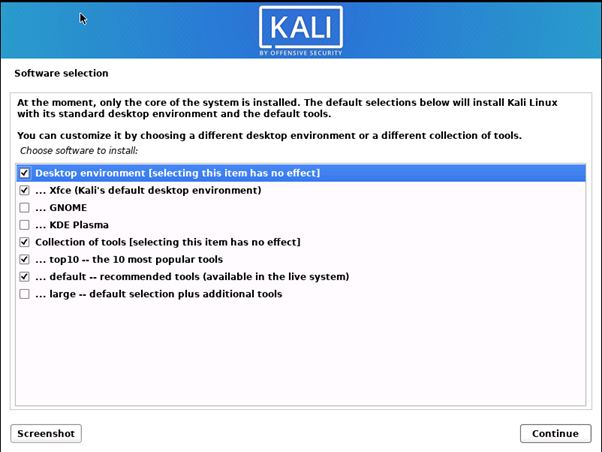
* You can leave the software selection on default: | |||
[[File:Software_selection.png]] | |||
* Click <i>yes</i> when prompted to install the GRUB boot loader to your primary drive and then as <i>Device for boot loader installation</i> enter <b>/dev/sda</b>; now you should be all set and your installation is finished as soon as the login window pops up | |||
== Used Hardware == | == Used Hardware == | ||
*Virtual machine in VMWare: 4 vCPUs, 8GB RAM, 100GB SCSI HDD | |||
* | |||
== References == | == References == | ||
* https:// | * https://www.kali.org/downloads/ | ||
[[Category: | [[Category:Basic]] | ||
Latest revision as of 17:51, 11 April 2021
Summary
In this documentation you will find the necessary steps to set up a Kali Linux Virtual Machine on VMware Workstation.
Requirements
- Kali Linux Image File: Kali Linux 2021.1 amd64 (download from https://www.kali.org/downloads/ )
- VMware Workstation (15.5 is used in this tutorial)
Steps
ISO file download
Download the newest Kali Linux ISO file from the official website.
VMware setup
Open VMware Workstation and follow these configurations for a successful installation:
- Click on File -> New Virtual Machine; a window with the configuration will pop up
- Choose Typical as the type of configuration and click Next>
- Choose Installer disc image file (iso) and find path to the downloaded Kali ISO file, then click Next>
- As Guest operating system select Linux and set the Version to Debian 9.x 64-bit, then click Next>
- Set Maximum Disk Size to 40 GB and choose Split virtual disk into multiple files, then click Next> and Finish
Now you're all set for configuring the Kali Linux Installer:
- Select Graphical install and set language and country preferences
- Set hostname and if you want also the domain name, otherwise skip it
- Set up users and passwords
- As partitioning method for the disks choose Guided - use entire disk and then just confirm the disk
- As partitioning scheme choose All files in one operation (recommended for new users)
- Choose Finish partitioning and write changes to disk, and when prompted whether to write the changes to disks, just click yes
- You can leave the software selection on default:
- Click yes when prompted to install the GRUB boot loader to your primary drive and then as Device for boot loader installation enter /dev/sda; now you should be all set and your installation is finished as soon as the login window pops up
Used Hardware
- Virtual machine in VMWare: 4 vCPUs, 8GB RAM, 100GB SCSI HDD
