Difference between revisions of "LoRaWAN / Riot-OS Setup"
TNicholson (talk | contribs) |
|||
| (27 intermediate revisions by 2 users not shown) | |||
| Line 5: | Line 5: | ||
== Requirements == | == Requirements == | ||
* Operating system: Ubuntu | * Operating system: Ubuntu | ||
* Packages: git | * Packages: git | ||
| Line 23: | Line 23: | ||
python-serial | python-serial | ||
libudev-dev | libudev-dev | ||
moserial | |||
=== Step 2 === | === Step 2 === | ||
| Line 28: | Line 29: | ||
Install the toolchain | Install the toolchain | ||
Goto https://developer.arm.com/ | Goto https://developer.arm.com/downloads/-/gnu-rm and download | ||
gcc-arm-none-eabi-7-2018-q2-update-linux.tar.bz2 | gcc-arm-none-eabi-7-2018-q2-update-linux.tar.bz2 | ||
Move it to your home directory. | Move it to your home directory. | ||
| Line 43: | Line 44: | ||
=== Step 3 === | === Step 3 === | ||
Download Riot-OS | Download Riot-OS | ||
git clone https://github.com/RIOT-OS/RIOT.git myRIOT | git clone https://github.com/RIOT-OS/RIOT.git myRIOT | ||
Build and run "Hello World" on | === Step 4 === | ||
Build and run "Hello World" on the STM32 LoRa and Sigfox kit. | |||
Set the rights for your username to be able to flash the application on the board. | |||
sudo usermod -a -G dialout <username> | |||
Then reboot your computer. | |||
Attach the antenna to the board - never use it without the antenna! | |||
Connect the board to your computer via micro USB cable. | |||
[[File:stm32loraBoardUSBconn.jpg]] | |||
Start up moSerial and connect it with the board. Make sure to adjust the parameters as specified in the screenshot. | |||
[[File:moSerial.jpg]] | |||
Build and | Build and flash the application. | ||
cd myRIOT/examples/hello-world | |||
make BOARD=b-l072z-lrwan1 | make BOARD=b-l072z-lrwan1 | ||
make BOARD=b-l072z-lrwan1 flash term | make BOARD=b-l072z-lrwan1 flash | ||
If you do not use a serial terminal like moserial or terraterm use term | |||
make BOARD=b-l072z-lrwan1 term | |||
You may also set the BOARD in the Makefile of the application. | You may also set the BOARD in the Makefile of the application. | ||
| Line 65: | Line 84: | ||
Create an application at the TTN (The Things Network). | Create an application at the TTN (The Things Network). | ||
Register at https://www.thethingsnetwork.org/ | Register at https://www.thethingsnetwork.org/ and login. Click on your user name and select "Console", and then click on "Applications" and then on "Create Application". | ||
[[File:Register_TTN_Application.png]] | |||
After filling in the name and description for your application click on "Create Application" at the bottom. | |||
Register the board for your application by clicking on "Register end device". | |||
Choose the option "Enter device specifics manually" and select the options as shown in the image below. Most LoRaWAN versions will work fine for this example. The JoinEUI field can be filled with all zeros. | |||
[[File:Register Device.png]] | |||
Then click "Confirm" button next to the JoinEUI to continue. | |||
Click the "Generate" button for both the DevEUI and the AppKey as shown in the image below. | |||
When completed, click "Register end device". | |||
[[File:Register Device 2.png]] | |||
You will now be redirected to the end device page. In the device overview, you can see all the parameters you need for the Makefile. | |||
[[File:Copy from here.png]] | |||
Now you can copy each key and paste it in your Makefile (cf. Step 6). | |||
=== Step 6 === | |||
Build and run LoRaWAN Riot application. | |||
cd myRIOT/examples/lorawan | |||
Now edit the Makefile: insert device EUI, application EUI, and application key. | |||
[[File:makefile.jpg]] | |||
Build the application and flash it to the board. | |||
make BOARD=b-l072z-lrwan1 | |||
make BOARD=b-l072z-lrwan1 flash term | |||
Goto to your TTN account and click on "Data" - there you can see the incoming data. | |||
If you get "Join procedure failed" output and all your EUIs in the makefile are correct, then press the RESET button (black) on your board. | |||
== Used Hardware == | == Used Hardware == | ||
[[STM32 LoRa and Sigfox Discovery kit]] | [[STM32 LoRa and Sigfox Discovery kit]] | ||
== Courses == | == Courses == | ||
* [[Internet- & Netzwerktechnologien]] (2019) | * [[Internet- & Netzwerktechnologien]] (2019) | ||
== References == | == References == | ||
* https:// | * https://www.thethingsnetwork.org/ | ||
* https:// | * https://developer.arm.com/ | ||
[[Category:Documentation]] | [[Category:Documentation]] | ||
Latest revision as of 10:59, 30 November 2023
Summary
Setting up a LoRaWAN application with Riot-OS on a STM32 LoRa and Sigfox Discovery Kit
Requirements
- Operating system: Ubuntu
- Packages: git
Description
Step 1
Install the following packages
sudo apt-get update
sudo apt-get install git
                     openocd
                     gcc-multilib
                     build-essential
                     python-serial
                     libudev-dev
                     moserial
Step 2
Install the toolchain
Goto https://developer.arm.com/downloads/-/gnu-rm and download
gcc-arm-none-eabi-7-2018-q2-update-linux.tar.bz2
Move it to your home directory.
Uninstall old packages
sudo apt remove binutils-arm-none-eabi gcc-arm-none-eabi libnewlib-arm-none-eabi
Unzip the downloaded file
tar -xjvf gcc-arm-none-eabi-7-2018-q2-update-linux.tar.bz2
Add the toolchain to your path
export PATH=$PATH:/home/(your user)/gcc-arm-none-eabi-7-2018-q2-update/bin/
Step 3
Download Riot-OS
git clone https://github.com/RIOT-OS/RIOT.git myRIOT
Step 4
Build and run "Hello World" on the STM32 LoRa and Sigfox kit.
Set the rights for your username to be able to flash the application on the board.
sudo usermod -a -G dialout <username>
Then reboot your computer.
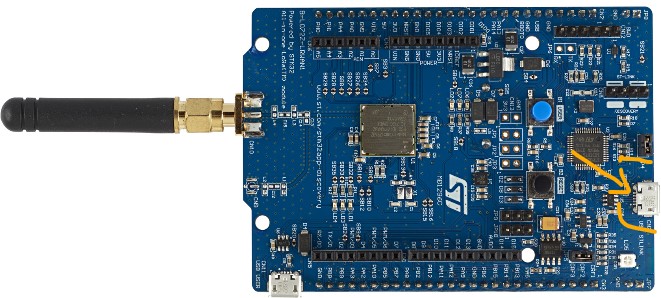
Attach the antenna to the board - never use it without the antenna! Connect the board to your computer via micro USB cable.
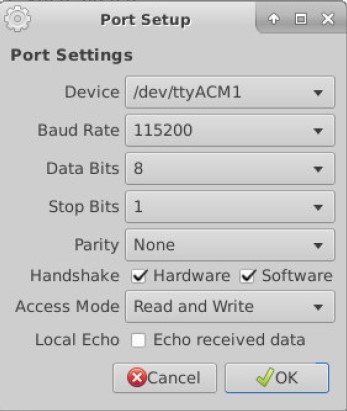
Start up moSerial and connect it with the board. Make sure to adjust the parameters as specified in the screenshot.
Build and flash the application.
cd myRIOT/examples/hello-world
make BOARD=b-l072z-lrwan1
make BOARD=b-l072z-lrwan1 flash
If you do not use a serial terminal like moserial or terraterm use term
make BOARD=b-l072z-lrwan1 term
You may also set the BOARD in the Makefile of the application.
Step 5
Create an application at the TTN (The Things Network).
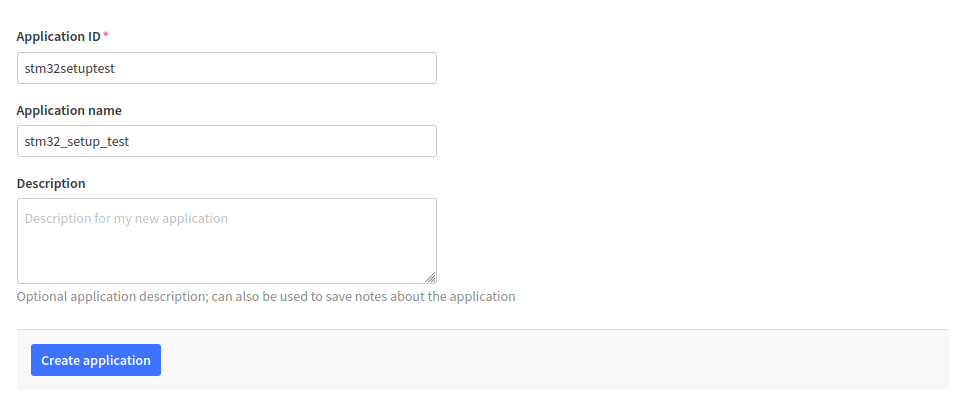
Register at https://www.thethingsnetwork.org/ and login. Click on your user name and select "Console", and then click on "Applications" and then on "Create Application".
After filling in the name and description for your application click on "Create Application" at the bottom.
Register the board for your application by clicking on "Register end device".
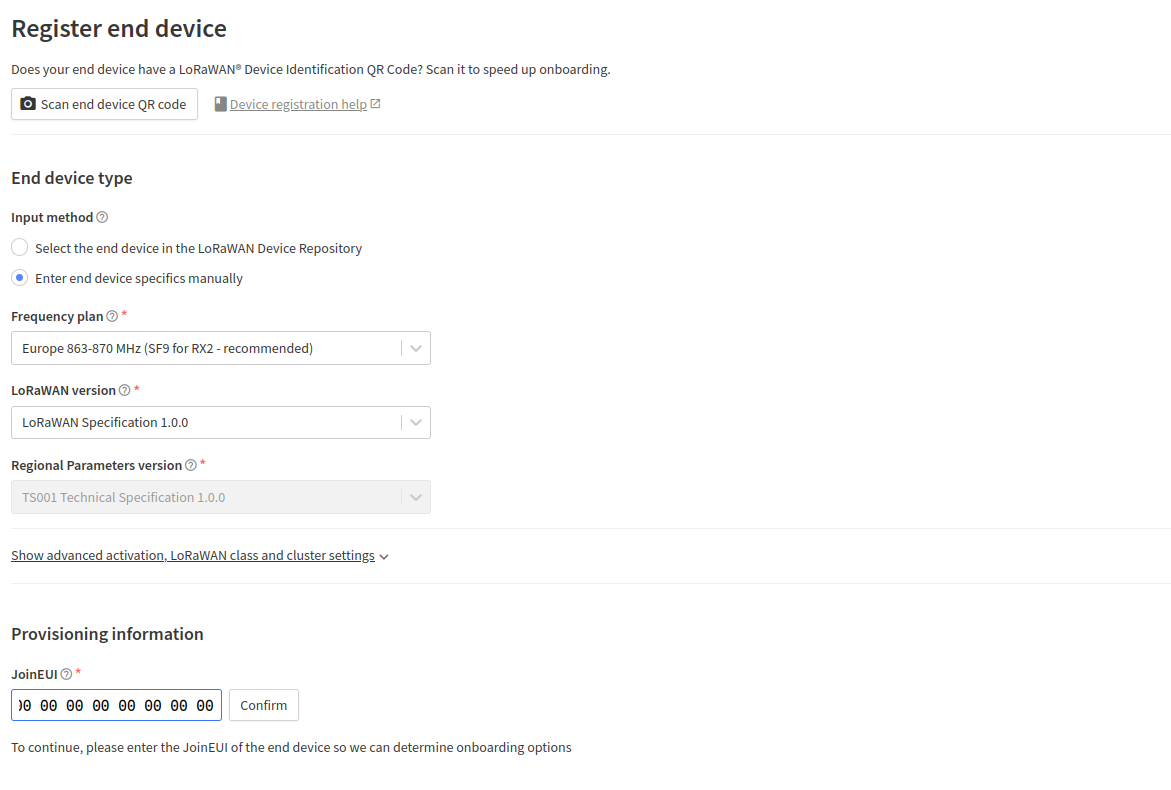
Choose the option "Enter device specifics manually" and select the options as shown in the image below. Most LoRaWAN versions will work fine for this example. The JoinEUI field can be filled with all zeros.
Then click "Confirm" button next to the JoinEUI to continue.
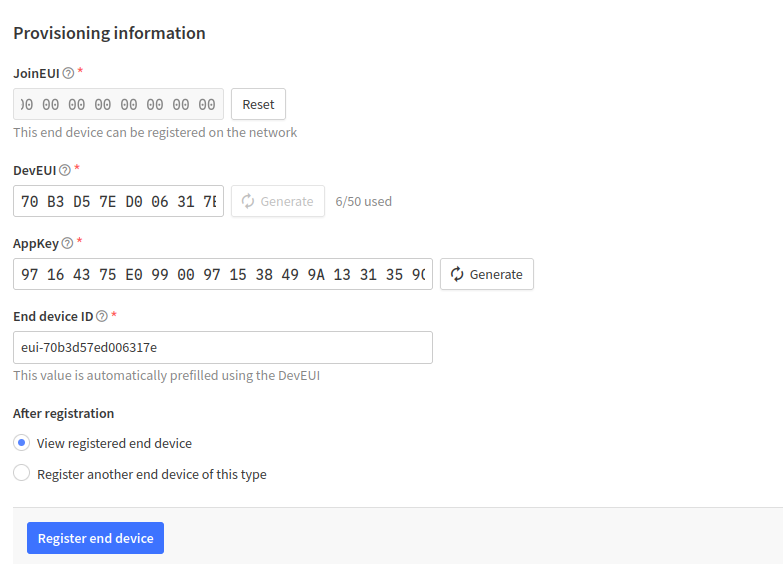
Click the "Generate" button for both the DevEUI and the AppKey as shown in the image below.
When completed, click "Register end device".
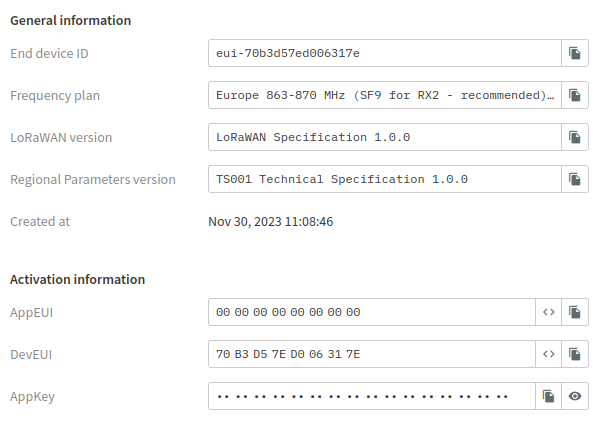
You will now be redirected to the end device page. In the device overview, you can see all the parameters you need for the Makefile.
Now you can copy each key and paste it in your Makefile (cf. Step 6).
Step 6
Build and run LoRaWAN Riot application.
cd myRIOT/examples/lorawan
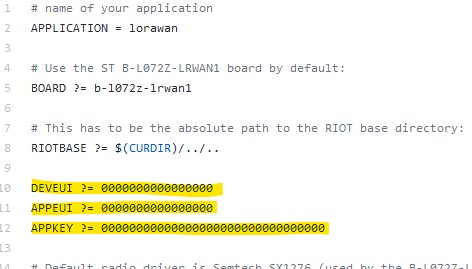
Now edit the Makefile: insert device EUI, application EUI, and application key.
Build the application and flash it to the board.
make BOARD=b-l072z-lrwan1
make BOARD=b-l072z-lrwan1 flash term
Goto to your TTN account and click on "Data" - there you can see the incoming data.
If you get "Join procedure failed" output and all your EUIs in the makefile are correct, then press the RESET button (black) on your board.
Used Hardware
STM32 LoRa and Sigfox Discovery kit
