MicroSD Card Adapter using with the Arduino Uno
Summary
The SD and micro SD card modules allow you to communicate with the memory card and write or read the information on them. The module interfaces in the SPI protocol. To use these modules with Arduino you need the SD library. This library is installed on the Arduino application by default.
Bandwidth
Control->Control Settings.Highlights
In this page, it is shown how to read and write SD cards utilizing the “MicroSD Card Adapter” module and Arduino Uno. An major advantage of the module is that it can be used with the SD library that comes with the Arduino IDE. The SD library makes initialization, reading, and writing of the card very easy.
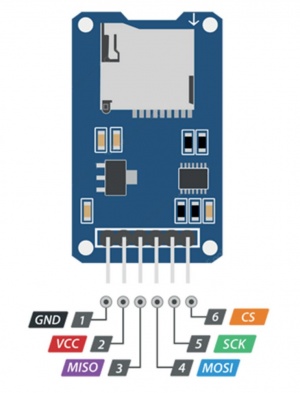
- SPI Reader Micro memory card module Pinout
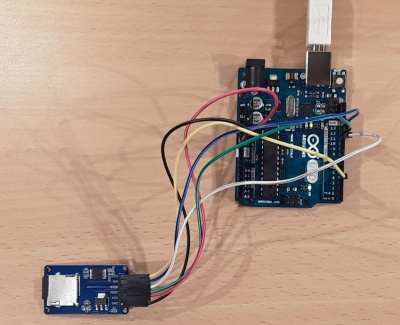
- Pin layout of MicroSD Card Adapter and Arduino Uno.
- Easy and inexpensive expansion of your Arduino storage space via SD card slot
- Easy communication with the Arduino using the SPI protocol
- Supports Micro SD Card(2G), Micro SDHC card (32G)(high-speed card)
- Supports 5V
How to connect the “MicroSD Card Adapter” module to the Arduino Uno?
The module comes with a voltage regulator. Therefore, the Arduino’s 5V and 3.3V pin can be used for the voltage supply. The module communicates via SPI (Serial Peripheral Interface) to the Arduino Uno. The following figure shows the complete pin layout.
Step 1: Hardware Installation
- Complete Pin Layout:
| MICROSD ADAPTER PIN | ARDUINO UNO PIN |
|---|---|
| CS | 4 |
| SCK | 13 |
| MOSI | 11 |
| MISO | 12 |
| VCC | 5V |
| GND | GND |
Step 2: Insert Coding
- Lets try an example in the Arduino.
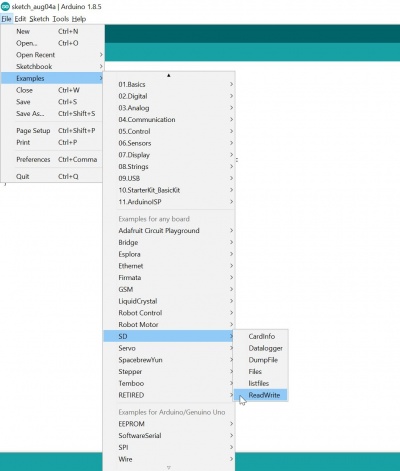
1. Open the Arduino software
2. Click 'file'
3. Find the 'example'
4. Click 'SD'
5. Choose 'ReadWrite'
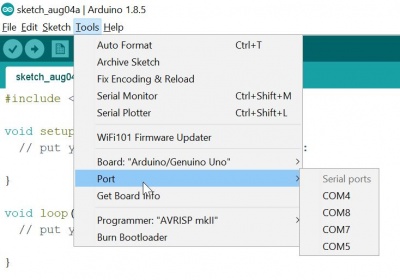
Step 3: Choose COM Port
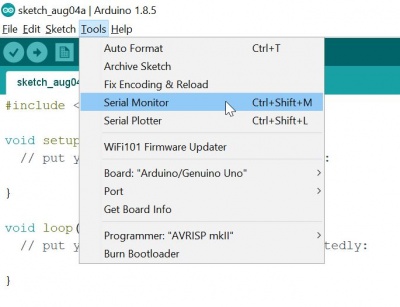
- Just click at 'Tools', then choose your port available on your PC.
Step 4: Upload Source Code
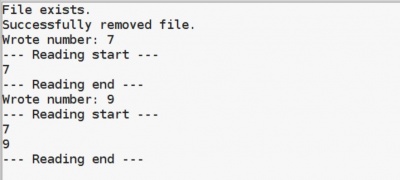
- Upload the source code into the Arduino and open the Serial Monitor to se the result.
Important SD Module Library Commands
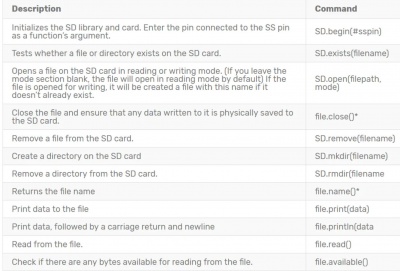
A brief explanation of practical SD library’s commands is provided in the following table:
How to program the SD card reader?
Make sure to use the latest version of the SD library (Sketch -> Include Library -> Manage Libraries -> Search for “SD”).
Moreover, the SD card must be formatted as FAT16 or FAT32. If something does not work as expected, a good start for debugging is always to upload CardInfo example of the library
(File -> Examples -> SD -> CardInfo) to the Arduino and read the messages of the serial monitor.
Part of Code:
$ #include <SD.h> //Load SD library
$ int chipSelect = 4; //chip select pin for the MicroSD Card Adapter
$ File file; // file object that is used to read and write data
$ void setup() {
 Serial.begin(9600); // start serial connection to print out debug messages and data
$ pinMode(chipSelect, OUTPUT); //chip select pin must be set to OUTPUT mode
 if (!SD.begin(chipSelect)) { // Initialize SD card
   Serial.println("Could not initialize SD card."); //if return value is false, something went wrong.
 }
$ if (SD.exists("file.txt")) { // if "file.txt" exists, fill will be deleted
   Serial.println("File exists.");
   if (SD.remove("file.txt") == true) {
     Serial.println("Successfully removed file.");
   } else {
     Serial.println("Could not removed file.");
   }
$ void loop() {
 file = SD.open("file.txt", FILE_WRITE); // open "file.txt" to write data
 if (file) {
   int number = random(10); //generate random number between 0 and 9
   file.println(number); // write number to file
   file.close(); // close file
   Serial.print("Wrote number: "); //debug output: show written number in serial monitor
$ Serial.println(number);
 } else {
   Serial.println("Could not open file (writing).");
 }
$ file = SD.open("file.txt", FILE_READ); // open "file.txt" to read data
 if (file) {
   Serial.println("--- Reading start ---");
   char character;
   while ((character = file.read()) != -1)
   {
   //this while loop reads data stored in "file.txt" and prints it to serial monitor
     Serial.print(character);
   }
$ file.close();
   Serial.println("--- Reading end ---");
 } else {
   Serial.println("Could not open file (reading).");
 }
 delay(5000); // wait for 5000ms
 }
➤ If everything works correctly, the serial monitor should show a similar output as shown in the following screenshot:
Used Hardware
References
- https://www.az-delivery.de/products/copy-of-spi-reader-micro-speicherkartenmodul-fur-arduino?variant=38523274578&gclid=EAIaIQobChMIreitgJGC6wIVGLd3Ch18lA7NEAQYASABEgKfR_D_BwE#description
- https://create.arduino.cc/projecthub/electropeak/sd-card-module-with-arduino-how-to-read-write-data-37f390
- https://www.instructables.com/id/Micro-SD-Card-Tutorial/
