Difference between revisions of "Proxmark3: Debricking"
Jostrowski (talk | contribs) |
m (Protected "Proxmark3: Debricking" ([Edit=Allow only administrators] (indefinite) [Move=Allow only administrators] (indefinite))) |
||
| (8 intermediate revisions by one other user not shown) | |||
| Line 1: | Line 1: | ||
== Summary == | == Summary == | ||
This tutorial will show how to reset a Proxmark3 RDV2 via the JTAG interface. | |||
This is useful when the '''Proxmark3 RDV2''' is bricked and won't connect to the computer. This will solve any software failures like a corrupt firmware or bootloader. | |||
'''1.''' Debricking process via '''Raspberry Pi''' 3+ (version 2, 3 and 4 work exactly the same)<br> | |||
'''2.''' Debricking process via '''Bus Pirate''' 3.6 | |||
: Note: The method with the Bus Pirate did '''not work''' for me. Maybe you have better luck. | |||
== Requirements == | == Requirements == | ||
* Proxmark3 | * Proxmark3 | ||
* Raspberry Pi 2, 3, or 4 | |||
* Bus Pirate v3 (or higher) | * Bus Pirate v3 (or higher) | ||
* Linux: Debian | * Linux: Debian | ||
== | == Raspberry Pi == | ||
[[File:Proxmark raspi.jpg|thumb|500px]] | |||
; This tutorial is based on: | |||
: http://www.lucasoldi.com/2017/01/17/unbrick-proxmark3-with-a-raspberry-pi-and-openocd/ | |||
: https://github.com/synthetos/PiOCD/wiki/Using-a-Raspberry-Pi-as-a-JTAG-Dongle | |||
: http://openocd.org/doc/html/OpenOCD-Project-Setup.html | |||
----- | |||
=== Compile Proxmark === | |||
See [https://wiki.elvis.science/index.php?title=Proxmark3:_Installation Proxmark: Installation] or from the [https://github.com/Proxmark/proxmark3/wiki/Ubuntu-Linux official website] | |||
=== Compile OpenOCD === | |||
<pre> | |||
sudo apt-get update | |||
sudo apt-get install -y autoconf libtool libftdi-dev textinfo pkg-config pkgconf git | |||
git clone https://git.code.sf.net/p/openocd/code openocd | |||
cd openocd | |||
./bootstrap | |||
./configure --enable-sysfsgpio --enable-bcm2835gpio | |||
make | |||
sudo make install | |||
sudo cp -r tcl/ /usr/share/openocd | |||
</pre> | |||
<code>make</code> will take about 15 minutes. | |||
-> '''Note:''' make, bootstrap and configure should give no compilation errors !!! (if not so check if you have all necessary libraries installed) | |||
-> '''Note:''' also make sure that you compiled the proxmark repository without any compilation errors! (if not so check if you have all necessary libraries installed) | |||
=== Connect physically === | |||
Connect the following pins from the Raspberry Pi to the Proxmark3 | |||
: {| class="wikitable" | |||
! Proxmark3 | |||
! Raspberry Pi | |||
! Cable colour | |||
|- | |||
| TMS || 22 || yellow | |||
|- | |||
| TDI || 19 || blue | |||
|- | |||
| TDO || 21 || green | |||
|- | |||
| TCK || 23 || orange | |||
|- | |||
| GND || 6 || grey | |||
|- | |||
| 3.3V || 1 || purple | |||
|} | |||
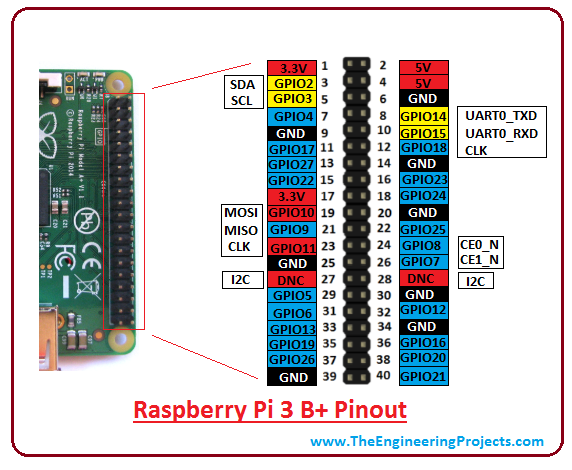
For the pin layout of the Raspberry Pi see [https://www.theengineeringprojects.com/wp-content/uploads/2018/07/introduction-to-raspberry-pi-3-b-plus-2.png link]. | |||
[[File:Proxmark raspi pin.jpg|border|600px]] | |||
The pin configuration can be changed in: <code>/usr/share/openocd/interface/raspberrypi2-native.cfg</code>. (Not necessary for this tutorial) | |||
----- | |||
=== Connect via OpenOCD === | |||
''Note: Power the Proxmark separately from the Raspberry Pi'' | |||
; 1. Start OpenOCD | |||
: switch to the Proxmark folder | |||
:: <code>cd proxmark3</code> | |||
:: ''Note: the source code of the Proxmark should be already be complied.'' | |||
; 2. Create OpenOCD configuration | |||
:: <code>nano tools/raspi.cfg</code> | |||
:: Past following code into the file | |||
<pre> | |||
# Ports | |||
telnet_port 4444 | |||
gdb_port 3333 | |||
# Interface | |||
adapter_khz 1000 | |||
source [find interface/raspberrypi2-native.cfg] | |||
# use combined on interfaces or targets that can't set TRST/SRST separately | |||
reset_config srst_only srst_pulls_trst | |||
jtag newtap sam7x cpu -irlen 4 -ircapture 0x1 -irmask 0xf | |||
target create sam7x.cpu arm7tdmi -endian little -chain-position sam7x.cpu | |||
sam7x.cpu configure -event reset-init { | |||
soft_reset_halt | |||
mww 0xfffffd00 0xa5000004 # RSTC_CR: Reset peripherals | |||
mww 0xfffffd44 0x00008000 # WDT_MR: disable watchdog | |||
mww 0xfffffd08 0xa5000001 # RSTC_MR enable user reset | |||
mww 0xfffffc20 0x00005001 # CKGR_MOR : enable the main oscillator | |||
sleep 10 | |||
mww 0xfffffc2c 0x000b1c02 # CKGR_PLLR: 16MHz * 12/2 = 96MHz | |||
sleep 10 | |||
mww 0xfffffc30 0x00000007 # PMC_MCKR : MCK = PLL / 2 = 48 MHz | |||
sleep 10 | |||
mww 0xffffff60 0x00480100 # MC_FMR: flash mode (FWS=1,FMCN=72) | |||
sleep 100 | |||
} | |||
gdb_memory_map enable | |||
#gdb_breakpoint_override hard | |||
#armv4_5 core_state arm | |||
sam7x.cpu configure -work-area-virt 0 -work-area-phys 0x00200000 -work-area-size 0x10000 -work-area-backup 0 | |||
flash bank sam7x512.flash.0 at91sam7 0 0 0 0 sam7x.cpu 0 0 0 0 0 0 0 18432 | |||
flash bank sam7x512.flash.1 at91sam7 0 0 0 0 sam7x.cpu 1 0 0 0 0 0 0 18432 | |||
</pre> | |||
; 3. Start OpenOCD with the configuration file just created | |||
:: <code>sudo openocd -f tools/raspi.cfg</code> | |||
:: Now a openOCD session is started. Do '''not''' close it. | |||
~/git/proxmark3 $ sudo openocd -f tools/raspi.cfg | |||
Open On-Chip Debugger 0.10.0+dev-01404-g393448342-dirty (2020-09-17-17:59) | |||
Licensed under GNU GPL v2 | |||
For bug reports, read | |||
http://openocd.org/doc/doxygen/bugs.html | |||
Info : auto-selecting first available session transport "jtag". To override use 'transport select <transport>'. | |||
Info : Listening on port 6666 for tcl connections | |||
Info : Listening on port 4444 for telnet connections | |||
Info : BCM2835 GPIO JTAG/SWD bitbang driver | |||
Info : clock speed 1001 kHz | |||
Info : JTAG tap: sam7x.cpu tap/device found: 0x3f0f0f0f (mfg: 0x787 (<unknown>), part: 0xf0f0, ver: 0x3) | |||
Info : Embedded ICE version 1 | |||
Info : sam7x.cpu: hardware has 2 breakpoint/watchpoint units | |||
Info : starting gdb server for sam7x.cpu on 3333 | |||
Info : Listening on port 3333 for gdb connections | |||
Info : accepting 'telnet' connection on tcp/4444 | |||
target halted in ARM state due to debug-request, current mode: Supervisor | |||
cpsr: 0x000000d3 pc: 0x00122a74 | |||
'''Note:''' If the output does not look like that and rather looks like this: | |||
~/git/proxmark3 $ sudo openocd -f tools/raspi.cfg | |||
Open On-Chip Debugger 0.10.0+dev-01404-g393448342-dirty (2020-09-17-17:59) | |||
Licensed under GNU GPL v2 | |||
For bug reports, read | |||
http://openocd.org/doc/doxygen/bugs.html | |||
Info : auto-selecting first available session transport "jtag". To override use 'transport select <transport>'. | |||
Info : Listening on port 6666 for tcl connections | |||
Info : Listening on port 4444 for telnet connections | |||
Info : BCM2835 GPIO JTAG/SWD bitbang driver | |||
Info : clock speed 1001 kHz | |||
Info : JTAG tap: sam7x.cpu tap/device found: 0x3f0f0f0f (mfg: 0x787 (<unknown>), part: 0xf0f0, ver: 0x3) | |||
Info : TAP auto0.tap does not have valid IDCODE (idcode=0x0) | |||
Info : TAP auto1.tap does not have valid IDCODE (idcode=0x0) | |||
Info : TAP auto2.tap does not have valid IDCODE (idcode=0x0) | |||
Info : TAP auto3.tap does not have valid IDCODE (idcode=0x0) | |||
Info : TAP auto4.tap does not have valid IDCODE (idcode=0x0) | |||
Info : TAP auto5.tap does not have valid IDCODE (idcode=0x0) | |||
, then erase the chip manually and enable the JTAG interface by connecting the pin of the AT91SAM7S512 to 3.3V (see http://www.proxmark.org/forum/viewtopic.php?id=6159) | |||
; 4. Connect to OpenOCD session | |||
: Open a new terminal window and telnet to the port that was specified in the .cfg file | |||
:: <code>telnet localhost 4444</code> | |||
; 5. Flash via JTAG | |||
; 6. Halt the Proxmark3 | |||
:: <code>halt</code> | |||
; 7. Erase the flash content: | |||
:: <code>flash erase_sector 0 0 15</code> | |||
:: <code>flash erase_sector 1 0 15</code> | |||
; 8. Flash the new firmware: | |||
:: <code>flash write_image ./armsrc/obj/fullimage.elf</code> | |||
:: <code>flash write_image ./bootrom/obj/bootrom.elf</code> | |||
$ telnet localhost 4444 | |||
Trying ::1... | |||
Trying 127.0.0.1... | |||
Connected to localhost. | |||
Escape character is '^]'. | |||
Open On-Chip Debugger | |||
> halt | |||
target halted in ARM state due to debug-request, current mode: Supervisor | |||
cpsr: 0x000000d3 pc: 0x00122a74 | |||
> flash erase_sector 0 0 15 | |||
erased sectors 0 through 15 on flash bank 0 in 0.032174s | |||
> flash erase_sector 1 0 15 | |||
erased sectors 0 through 15 on flash bank 1 in 0.031851s | |||
> flash write_image ./armsrc/obj/fullimage.elf | |||
wrote 257448 bytes from file ./armsrc/obj/fullimage.elf in 21.204687s (11.857 KiB/s) | |||
> flash write_image ./bootrom/obj/bootrom.elf | |||
wrote 3888 bytes from file ./bootrom/obj/bootrom.elf in 0.352596s (10.768 KiB/s) | |||
'''Done!''' | |||
Disconnect the Raspberry Pi from the Proxmark | |||
Now you should be able to connect to the Proxmark as usual: | |||
<code>./client/proxmark3 /dev/ttyACM0</code> | |||
For useful commands visit: [[Proxmark3: Useful commands]] | |||
== Bus Pirate == | |||
''Note: Here the Bus Pirate 3.6 will be used'' | |||
''Note: This did not work for me, maybe it was faulty hardware or faulty firmware'' | |||
This tutorial is based on https://scund00r.com/all/rfid/2018/05/18/debrick-proxmark.html | |||
; Update the Bus Pirate | ; Update the Bus Pirate | ||
Latest revision as of 15:05, 19 March 2021
Summary
This tutorial will show how to reset a Proxmark3 RDV2 via the JTAG interface.
This is useful when the Proxmark3 RDV2 is bricked and won't connect to the computer. This will solve any software failures like a corrupt firmware or bootloader.
1. Debricking process via Raspberry Pi 3+ (version 2, 3 and 4 work exactly the same)
2. Debricking process via Bus Pirate 3.6
- Note: The method with the Bus Pirate did not work for me. Maybe you have better luck.
Requirements
- Proxmark3
- Raspberry Pi 2, 3, or 4
- Bus Pirate v3 (or higher)
- Linux: Debian
Raspberry Pi

- This tutorial is based on
- http://www.lucasoldi.com/2017/01/17/unbrick-proxmark3-with-a-raspberry-pi-and-openocd/
- https://github.com/synthetos/PiOCD/wiki/Using-a-Raspberry-Pi-as-a-JTAG-Dongle
- http://openocd.org/doc/html/OpenOCD-Project-Setup.html
Compile Proxmark
See Proxmark: Installation or from the official website
Compile OpenOCD
sudo apt-get update
sudo apt-get install -y autoconf libtool libftdi-dev textinfo pkg-config pkgconf git
git clone https://git.code.sf.net/p/openocd/code openocd
cd openocd
./bootstrap
./configure --enable-sysfsgpio --enable-bcm2835gpio
make
sudo make install
sudo cp -r tcl/ /usr/share/openocd
make will take about 15 minutes.
-> Note: make, bootstrap and configure should give no compilation errors !!! (if not so check if you have all necessary libraries installed)
-> Note: also make sure that you compiled the proxmark repository without any compilation errors! (if not so check if you have all necessary libraries installed)
Connect physically
Connect the following pins from the Raspberry Pi to the Proxmark3
Proxmark3 Raspberry Pi Cable colour TMS 22 yellow TDI 19 blue TDO 21 green TCK 23 orange GND 6 grey 3.3V 1 purple
For the pin layout of the Raspberry Pi see link.

The pin configuration can be changed in: /usr/share/openocd/interface/raspberrypi2-native.cfg. (Not necessary for this tutorial)
Connect via OpenOCD
Note: Power the Proxmark separately from the Raspberry Pi
- 1. Start OpenOCD
- switch to the Proxmark folder
cd proxmark3- Note: the source code of the Proxmark should be already be complied.
- 2. Create OpenOCD configuration
-
nano tools/raspi.cfg- Past following code into the file
# Ports
telnet_port 4444
gdb_port 3333

# Interface
adapter_khz 1000
source [find interface/raspberrypi2-native.cfg]

# use combined on interfaces or targets that can't set TRST/SRST separately
reset_config srst_only srst_pulls_trst

jtag newtap sam7x cpu -irlen 4 -ircapture 0x1 -irmask 0xf

target create sam7x.cpu arm7tdmi -endian little -chain-position sam7x.cpu

sam7x.cpu configure -event reset-init {
    soft_reset_halt
    mww 0xfffffd00 0xa5000004   # RSTC_CR: Reset peripherals
    mww 0xfffffd44 0x00008000   # WDT_MR: disable watchdog
    mww 0xfffffd08 0xa5000001   # RSTC_MR enable user reset
    mww 0xfffffc20 0x00005001   # CKGR_MOR : enable the main oscillator
    sleep 10
    mww 0xfffffc2c 0x000b1c02   # CKGR_PLLR: 16MHz * 12/2 = 96MHz
    sleep 10
    mww 0xfffffc30 0x00000007   # PMC_MCKR : MCK = PLL / 2 = 48 MHz
    sleep 10
    mww 0xffffff60 0x00480100   # MC_FMR: flash mode (FWS=1,FMCN=72)
    sleep 100

}

gdb_memory_map enable
#gdb_breakpoint_override hard
#armv4_5 core_state arm

sam7x.cpu configure -work-area-virt 0 -work-area-phys 0x00200000 -work-area-size 0x10000 -work-area-backup 0
flash bank sam7x512.flash.0 at91sam7 0 0 0 0 sam7x.cpu 0 0 0 0 0 0 0 18432
flash bank sam7x512.flash.1 at91sam7 0 0 0 0 sam7x.cpu 1 0 0 0 0 0 0 18432
- 3. Start OpenOCD with the configuration file just created
-
sudo openocd -f tools/raspi.cfg- Now a openOCD session is started. Do not close it.
~/git/proxmark3 $ sudo openocd -f tools/raspi.cfg
Open On-Chip Debugger 0.10.0+dev-01404-g393448342-dirty (2020-09-17-17:59)
Licensed under GNU GPL v2
For bug reports, read
	http://openocd.org/doc/doxygen/bugs.html
Info : auto-selecting first available session transport "jtag". To override use 'transport select <transport>'.
Info : Listening on port 6666 for tcl connections
Info : Listening on port 4444 for telnet connections
Info : BCM2835 GPIO JTAG/SWD bitbang driver
Info : clock speed 1001 kHz
Info : JTAG tap: sam7x.cpu tap/device found: 0x3f0f0f0f (mfg: 0x787 (<unknown>), part: 0xf0f0, ver: 0x3)
Info : Embedded ICE version 1
Info : sam7x.cpu: hardware has 2 breakpoint/watchpoint units
Info : starting gdb server for sam7x.cpu on 3333
Info : Listening on port 3333 for gdb connections
Info : accepting 'telnet' connection on tcp/4444
target halted in ARM state due to debug-request, current mode: Supervisor
cpsr: 0x000000d3 pc: 0x00122a74
Note: If the output does not look like that and rather looks like this:
~/git/proxmark3 $ sudo openocd -f tools/raspi.cfg
Open On-Chip Debugger 0.10.0+dev-01404-g393448342-dirty (2020-09-17-17:59)
Licensed under GNU GPL v2
For bug reports, read
	http://openocd.org/doc/doxygen/bugs.html
Info : auto-selecting first available session transport "jtag". To override use 'transport select <transport>'.
Info : Listening on port 6666 for tcl connections
Info : Listening on port 4444 for telnet connections
Info : BCM2835 GPIO JTAG/SWD bitbang driver
Info : clock speed 1001 kHz
Info : JTAG tap: sam7x.cpu tap/device found: 0x3f0f0f0f (mfg: 0x787 (<unknown>), part: 0xf0f0, ver: 0x3)
Info : TAP auto0.tap does not have valid IDCODE (idcode=0x0)
Info : TAP auto1.tap does not have valid IDCODE (idcode=0x0)
Info : TAP auto2.tap does not have valid IDCODE (idcode=0x0)
Info : TAP auto3.tap does not have valid IDCODE (idcode=0x0)
Info : TAP auto4.tap does not have valid IDCODE (idcode=0x0)
Info : TAP auto5.tap does not have valid IDCODE (idcode=0x0)
, then erase the chip manually and enable the JTAG interface by connecting the pin of the AT91SAM7S512 to 3.3V (see http://www.proxmark.org/forum/viewtopic.php?id=6159)
- 4. Connect to OpenOCD session
- Open a new terminal window and telnet to the port that was specified in the .cfg file
telnet localhost 4444
- 5. Flash via JTAG
- 6. Halt the Proxmark3
-
halt
- 7. Erase the flash content
-
flash erase_sector 0 0 15flash erase_sector 1 0 15
- 8. Flash the new firmware
-
flash write_image ./armsrc/obj/fullimage.elfflash write_image ./bootrom/obj/bootrom.elf
$ telnet localhost 4444
Trying ::1...
Trying 127.0.0.1...
Connected to localhost.
Escape character is '^]'.
Open On-Chip Debugger
> halt
target halted in ARM state due to debug-request, current mode: Supervisor
cpsr: 0x000000d3 pc: 0x00122a74
> flash erase_sector 0 0 15
erased sectors 0 through 15 on flash bank 0 in 0.032174s

> flash erase_sector 1 0 15
erased sectors 0 through 15 on flash bank 1 in 0.031851s

> flash write_image ./armsrc/obj/fullimage.elf
wrote 257448 bytes from file ./armsrc/obj/fullimage.elf in 21.204687s (11.857 KiB/s)

> flash write_image ./bootrom/obj/bootrom.elf
wrote 3888 bytes from file ./bootrom/obj/bootrom.elf in 0.352596s (10.768 KiB/s)
Done!
Disconnect the Raspberry Pi from the Proxmark
Now you should be able to connect to the Proxmark as usual:
./client/proxmark3 /dev/ttyACM0
For useful commands visit: Proxmark3: Useful commands
Bus Pirate
Note: Here the Bus Pirate 3.6 will be used
Note: This did not work for me, maybe it was faulty hardware or faulty firmware
This tutorial is based on https://scund00r.com/all/rfid/2018/05/18/debrick-proxmark.html
- Update the Bus Pirate
- you can use following guide: Bus Pirate: First steps
- Get the latest Proxmark3 repository & build
git clone https://github.com/Proxmark/proxmark3.gitcd proxmark3- install needed components:
sudo apt install p7zip git build-essential libreadline5 libreadline-dev libusb-0.1-4 libusb-dev libqt4-dev perl pkg-config wget libncurses5-dev gcc-arm-none-eabi libstdc++-arm-none-eabi-newlib libpcsclite-dev pcscdmake clean && make all- Install proxmark3 driver:
sudo cp -rf driver/77-mm-usb-device-blacklist.rules /etc/udev/rules.d/77-mm-usb-device-blacklist.rulessudo udevadm control --reload-rules
- Add user
sudo adduser $USER dialout- Now logout and login in again
- Install OpenOCD
sudo apt-get install openocd- Connect the Proxmark3 to the Bus Pirate
- use this pin configuration:
Proxmark3 Bus Pirate TMS CS TDI MOSI TDO MISO TCK CLK GND GND 3.3V 3.3V
- Flashing
- check on with Port the Bus Pirate is connected:
ls /dev/tty*- OR
dmesg -wHand plugout and connect the Bus Pirate again
- Set OpenOCD config
nano tools/at91sam7s512-buspirate.cfg
# Interface
interface buspirate
buspirate_port /dev/ttyUSB0
adapter_khz 1000
- Start OpenOCD
- Launch OpenOCD
sudo openocd -f tools/at91sam7s512-buspirate.cfg
:~/git/proxmark3$ sudo openocd -f tools/at91sam7s512-buspirate.cfg
[sudo] password for j:
Open On-Chip Debugger 0.10.0-rc1-dev-gc404ff5d-dirty (2019-11-11-15:43)
Licensed under GNU GPL v2
For bug reports, read
   http://openocd.org/doc/doxygen/bugs.html
Warn : Adapter driver 'buspirate' did not declare which transports it allows; assuming  legacy JTAG-only
Info : only one  transport option; autoselect 'jtag'
adapter speed: 1 000 kHz
srst_only srst_p ulls_tr st srst_gates_jtag srst_open_drain connect_deassert_srst
Info : Buspirate  Interf ace ready!
Info : This adap ter doe sn't suppo rt configurable speed
Info : JTAG tap:  sam7x. cpu tap/de vice found: 0x3f0f0f0f (mfg: 0x787 (<unknown>), part:  0xf0f0, ver: 0x3 )
Info : Embedded ICE version 1
Info : sam7x.cpu: hardware has 2 breakpoint/watchpoint units
Info : accepting 'telnet' connection on tcp/4444
- Open a new terminal window
- and type:
telnet localhost 4444
- and type:
j@laptop:~/git/proxmark3$ telnet localhost 4444
Trying 127.0.0.1...
Connected to localhost.
Escape character is '^]'.
Open On-Chip Debugger
>
- Halt the Proxmark3
halt
- Erase the flash content:
flash erase_sector 0 0 15flash erase_sector 1 0 15
- Flash the new firmware:
flash write_image ./armsrc/obj/fullimage.elf- This will take a while (about 6 minutes)
flash write_image ./bootrom/obj/bootrom.elf
Used Hardware
Proxmark3 RDV2 Kit Bus Pirate v3.6 Universal serial interface