Difference between revisions of "Proxmark3: Debricking"
Jostrowski (talk | contribs) m (Jostrowski moved page Proxmark3: Debricking using the Bus Pirate to Proxmark3: Debricking) |
Jostrowski (talk | contribs) |
||
| Line 1: | Line 1: | ||
== Summary == | == Summary == | ||
Description on how to debrick the Proxmark3 using a Bus Pirate. | Description on how to debrick the Proxmark3 RDV2 if the bootloader or firmware is corrupted and there is no connection between the Proxmark3 and the computer. | ||
Note: The method with the Bus Pirate did '''not work''' for me. Maybe you have better luck. | |||
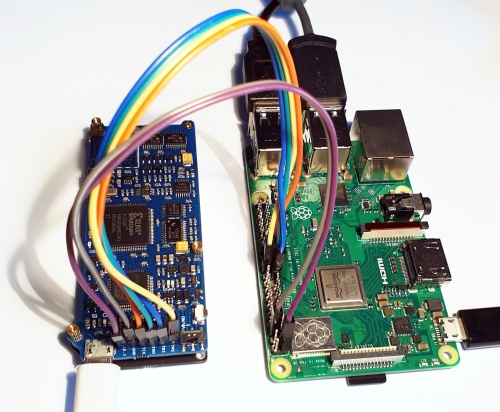
In the first part the debricking process with an Raspberry Pi 3+ (version 2, 3 and 4 will work exactly the same) will be showcased. In the second part the same will be shown using a Bus Pirate. | |||
using a Bus Pirate. | |||
== Requirements == | == Requirements == | ||
* Proxmark3 | * Proxmark3 | ||
* Raspberry Pi 2, 3, or 4 | |||
* Bus Pirate v3 (or higher) | * Bus Pirate v3 (or higher) | ||
* Linux: Debian | * Linux: Debian | ||
== | == Raspberry Pi == | ||
[[File:Proxmark raspi.jpg|thumb|500px]] | |||
; This tutorial is based on: | |||
: http://www.lucasoldi.com/2017/01/17/unbrick-proxmark3-with-a-raspberry-pi-and-openocd/ | |||
: https://github.com/synthetos/PiOCD/wiki/Using-a-Raspberry-Pi-as-a-JTAG-Dongle | |||
: http://openocd.org/doc/html/OpenOCD-Project-Setup.html | |||
----- | |||
=== Compile Proxmark === | |||
See [https://wiki.elvis.science/index.php?title=Proxmark3:_Installation Proxmark: Installation] or from the [https://github.com/Proxmark/proxmark3/wiki/Ubuntu-Linux official website] | |||
=== Compiling OpenOCD === | |||
<pre> | |||
sudo apt-get update | |||
sudo apt-get install -y autoconf libtool libftdi-dev textinfo pkg-config pkgconf git | |||
git clone https://git.code.sf.net/p/openocd/code openocd | |||
cd openocd | |||
./bootstrap | |||
./configure --enable-sysfsgpio --enable-bcm2835gpio | |||
make | |||
sudo make install | |||
sudo cp -r tcl/ /usr/share/openocd | |||
</pre> | |||
<code>make</code> will take about 15 minutes. | |||
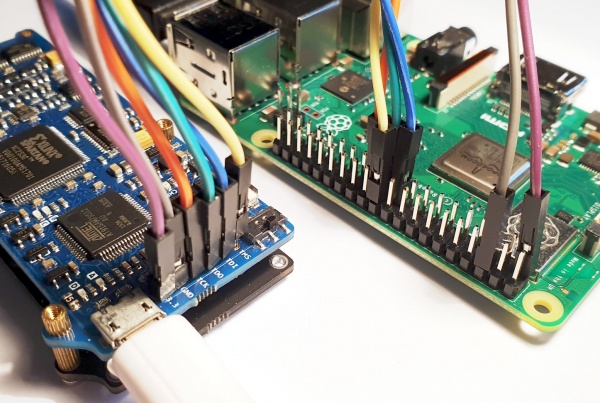
=== Connect === | |||
Connect the following pins from the Raspberry Pi to the Proxmark3 | |||
: {| class="wikitable" | |||
! Proxmark3 | |||
! Raspberry Pi | |||
|- | |||
| TMS || | |||
|- | |||
| TDI || | |||
|- | |||
| TDO || | |||
|- | |||
| TCK || | |||
|- | |||
| GND || 6 | |||
|- | |||
| 3.3V || 3.3V | |||
|} | |||
[[File:Proxmark raspi pin.jpg|border|600px]] | |||
The pin configuration can be set in: <code>/usr/share/openocd/interface/raspberrypi2-native.cfg</code> | |||
== Bus Pirate == | |||
''Note: Here the Bus Pirate 3.6 will be used'' | |||
''Note: This did not work for me, maybe it was faulty hardware a faulty firmware'' | |||
This tutorial is based on https://scund00r.com/all/rfid/2018/05/18/debrick-proxmark.html | |||
; Update the Bus Pirate | ; Update the Bus Pirate | ||
Revision as of 11:24, 12 December 2019
Summary
Description on how to debrick the Proxmark3 RDV2 if the bootloader or firmware is corrupted and there is no connection between the Proxmark3 and the computer.
Note: The method with the Bus Pirate did not work for me. Maybe you have better luck.
In the first part the debricking process with an Raspberry Pi 3+ (version 2, 3 and 4 will work exactly the same) will be showcased. In the second part the same will be shown using a Bus Pirate. using a Bus Pirate.
Requirements
- Proxmark3
- Raspberry Pi 2, 3, or 4
- Bus Pirate v3 (or higher)
- Linux: Debian
Raspberry Pi
- This tutorial is based on
- http://www.lucasoldi.com/2017/01/17/unbrick-proxmark3-with-a-raspberry-pi-and-openocd/
- https://github.com/synthetos/PiOCD/wiki/Using-a-Raspberry-Pi-as-a-JTAG-Dongle
- http://openocd.org/doc/html/OpenOCD-Project-Setup.html
Compile Proxmark
See Proxmark: Installation or from the official website
Compiling OpenOCD
sudo apt-get update
sudo apt-get install -y autoconf libtool libftdi-dev textinfo pkg-config pkgconf git
git clone https://git.code.sf.net/p/openocd/code openocd
cd openocd
./bootstrap
./configure --enable-sysfsgpio --enable-bcm2835gpio
make
sudo make install
sudo cp -r tcl/ /usr/share/openocd
make will take about 15 minutes.
Connect
Connect the following pins from the Raspberry Pi to the Proxmark3
Proxmark3 Raspberry Pi TMS TDI TDO TCK GND 6 3.3V 3.3V
The pin configuration can be set in: /usr/share/openocd/interface/raspberrypi2-native.cfg
Bus Pirate
Note: Here the Bus Pirate 3.6 will be used
Note: This did not work for me, maybe it was faulty hardware a faulty firmware
This tutorial is based on https://scund00r.com/all/rfid/2018/05/18/debrick-proxmark.html
- Update the Bus Pirate
- you can use following guide: Bus Pirate: First steps
- Get the latest Proxmark3 repository & build
git clone https://github.com/Proxmark/proxmark3.gitcd proxmark3- install needed components:
sudo apt install p7zip git build-essential libreadline5 libreadline-dev libusb-0.1-4 libusb-dev libqt4-dev perl pkg-config wget libncurses5-dev gcc-arm-none-eabi libstdc++-arm-none-eabi-newlib libpcsclite-dev pcscdmake clean && make all- Install proxmark3 driver:
sudo cp -rf driver/77-mm-usb-device-blacklist.rules /etc/udev/rules.d/77-mm-usb-device-blacklist.rulessudo udevadm control --reload-rules
- Add user
sudo adduser $USER dialout- Now logout and login in again
- Install OpenOCD
sudo apt-get install openocd- Connect the Proxmark3 to the Bus Pirate
- use this pin configuration:
Proxmark3 Bus Pirate TMS CS TDI MOSI TDO MISO TCK CLK GND GND 3.3V 3.3V
- Flashing
- check on with Port the Bus Pirate is connected:
ls /dev/tty*- OR
dmesg -wHand plugout and connect the Bus Pirate again
- Set OpenOCD config
nano tools/at91sam7s512-buspirate.cfg
# Interface
interface buspirate
buspirate_port /dev/ttyUSB0
adapter_khz 1000
- Start OpenOCD
- Launch OpenOCD
sudo openocd -f tools/at91sam7s512-buspirate.cfg
:~/git/proxmark3$ sudo openocd -f tools/at91sam7s512-buspirate.cfg
[sudo] password for j:
Open On-Chip Debugger 0.10.0-rc1-dev-gc404ff5d-dirty (2019-11-11-15:43)
Licensed under GNU GPL v2
For bug reports, read
   http://openocd.org/doc/doxygen/bugs.html
Warn : Adapter driver 'buspirate' did not declare which transports it allows; assuming  legacy JTAG-only
Info : only one  transport option; autoselect 'jtag'
adapter speed: 1 000 kHz
srst_only srst_p ulls_tr st srst_gates_jtag srst_open_drain connect_deassert_srst
Info : Buspirate  Interf ace ready!
Info : This adap ter doe sn't suppo rt configurable speed
Info : JTAG tap:  sam7x. cpu tap/de vice found: 0x3f0f0f0f (mfg: 0x787 (<unknown>), part:  0xf0f0, ver: 0x3 )
Info : Embedded ICE version 1
Info : sam7x.cpu: hardware has 2 breakpoint/watchpoint units
Info : accepting 'telnet' connection on tcp/4444
- Open a new terminal window
- and type:
telnet localhost 4444
- and type:
j@laptop:~/git/proxmark3$ telnet localhost 4444
Trying 127.0.0.1...
Connected to localhost.
Escape character is '^]'.
Open On-Chip Debugger
>
- Halt the Proxmark3
halt
- Erase the flash content:
flash erase_sector 0 0 15flash erase_sector 1 0 15
- Flash the new firmware:
flash write_image ./armsrc/obj/fullimage.elf- This will take a while (about 6 minutes)
flash write_image ./bootrom/obj/bootrom.elf
Used Hardware
Proxmark3 RDV2 Kit Bus Pirate v3.6 Universal serial interface

