Proxmark3: Debricking
Summary
Description on how to debrick the Proxmark3 RDV2 if the bootloader or firmware is corrupted and there is no connection between the Proxmark3 and the computer.
Note: The method with the Bus Pirate did not work for me. Maybe you have better luck.
In the first part the debricking process with an Raspberry Pi 3+ (version 2, 3 and 4 will work exactly the same) will be showcased. In the second part the same will be shown using a Bus Pirate. using a Bus Pirate.
Requirements
- Proxmark3
- Raspberry Pi 2, 3, or 4
- Bus Pirate v3 (or higher)
- Linux: Debian
Raspberry Pi

- This tutorial is based on
- http://www.lucasoldi.com/2017/01/17/unbrick-proxmark3-with-a-raspberry-pi-and-openocd/
- https://github.com/synthetos/PiOCD/wiki/Using-a-Raspberry-Pi-as-a-JTAG-Dongle
- http://openocd.org/doc/html/OpenOCD-Project-Setup.html
Compile Proxmark
See Proxmark: Installation or from the official website
Compiling OpenOCD
sudo apt-get update
sudo apt-get install -y autoconf libtool libftdi-dev textinfo pkg-config pkgconf git
git clone https://git.code.sf.net/p/openocd/code openocd
cd openocd
./bootstrap
./configure --enable-sysfsgpio --enable-bcm2835gpio
make
sudo make install
sudo cp -r tcl/ /usr/share/openocd
make will take about 15 minutes.
Connect physically
Connect the following pins from the Raspberry Pi to the Proxmark3
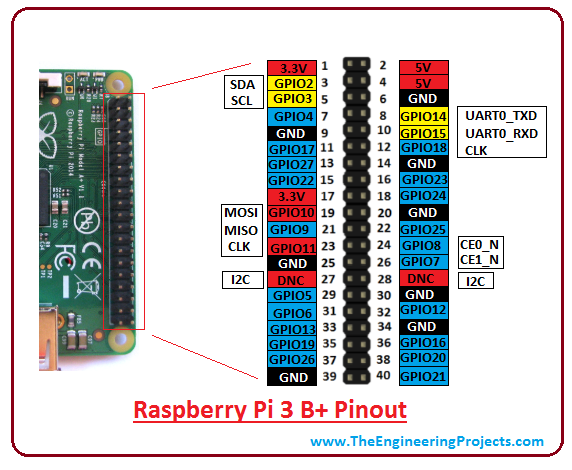
Proxmark3 Raspberry Pi Cable color TMS 22 yellow TDI 19 blue TDO 21 green TCK 23 orange GND 6 purple 3.3V 1 grey
For the pin layout of the Raspberry Pi see link.

The pin configuration can be changed in: /usr/share/openocd/interface/raspberrypi2-native.cfg. (Not necessary for this tutorial)
Connect via OpenOCD
Note: Power the Proxmark desperately from the Raspberry Pi
- 1. Start OpenOCD
- switch to the Proxmark folder
cd proxmark3- Note: the source code of the proxmark should be already be complied.
- 2. Create OpenOCD configuration
-
nano tools/raspi.cfg- Past following code into the file
TODO: Paste code here
- 3. Start OpenOCD with the configuration file just created
-
sudo openocd -f tools/raspi.cfg- Now a openOCD session is started. Do not close it.
- 4. Connect to OpenOCD session
- Open a new terminal window and telnet to the port that was specified in the .cfg file
telnet localhost 4444
- 5. Flash via JTAG
j@laptop:~/git/proxmark3$ telnet localhost 4444
Trying 127.0.0.1...
Connected to localhost.
Escape character is '^]'.
Open On-Chip Debugger
>
- 6. Halt the Proxmark3
-
halt
- 7. Erase the flash content
-
flash erase_sector 0 0 15flash erase_sector 1 0 15
- 8. Flash the new firmware
-
flash write_image ./armsrc/obj/fullimage.elfflash write_image ./bootrom/obj/bootrom.elf
Done!
Disconnect the Raspberry Pi from the Proxmark
Now you should be able to connect to the Proxmark as usual:
./client/proxmark3 /dev/ttyACM0
For useful commands visit: Proxmark3: Useful commands
Bus Pirate
Note: Here the Bus Pirate 3.6 will be used
Note: This did not work for me, maybe it was faulty hardware a faulty firmware
This tutorial is based on https://scund00r.com/all/rfid/2018/05/18/debrick-proxmark.html
- Update the Bus Pirate
- you can use following guide: Bus Pirate: First steps
- Get the latest Proxmark3 repository & build
git clone https://github.com/Proxmark/proxmark3.gitcd proxmark3- install needed components:
sudo apt install p7zip git build-essential libreadline5 libreadline-dev libusb-0.1-4 libusb-dev libqt4-dev perl pkg-config wget libncurses5-dev gcc-arm-none-eabi libstdc++-arm-none-eabi-newlib libpcsclite-dev pcscdmake clean && make all- Install proxmark3 driver:
sudo cp -rf driver/77-mm-usb-device-blacklist.rules /etc/udev/rules.d/77-mm-usb-device-blacklist.rulessudo udevadm control --reload-rules
- Add user
sudo adduser $USER dialout- Now logout and login in again
- Install OpenOCD
sudo apt-get install openocd- Connect the Proxmark3 to the Bus Pirate
- use this pin configuration:
Proxmark3 Bus Pirate TMS CS TDI MOSI TDO MISO TCK CLK GND GND 3.3V 3.3V
- Flashing
- check on with Port the Bus Pirate is connected:
ls /dev/tty*- OR
dmesg -wHand plugout and connect the Bus Pirate again
- Set OpenOCD config
nano tools/at91sam7s512-buspirate.cfg
# Interface
interface buspirate
buspirate_port /dev/ttyUSB0
adapter_khz 1000
- Start OpenOCD
- Launch OpenOCD
sudo openocd -f tools/at91sam7s512-buspirate.cfg
:~/git/proxmark3$ sudo openocd -f tools/at91sam7s512-buspirate.cfg
[sudo] password for j:
Open On-Chip Debugger 0.10.0-rc1-dev-gc404ff5d-dirty (2019-11-11-15:43)
Licensed under GNU GPL v2
For bug reports, read
   http://openocd.org/doc/doxygen/bugs.html
Warn : Adapter driver 'buspirate' did not declare which transports it allows; assuming  legacy JTAG-only
Info : only one  transport option; autoselect 'jtag'
adapter speed: 1 000 kHz
srst_only srst_p ulls_tr st srst_gates_jtag srst_open_drain connect_deassert_srst
Info : Buspirate  Interf ace ready!
Info : This adap ter doe sn't suppo rt configurable speed
Info : JTAG tap:  sam7x. cpu tap/de vice found: 0x3f0f0f0f (mfg: 0x787 (<unknown>), part:  0xf0f0, ver: 0x3 )
Info : Embedded ICE version 1
Info : sam7x.cpu: hardware has 2 breakpoint/watchpoint units
Info : accepting 'telnet' connection on tcp/4444
- Open a new terminal window
- and type:
telnet localhost 4444
- and type:
j@laptop:~/git/proxmark3$ telnet localhost 4444
Trying 127.0.0.1...
Connected to localhost.
Escape character is '^]'.
Open On-Chip Debugger
>
- Halt the Proxmark3
halt
- Erase the flash content:
flash erase_sector 0 0 15flash erase_sector 1 0 15
- Flash the new firmware:
flash write_image ./armsrc/obj/fullimage.elf- This will take a while (about 6 minutes)
flash write_image ./bootrom/obj/bootrom.elf
Used Hardware
Proxmark3 RDV2 Kit Bus Pirate v3.6 Universal serial interface