Raspberry Pi: Sense Hat
Summary
This documentation deals with the Raspberry Sense Hat.
Requirements
- Hardware: Raspberry Pi
- Operating system: Rasbian
- Interpreter: Python or Python3
- Packages: sense-hat
Description
This add-on board has a is packed with three sensor chips as wall as a 8 by 8 RGB Led matrix and a joystick. The Sensors are a barometer, a hygrometer and an IMU (Inertial Measurement Unit). The barometer measures the air pressure and the temperature. The hygrometer measures the humidity and the temperature as well. The used IMU holds a gyroscope, an accelerometer and a magnetometer for an accurate determination of rotation, movement and detection of magnetic fields.
Package Installation
sudo apt-get install sense-hat
Python Programming
The Sense Hat is mainly used via python programming. The developers also developed a sense hat programming simulation program on trinket.io where you are able to test your code without owning the Sense Hat.
The Project comes with two main libraries the sense_emu which is needed when using the Emulator and the sense_hat for the device. For detailed information about the library use the documentation.
Importing the Libary
# emulator libary
from sense_emu import SenseHat
sense = SenseHat()
# sensehat libary
from sense_hat import SenseHat
sense = SenseHat()
Using the barometer
The barometer delivers two functions the get_pressure() and the get_temperature_from_pressure().Both of them return a float value of the corresponding unit.
pressure = sense.get_pressure()
print("Pressure: %s Millibars" % pressure)
temp = sense.get_temperature_from_pressure()
print("Temperature from pressure sensor: %s C" % temp)
Using the hygrometer
The hygrometer delivers also two functions the get_humidity() and the get_temperature_from_humidity(), Both of them return a float value of the corresponding unit.
humidity = sense.get_humidity()
print("Humidity: %s %%" % humidity)
temp = sense.get_temperature_from_humidity()
print("Temperature from pressure humidity: %s C" % temp)
Using the Inertial Measurement Unit
The separte measurement units have their own functions the returns a preformatted dictionary object. The library also delivers a raw funtion that returns unformatted values for the maximum flexibility at after processing
1. Using the Gyroscope
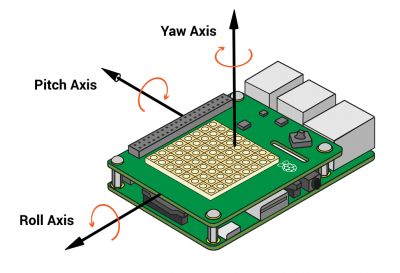
The get_gyroscope() function returns a dictionary object with the pitch, roll, yaw measured in degrees. The raw output function get_gyroscope_raw() returns a dictionary object with the x, y, z axis representing the rotational intensity of the axis in radians per second.
These three rotation axis can determine the exect headed direction in the three-dimensional space. The three axis are used like in the image below.
gyroscope = sense.get_gyroscope()
print("p: {pitch}, r: {roll}, y: {yaw}".format(**gyroscope))
# Returned dictionary object
{
  "pitch": Float,
  "roll": Float,
  "yaw": Float
}
gyroscope_raw = sense.get_gyroscope_raw()
print("x: {x}, y: {y}, z: {z}".format(**gyroscope_raw))
# Returned dictionary object
{
  "x": Float,
  "y": Float,
  "z": Float
}
2. Using the Accelerometer
The accelerometer returns the g-force on the corresponding axis. Therefore are also two functions useable to retrieve the data. get_accelerometer() which returns a dictionary object with pitch, roll, yaw measured in degrees. And the get_accelerometer_raw() which returns a dictionary object with x, y, z representing the acceleration intensity of the axis in Gs.
accelerometer = sense.get_accelerometer()
print("p: {pitch}, r: {roll}, y: {yaw}".format(**accelerometer))
# Returned dictionary object
{
  "pitch": Float,
  "roll": Float,
  "yaw": Float
}
accelerometer_raw = sense.get_accelerometer_raw()
print("x: {x}, y: {y}, z: {z}".format(**accelerometer_raw))
# Returned dictionary object
{
  "x": Float,
  "y": Float,
  "z": Float
}
3. Using the Magnetometer
The Magnetometer measures the magnetic force and can idenftify the location of the magnetix north pole of the earth. The get_compass() function returns the diffrence if the rotation between the sensor and the magnetix north pole in degrees. The get_ compass_raw() function returns a dictionary object with x, y, z representing the magnetic intensity of the axis in microteslas (µT).
compass = sense.get_compass()
print("North: %s" % north)
compass_raw = sense.get_compass_raw()
print("x: {x}, y: {y}, z: {z}".format(**compass_raw))
# Returned dictionary object
{
  "x": Float,
  "y": Float,
  "z": Float
}
Using the 8 by 8 LED RGB Matrix
Setting the orientation
The chip of the sense hat allows us to flip and the rotate the addresses of the LEDs as we want. Therefore got flip_h(), flip_v() and set_rotation(180) implemented by the API developers. The code is as follows:
#rotate 180 degrees
sense.set_rotation(180)
#flip vertically
sense.flip_v()
#flip horizontally
sense.flip_h()
Displaying Text The API also implements functions to projects letters and moving messages on the LED matrix:
#display message
sense.show_message("Hello World!", text_colour = [255, 0, 0], back_colour = [0, 0, 0])
#display letter
sense.show_letter('s', text_colour = [255, 0, 0], back_colour = [0, 0, 0])
Painting Pixels
The every single LED can be addressed and set with RGB values and it is also possible to set the Matrix at once:
#setting a single pixel
sense.set_pixel(x, y, (0, 0, 255))

#setting the LED matrix
g = (0, 255, 0)
b = (0, 0, 255)
pixels_array = [
g, g, g, g, g, g, g, g,
g, g, g, g, g, g, g, g,
g, b, b, g, g, b, b, g,
g, b, b, g, g, b, b, g,
g, g, g, b, b, g, g, g,
g, g, b, b, b, b, g, g,
g, g, b, b, b, b, g, g,
g, g, b, g, g, b, g, g
]
sense.set_pixels(pixels_array)
