Difference between revisions of "Riot-OS Setup"
| (5 intermediate revisions by one other user not shown) | |||
| Line 54: | Line 54: | ||
For now: you will have to do this in the bash where you build your application - after each restart. | For now: you will have to do this in the bash where you build your application - after each restart. | ||
Add toolchain permanently to PATH (otherwise it's necessary to do it manually after every restart): | |||
vim ~/.profile | |||
and/or | |||
vim ~/.bashrc | |||
Add the following line to the bottom and save (adapt to your used ARM toolchain!): | |||
export PATH=$PATH:<path to unzipped folder>/gcc-arm-none-eabi-9-2020-q2-update/bin | |||
Apply changes for current shell: | |||
source ~/.profile | |||
source ~/.bashrc | |||
=== Step 3 === | === Step 3 === | ||
| Line 110: | Line 126: | ||
make BOARD=samr21-xpro term | make BOARD=samr21-xpro term | ||
You may also set the BOARD in the Makefile of the application. | Or via <code>pyterm</code> (which is shipped with RIOT-OS): | ||
sudo pip3 install pyserial | |||
cd RIOT/dist/tools/pyterm | |||
./pyterm -p /dev/ttyACM0 | |||
'''You may also set the BOARD in the Makefile of the application.''' | |||
To find out the correct <code>tty</code> when multiple (SAMR21-xpro) boards are connected to your system: | |||
$ cd RIOT/examples/hello-world | |||
$ make list-ttys | |||
/sys/bus/usb/devices/1-3: Atmel Corp. EDBG CMSIS-DAP, serial: 'ATMLXXXXXXX80000XXX1', tty(s): ttyACM0 | |||
/sys/bus/usb/devices/1-2: Atmel Corp. EDBG CMSIS-DAP, serial: 'ATMLXXXXXXX80000XXX2', tty(s): ttyACM1 | |||
If you have multiple boards connected to your computer it is necessary to provide the serial during flashing: | |||
BOARD=samr21-xpro SERIAL="ATMLXXXXXXX80000XXX1" make flash | |||
== Used Hardware == | == Used Hardware == | ||
[[Atmel SAM R21 Xplained Pro Evaluation Platform]] | * Remote IoTLab [[Atmel SAM R21 Xplained Pro Evaluation Platform]] | ||
* [[Atmel_SAM_R21_Xplained_Pro]] | |||
== Courses == | |||
* [[Mobile and Embedded Security]] (2019-) | |||
== RIOT More Information/Resources/Links == | |||
* [[RIOT-OS_and_IEEE_802.15.4_/_6LoWPAN|Wiki: RIOT-OS and IEEE 802.15.4 / 6LoWPAN]] | |||
* [[Raspberry_Pi_3B%2B_802.15.4/6LoWPAN_Setup|Wiki: Raspberry Pi 3B+ 802.15.4/6LoWPAN Setup]] | |||
* Paper (optional): Baccelli, Emmanuel, et al. _"RIOT: An open source operating system for low-end embedded devices in the IoT."_ IEEE Internet of Things Journal 5.6 (2018): 4428-4440. | |||
* Riot-OS Setup (ELVIS Wiki): https://wiki.elvis.science/index.php?title=Riot-OS_Setup | |||
** RIOT-OS+SAMR21 Setup (CoMatrix): https://comatrix.eu/setup/samr21_and_RIOT-OS/ | |||
* RIOT-OS Github repository: https://github.com/RIOT-OS/RIOT | |||
** Examples: https://github.com/RIOT-OS/RIOT/tree/master/examples | |||
** Tests: https://github.com/RIOT-OS/RIOT/tree/master/tests | |||
* Getting Started: https://doc.riot-os.org/getting-started.html | |||
** Introduction: https://github.com/RIOT-OS/RIOT/wiki/Introduction | |||
** Changelog/Release Notes: https://doc.riot-os.org/changelog.html | |||
** Use Docker to build RIOT: | |||
*** https://doc.riot-os.org/getting-started.html#docker | |||
*** https://doc.riot-os.org/build-in-docker.html | |||
*** Podman: https://github.com/RIOT-OS/RIOT/pull/18671 | |||
* API documentation: https://doc.riot-os.org/ | |||
* Wiki: https://github.com/RIOT-OS/RIOT/wiki | |||
** FAQ: https://github.com/RIOT-OS/RIOT/wiki/FAQ | |||
** Best Practice for RIOT Programming: https://github.com/RIOT-OS/RIOT/wiki/Best-Practice-for-RIOT-Programming | |||
* Tutorials: https://github.com/RIOT-OS/Tutorials | |||
** RIOT online course: https://github.com/RIOT-OS/riot-course | |||
** RIOT Beginner Tutorial - RIOT Summit 2021: https://riot-os.github.io/riot-course/slides/tutorial-summit-networking/ | |||
** Networking in RIOT: https://riot-os.github.io/riot-course/slides/04-networking-in-riot/ | |||
** RIOT Tutorial - IoT Security with Microcontrollers: https://riot-os.github.io/riot-course/slides/tutorial-summit-security | |||
* Forum: https://forum.riot-os.org/ | |||
** Matrix Channel: https://matrix.to/#/#riot-os:matrix.org | |||
* ... and slides from Silvie | |||
* pyterm is an alternative to Moserial | |||
** i.e. implicit use with <code>make BOARD=samr21-xpro term</code> | |||
* <code>make list-ttys</code>: returns the list of serial ports available with information on the board connected (useful when working with multiple boards) | |||
** afterwards e.g. <code>make term SERIAL="1232135328821"`</code> | |||
* <code>make debug</code> | |||
* '''Remember that the examples directory is very helpful - as well as the test directories :)''' | |||
== References == | == References == | ||
Latest revision as of 19:22, 28 November 2023
Summary
Setting up Riot-OS on a Atmel SAM R21 Xpro Board.
Requirements
- Operating system: Ubuntu 20.04
- Packages: git
Description
Step 1
Install the following packages
sudo apt-get update
sudo apt-get install git
                     openocd
                     gcc-multilib
                     build-essential
                     python3-serial
                     libudev-dev
                     moserial
Step 2
Install the toolchain
sudo apt-get install gcc-arm-none-eabi
If you use a recent version of RIOT-OS (Release-2021.07) you can go on with Step 3.
If you use an older RIOT-OS version, you will have to do the following steps:
Goto https://developer.arm.com/tools-and-software/open-source-software/developer-tools/gnu-toolchain/gnu-rm and download
gcc-arm-none-eabi-7-2018-q2-update-linux.tar.bz2
Move it to your home directory.
Uninstall old packages
sudo apt remove binutils-arm-none-eabi gcc-arm-none-eabi libnewlib-arm-none-eabi
Unzip the downloaded file
tar -xjvf gcc-arm-none-eabi-7-2018-q2-update-linux.tar.bz2
Add the toolchain to your path
export PATH=$PATH:/home/(your user)/gcc-arm-none-eabi-7-2018-q2-update/bin/
For now: you will have to do this in the bash where you build your application - after each restart.
Add toolchain permanently to PATH (otherwise it's necessary to do it manually after every restart):
vim ~/.profile
and/or
vim ~/.bashrc
Add the following line to the bottom and save (adapt to your used ARM toolchain!):
export PATH=$PATH:<path to unzipped folder>/gcc-arm-none-eabi-9-2020-q2-update/bin
Apply changes for current shell:
source ~/.profile
source ~/.bashrc
Step 3
Download Riot-OS
git clone https://github.com/RIOT-OS/RIOT.git myRIOT
Move to the "Hello World"-Example
cd myRIOT/examples/hello-world
Build the application on "native"
make all term
Now, you should see this output in your terminal:
RIOT native interrupts/signals initialized.
LED_RED_OFF
LED_GREEN_ON
RIOT native board initialized.
RIOT native hardware initialization complete.

main(): This is RIOT! (Version: 2022.01-devel-129-g554d3)
Hello World!
You are running RIOT on a(n) native board.
This board features a(n) native MCU.
Step 4
Build and run "Hello World" on the SAM R21 Board.
Set the rights for your username to be able to flash the application on the board.
sudo usermod -a -G dialout <username>
Then reboot your computer.
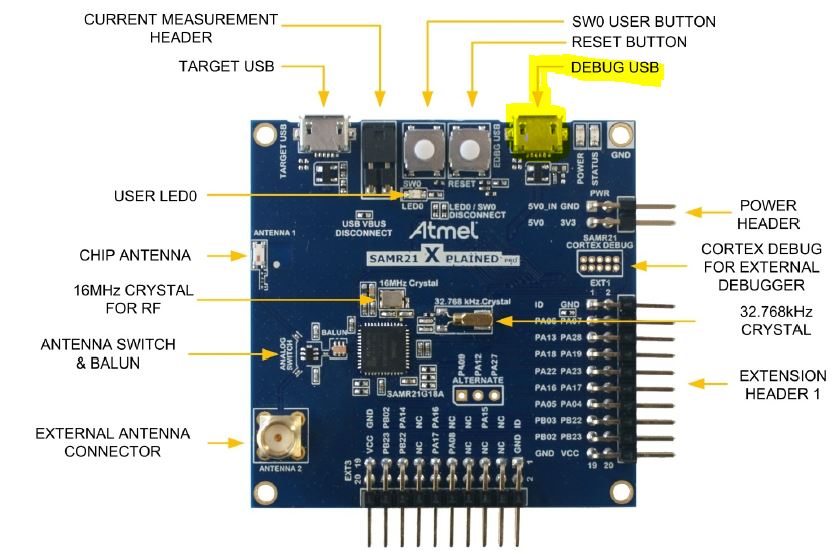
Connect the board to your computer via micro USB cable (USB EDBG interface).
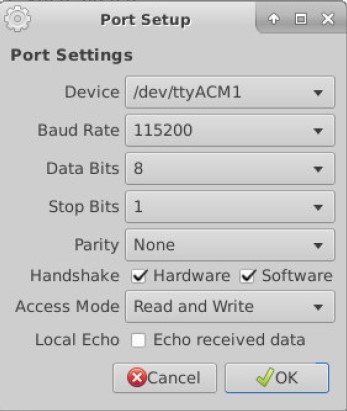
Connect via Moserial.
Build and flash the application.
cd myRIOT/examples/hello-world
make BOARD=samr21-xpro
make BOARD=samr21-xpro flash
If you do not use a serial terminal like moserial or terraterm use term
make BOARD=samr21-xpro term
Or via pyterm (which is shipped with RIOT-OS):
sudo pip3 install pyserial
cd RIOT/dist/tools/pyterm
./pyterm -p /dev/ttyACM0
You may also set the BOARD in the Makefile of the application.
To find out the correct tty when multiple (SAMR21-xpro) boards are connected to your system:
$ cd RIOT/examples/hello-world
$ make list-ttys
/sys/bus/usb/devices/1-3: Atmel Corp. EDBG CMSIS-DAP, serial: 'ATMLXXXXXXX80000XXX1', tty(s): ttyACM0
/sys/bus/usb/devices/1-2: Atmel Corp. EDBG CMSIS-DAP, serial: 'ATMLXXXXXXX80000XXX2', tty(s): ttyACM1
If you have multiple boards connected to your computer it is necessary to provide the serial during flashing:
BOARD=samr21-xpro SERIAL="ATMLXXXXXXX80000XXX1" make flash
Used Hardware
Courses
- Mobile and Embedded Security (2019-)
RIOT More Information/Resources/Links
- Wiki: RIOT-OS and IEEE 802.15.4 / 6LoWPAN
- Wiki: Raspberry Pi 3B+ 802.15.4/6LoWPAN Setup
- Paper (optional): Baccelli, Emmanuel, et al. _"RIOT: An open source operating system for low-end embedded devices in the IoT."_ IEEE Internet of Things Journal 5.6 (2018): 4428-4440.
- Riot-OS Setup (ELVIS Wiki): https://wiki.elvis.science/index.php?title=Riot-OS_Setup
- RIOT-OS+SAMR21 Setup (CoMatrix): https://comatrix.eu/setup/samr21_and_RIOT-OS/
- RIOT-OS Github repository: https://github.com/RIOT-OS/RIOT
- Getting Started: https://doc.riot-os.org/getting-started.html
- Introduction: https://github.com/RIOT-OS/RIOT/wiki/Introduction
- Changelog/Release Notes: https://doc.riot-os.org/changelog.html
- Use Docker to build RIOT:
- API documentation: https://doc.riot-os.org/
- Wiki: https://github.com/RIOT-OS/RIOT/wiki
- FAQ: https://github.com/RIOT-OS/RIOT/wiki/FAQ
- Best Practice for RIOT Programming: https://github.com/RIOT-OS/RIOT/wiki/Best-Practice-for-RIOT-Programming
- Tutorials: https://github.com/RIOT-OS/Tutorials
- RIOT online course: https://github.com/RIOT-OS/riot-course
- RIOT Beginner Tutorial - RIOT Summit 2021: https://riot-os.github.io/riot-course/slides/tutorial-summit-networking/
- Networking in RIOT: https://riot-os.github.io/riot-course/slides/04-networking-in-riot/
- RIOT Tutorial - IoT Security with Microcontrollers: https://riot-os.github.io/riot-course/slides/tutorial-summit-security
- Forum: https://forum.riot-os.org/
- Matrix Channel: https://matrix.to/#/#riot-os:matrix.org
- ... and slides from Silvie
- pyterm is an alternative to Moserial
- i.e. implicit use with
make BOARD=samr21-xpro term
- i.e. implicit use with
make list-ttys: returns the list of serial ports available with information on the board connected (useful when working with multiple boards)- afterwards e.g.
make term SERIAL="1232135328821"`
- afterwards e.g.
make debug- Remember that the examples directory is very helpful - as well as the test directories :)

