Difference between revisions of "WebAuthn"
Sprochazka (talk | contribs) |
(Added Codesnippets of the API integration. Explained the parameters needed to perform the call. Also explained the reply from the call.) |
||
| (68 intermediate revisions by 3 users not shown) | |||
| Line 1: | Line 1: | ||
[[File:webauthn_logo.PNG|500px|thumb|WebAuthn logo<ref name="webauthn" />]] | |||
== Summary == | == Summary == | ||
| Line 5: | Line 7: | ||
== Goal == | == Goal == | ||
Its purpose is to offer a more secure and easy possibility to log into your online accounts without storing or remembering huge amounts of passwords to prevent the possibility of passwords getting leaked or forgotten. | Its purpose is to offer a more secure and easy possibility to log into your online accounts without storing or remembering huge amounts of passwords to prevent the possibility of passwords getting leaked or forgotten. | ||
== Architecture <ref name="overview" /> == | |||
[[File:FIDO2-WebAuthn_Architecture.PNG|thumb|600px|FIDO2/WebAuthn Architecture<ref name="overview" />]] | |||
;''' Authenticator ''' | |||
The authenticator creates credentials, generates cryptographic proof of user authentication and administrate the PIN. | |||
There are two types of authenticators: | |||
*external authenticator (e.g. security key) that is removable from the device | |||
*internal authenticator (e.g. fingerprint reader) that is implemented on the device | |||
;'''Client/Platform''' | |||
The client implements CTAP2 and client-side WebAuthn API and proves the validity of the identity of the Relying Party to prevent phishing attacks. | |||
The client could be a browser for web applications or an operating system subsystem that offers a platform-specific FIDO API for mobile or desktop apps. | |||
;'''Relying Party (RP)''' | |||
The Relying Party consists of at least one webserver, the server-side parts of the WebAuthn API and a WebAuthn Server, that has a trust store. | |||
The trust store contains the public trust parts for the attestation of the authenticator. | |||
== Functionality == | == Functionality == | ||
| Line 10: | Line 32: | ||
'''The Registration:''' | '''The Registration:''' | ||
The Registration involves a Relying Party and the user client that must host at least one authenticator. To register, the user has to navigate to the website where he wishes to use Web Authentication and sign in using the method that was used to this point, which means for example a password. After that it is to choose to register this site from now an using Web Authentication, which leads to the request to submit the configures authorization gesture. When the provided gesture is accepted, the registrations is complete. | The Registration involves a Relying Party, the server that hosts the Website, and the user client that must host at least one authenticator. To register, the user has to navigate to the website where he wishes to use Web Authentication and sign in using the method that was used to this point, which means for example a password. After that it is to choose to register this site from now an using Web Authentication, which leads to the request to submit the configures authorization gesture. When the provided gesture is accepted, the registrations is complete. | ||
'''The Authentication:''' | '''The Authentication:''' | ||
For the user, the authentication using the Web Authenticator works seemingly as a normal login with just the difference that instead of typing a password to verify its identity, the user uses the same Authentication gesture that he used to register to the site. | For the user, the authentication using the Web Authenticator works seemingly as a normal login with just the difference that instead of typing a password to verify its identity, the user uses the same Authentication gesture that he used to register to the site. | ||
== Examples == | |||
=== Login WebAuthn test website === | |||
[[File:webauthn_1.PNG|400px]] | |||
First you have to navigate to the Website where you want to change the default login to WebAuthn, in this case it is the test website of WebAuthn, the link is provided below, so we create a new user and pick the option TPM for we are going to use the inbuilt fingerprint sensor of the laptop to verify our identity. | |||
<br /> | |||
<br /> | |||
[[File:webauthn2.PNG|300px]] | |||
The security feature now asks us to verify the identity with the same Authenticatior you want to use every time you log into the website. The choice will be stored with your ID and used every time you login. | |||
<br /> | |||
<br /> | |||
[[File:webauthn3.PNG|600px]] | |||
The login was a success and now we are able to login just using our fingerprint. | |||
<br /> | |||
<br /> | |||
[[File:webauthn4.PNG|300px]] | |||
You are ask to provide the same authentication which you used to login, in this case the fingerprint. | |||
<br /> | |||
<br /> | |||
[[File:webauthn5.PNG|800px]] | |||
If everything goes well, you are now logged in just using a fingerprint sensor! | |||
<br /> | |||
<br /> | |||
Try it out for yourself! | |||
[https://webauthn.io/ WebAuthn Demo] | |||
---- | |||
=== Passwordless Login === | |||
This example shows how to add a security key to the Microsoft account and how to log in to the account without a username and password. | |||
A passwordless login to the MS account was tested with the following in every possible combination (OS+Browser+Security Key): | |||
{| class="wikitable" | |||
|- | |||
! scope="col"| Operating System | |||
! scope="col"| Browser | |||
! scope="col"| Security Key | |||
! scope="col"| Successful | |||
|- | |||
| Windows 10 | |||
| Google Chrome<br />Microsoft Edge<br />Mozilla Firefox<br />Opera | |||
| [[Yubico Security Key]]<br />[[Yubikey 5 C]]<br />[[Yubikey 5 NFC]]<br />[https://www.yubico.com/at/product/yubikey-5c-nfc/ Yubikey 5C NFC] | |||
| Yes | |||
|- | |||
| Android 9 | |||
| Google Chrome<br />Microsoft Edge<br />Mozilla Firefox<br />Opera | |||
| Security Keys are not supported <br />to login to the MS account | |||
| No | |||
|} | |||
Assumption: one has a Microsoft account but has not yet added a security key | |||
1. Sign in with your '''username''' and '''password'''. | |||
2. Go to '''''Security>Advanced Security Options'''''. | |||
3. Click on '''''Add a new way to sign in or verify'''''. | |||
[[File:FIDO2-WebAuthn_pwless_1.PNG|none|800px|]] | |||
<br /> | |||
4. The window shows the additional options to verify or sign in. Select '''''Use a security key'''''. | |||
[[File:FIDO2-WebAuthn_pwless_2.PNG|none|300px]] | |||
<br /> | |||
5. Read the instruction for your prefered method (USB or NFC) to register the security key. In this example USB was chosen. | |||
[[File:FIDO2-WebAuthn_pwless_3.PNG|none|600px]] | |||
<br /> | |||
6. Enter the PIN. | |||
[[File:FIDO2-WebAuthn_pwless_pin.png|none|300px]] | |||
<br /> | |||
7. Touch the button of the security key. | |||
[[File:FIDO2-WebAuthn_pwless_touch.PNG|none|300px]] | |||
<br /> | |||
8. Name the added security key. It is recommended to add more than one security key. Naming the security keys helps to distinguish them. | |||
[[File:FIDO2-WebAuthn_pwless_keyname.PNG|none|300px]] | |||
<br /> | |||
9. The key is now registered. | |||
[[File:FIDO2-WebAuthn_pwless_finish.png|none|500px]] | |||
<br /> | |||
No username and password are needed for the next login with the added key. | |||
<br /> | |||
'''Login:'''<br /> | |||
1. Select '''''Sign in with a security key'''''. | |||
[[File:FIDO2-WebAuthn_pwless_login.PNG|none|300px]] | |||
<br /> | |||
2. Enter the PIN. | |||
[[File:FIDO2-WebAuthn_pwless_login_pin.PNG|none|300px]] | |||
<br /> | |||
3. Touch the button of the security key. | |||
[[File:FIDO2-WebAuthn_pwless_login_touch.PNG|none|300px]] | |||
<br /> | |||
If these steps were successful, the user is logged in. | |||
---- | |||
=== Second Factor Login === | |||
This example shows how to add a security key to the Google account and how to log in to the account with the second factor method. | |||
The second factor login to the Google account was tested with the following in every possible combination (OS+Browser+Security Key): | |||
{| class="wikitable" | |||
|- | |||
! scope="col"| Operating System | |||
! scope="col"| Browser | |||
! scope="col"| Security Key | |||
! scope="col"| Successful | |||
|- | |||
| Windows 10 | |||
| Google Chrome<br />Microsoft Edge<br />Mozilla Firefox<br />Opera | |||
| [[Yubico Security Key]]<br />[[Yubikey 5 C]]<br />[[Yubikey 5 NFC]]<br />[https://www.yubico.com/at/product/yubikey-5c-nfc/ Yubikey 5C NFC] | |||
| Yes | |||
|- | |||
| rowspan="3"|Android 9 | |||
| rowspan="2"|Google Chrome | |||
| [[Yubico Security Key]]<br /> (USB A and no NFC) | |||
| No | |||
|- | |||
|[[Yubikey 5 C]]<br />[[Yubikey 5 NFC]]<br />[https://www.yubico.com/at/product/yubikey-5c-nfc/ Yubikey 5C NFC] | |||
| Yes | |||
|- | |||
| Microsoft Edge<br />Mozilla Firefox<br />Opera | |||
| Security Keys are not supported on<br />this device or in this browser | |||
| No | |||
|} | |||
Assumption: one has a Google account but has not yet added a security key | |||
1. Sign in with '''username''' and '''password'''. | |||
2. Click on the profile on the top right and select '''''Manage your Google Account'''''. | |||
3. Go to '''''Security'''''. | |||
4. Select '''''2-Step Verification'''''. | |||
[[File:FIDO2_2Step_1.PNG|none|500px]] | |||
<br /> | |||
5. Enter your '''password'''. | |||
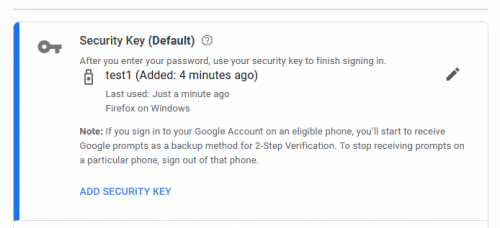
6. Google shows the options that can be used for the 2-Step Verification. Choose '''''ADD SECURITY KEY'''''. | |||
[[File:FIDO2_2Step_2.PNG|none|500px]] | |||
<br /> | |||
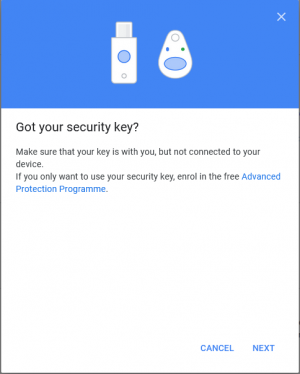
7. Get your security key and select '''''Next''''' to continue the process. | |||
[[File:FIDO2_2Step_3.PNG|none|300px]] | |||
<br /> | |||
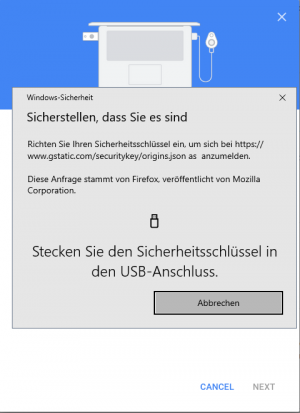
8. Insert the security key into the USB port. | |||
[[File:FIDO2_2Step_4.PNG|none|300px]] | |||
<br /> | |||
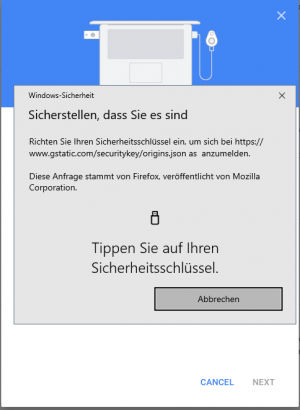
9. Tap on the button of the security key. | |||
[[File:FIDO2_2Step_5.PNG|none|300px]] | |||
<br /> | |||
10. Name the security key (optional) | |||
[[File:FIDO2_2Step_6.PNG|none|300px]] | |||
<br /> | |||
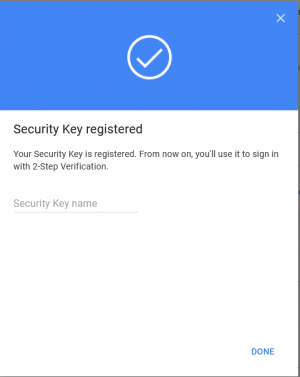
11. The key is registered now. | |||
[[File:FIDO2_2Step_7.PNG|none|500px]] | |||
<br /> | |||
'''Login:''' | |||
1. Enter your '''username'''. | |||
2. Enter your '''password'''. | |||
3. Tap on the security key. | |||
[[File:FIDO2_2Step_login_1.PNG|none|300px]] | |||
<br /> | |||
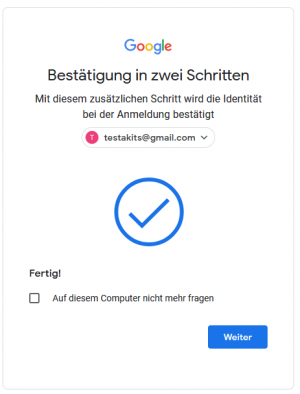
4. Select '''''Next''''' to finish the process. Optionally, you can select if the security key on this device should no longer be used for logging in to the Google account. | |||
[[File:FIDO2_2Step_login_2.PNG|none|300px]] | |||
<br /> | |||
== Integrating the API == | |||
===Create Credentials === | |||
[[File:CreateWebauthn.jpg|500px|Codesnippet that shows API call to Create Credentials.]] | |||
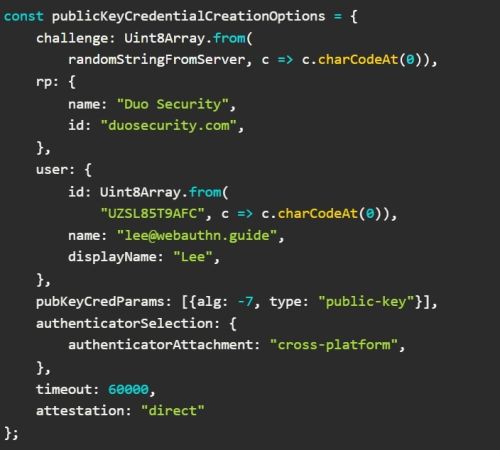
*'''challenge:''' The challenge is a buffer of cryptographically random bytes generated on the server, necessary to prevent "replay attacks." | |||
*'''rp:''' Short for “relying party,” it describes the organization responsible for registering and authenticating the user. The id must be a subset of the domain currently in the browser. For example, a valid id for this page is webauthn.guide. | |||
*'''user:''' This contains information about the user currently registering. The authenticator uses the id to associate a credential with the user. It is advisable not to use personally identifying information as the id, as it may be stored in an authenticator. | |||
*'''pubKeyCredParams:''' An array of objects describing acceptable public key types to a server. The alg is a number described in the COSE registry; for example, -7 indicates that the server accepts Elliptic Curve public keys using a SHA-256 signature algorithm. | |||
*'''authenticatorSelection:''' This optional object aids relying parties in imposing additional restrictions on the type of authenticators allowed for registration. In this example, we indicate a preference for registering a cross-platform authenticator (like a Yubikey) instead of a platform authenticator like Windows Hello or Touch ID. | |||
*'''timeout:''' The time (in milliseconds) that the user has to respond to a prompt for registration before an error is returned. | |||
*'''attestation:''' The attestation data returned from the authenticator contains information that could be used to track users. This option allows servers to indicate the importance of the attestation data to this registration event. A value of "none" indicates that the server does not prioritize attestation. A value of "indirect" means that the server will allow anonymized attestation data. "Direct" means that the server wishes to receive attestation data directly from the authenticator. | |||
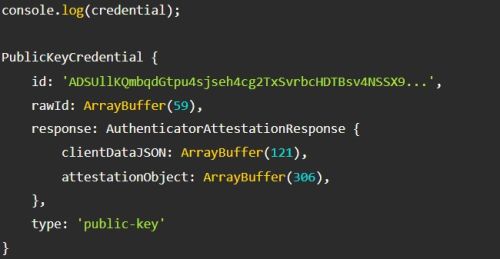
The object obtained from the create() call, representing the credential, includes the public key and additional attributes essential for validating the registration event. | |||
The | [[File:CreateCredentialsResponseWebauthn.jpg|500px]] | ||
*'''id:''' An identifier for the recently generated credential, serving as a means to identify the credential during user authentication. The ID is presented here as a base64-encoded string. | |||
*'''rawId:''' Once again, the identifier, now in binary form. | |||
*'''clientDataJSON:''' This signifies the data transmitted from the browser to the authenticator, facilitating the association of the new credential with the server and browser. The authenticator provides it as a UTF-8 byte array. | |||
*'''attestationObject:''' Containing the credential public key, an optional attestation certificate, and additional metadata for validating the registration event, this object is encoded in CBOR as binary data. | |||
=== Authenticate the User === | |||
[[File:Authenticatewebauthn.jpg|500px|Codesnippet that shows API call to authenticate a user.]] | |||
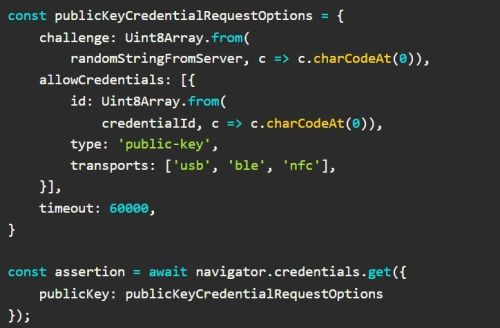
The API call is made by calling the navigator.credentials.get() method | |||
The API call has to meet a certain criteria. Some input parameters have to be set: | |||
*'''challenge:''' This needs to be bytes generated cryptographically on the server. | |||
*'''allowCredentials:''' This array informs the browser about the credentials the server wishes the user to authenticate with. The credentialId, obtained and stored during registration, is included here. Optionally, the server can specify preferred transports such as USB, NFC, and Bluetooth. | |||
*'''timeout:''' Similar to the registration process, this can optionally specify the time (in milliseconds) allowed for the user to respond to an authentication prompt. | |||
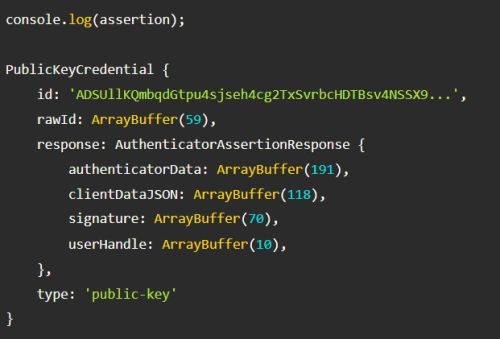
The object returned from the get() call is once more a PublicKeyCredential object. It differs slightly from the one received during registration; notably, it contains a signature member and omits the public key. | |||
[[File:AssertionOutputWebauthn.jpg|500px|Assertion Object received from api call]] | |||
*'''id:''' Identifies the credential used to generate the authentication assertion. | |||
*'''rawId:''' Represents the identifier in binary form. | |||
*'''authenticatorData:''' Similar to the authData received during registration, excluding the public key. It serves as source bytes for generating the assertion signature during authentication. | |||
*'''clientDataJSON:''' Like during registration, clientDataJSON is a set of data transmitted from the browser to the authenticator. It contributes as source bytes for generating the signature during authentication. | |||
*'''signature:''' Generated by the private key linked to this credential, the signature is verified on the server using the public key. | |||
*'''userHandle:''' Optionally provided by the authenticator, userHandle represents the user.id from registration. Encoded as a UTF-8 byte array, it aids in associating this assertion with the user on the server. | |||
== References == | == References == | ||
* https://webauthn.guide/#about-webauthn | * https://webauthn.guide/#about-webauthn | ||
* https://www.w3.org/TR/webauthn/ | * https://www.w3.org/TR/webauthn/ | ||
<references> | |||
<ref name="webauthn">https://webauthn.io</ref> | |||
<ref name="overview">https://developers.yubico.com/WebAuthn/WebAuthn_Developer_Guide/</ref> | |||
</references> | |||
[[Category:Documentation]] | [[Category:Documentation]] | ||
Latest revision as of 16:50, 25 January 2024
Summary
WebAuthn is an Application created by the FIDO (Fast Identity Online) alliance and the W3C (World Wide Web Consortium) to offer the possibility of passwordless authentication online. The latest recommendation is of March 2019 published by the W3C. Instead WebAuthn work either with the inbuild Authenticator of the device, such as fingerprint sensor or facial recognition, or with an extern media like an USB Stick for verification.
Goal
Its purpose is to offer a more secure and easy possibility to log into your online accounts without storing or remembering huge amounts of passwords to prevent the possibility of passwords getting leaked or forgotten.
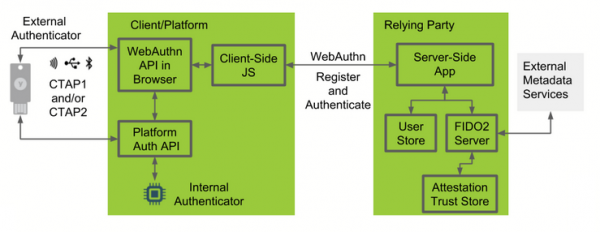
Architecture [2]
- Authenticator
The authenticator creates credentials, generates cryptographic proof of user authentication and administrate the PIN.
There are two types of authenticators:
- external authenticator (e.g. security key) that is removable from the device
- internal authenticator (e.g. fingerprint reader) that is implemented on the device
- Client/Platform
The client implements CTAP2 and client-side WebAuthn API and proves the validity of the identity of the Relying Party to prevent phishing attacks. The client could be a browser for web applications or an operating system subsystem that offers a platform-specific FIDO API for mobile or desktop apps.
- Relying Party (RP)
The Relying Party consists of at least one webserver, the server-side parts of the WebAuthn API and a WebAuthn Server, that has a trust store. The trust store contains the public trust parts for the attestation of the authenticator.
Functionality
WebAuthn works with two ceremonies:
The Registration: The Registration involves a Relying Party, the server that hosts the Website, and the user client that must host at least one authenticator. To register, the user has to navigate to the website where he wishes to use Web Authentication and sign in using the method that was used to this point, which means for example a password. After that it is to choose to register this site from now an using Web Authentication, which leads to the request to submit the configures authorization gesture. When the provided gesture is accepted, the registrations is complete.
The Authentication: For the user, the authentication using the Web Authenticator works seemingly as a normal login with just the difference that instead of typing a password to verify its identity, the user uses the same Authentication gesture that he used to register to the site.
Examples
Login WebAuthn test website
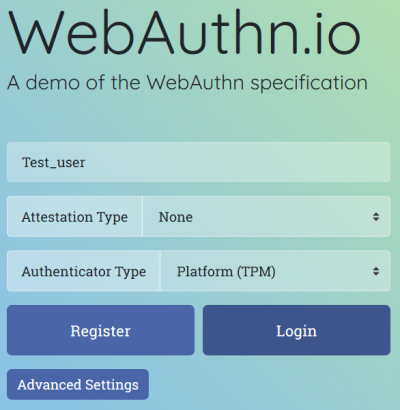
First you have to navigate to the Website where you want to change the default login to WebAuthn, in this case it is the test website of WebAuthn, the link is provided below, so we create a new user and pick the option TPM for we are going to use the inbuilt fingerprint sensor of the laptop to verify our identity.
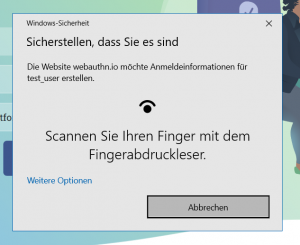
The security feature now asks us to verify the identity with the same Authenticatior you want to use every time you log into the website. The choice will be stored with your ID and used every time you login.
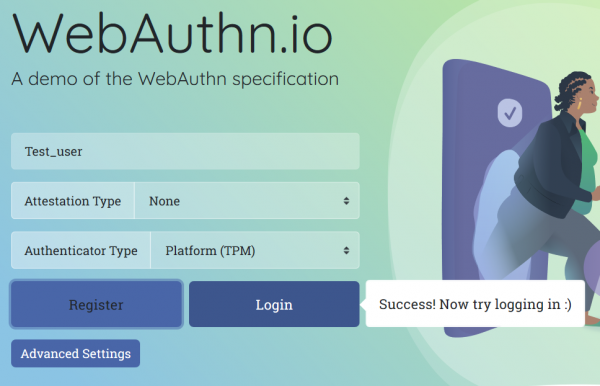
The login was a success and now we are able to login just using our fingerprint.
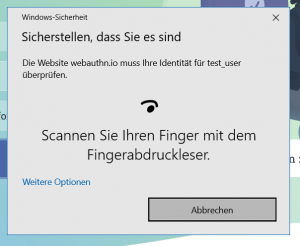
You are ask to provide the same authentication which you used to login, in this case the fingerprint.
If everything goes well, you are now logged in just using a fingerprint sensor!
Try it out for yourself! WebAuthn Demo
Passwordless Login
This example shows how to add a security key to the Microsoft account and how to log in to the account without a username and password.
A passwordless login to the MS account was tested with the following in every possible combination (OS+Browser+Security Key):
| Operating System | Browser | Security Key | Successful |
|---|---|---|---|
| Windows 10 | Google Chrome Microsoft Edge Mozilla Firefox Opera |
Yubico Security Key Yubikey 5 C Yubikey 5 NFC Yubikey 5C NFC |
Yes |
| Android 9 | Google Chrome Microsoft Edge Mozilla Firefox Opera |
Security Keys are not supported to login to the MS account |
No |
Assumption: one has a Microsoft account but has not yet added a security key
1. Sign in with your username and password.
2. Go to Security>Advanced Security Options.
3. Click on Add a new way to sign in or verify.
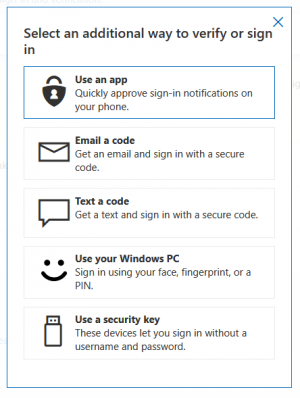
4. The window shows the additional options to verify or sign in. Select Use a security key.
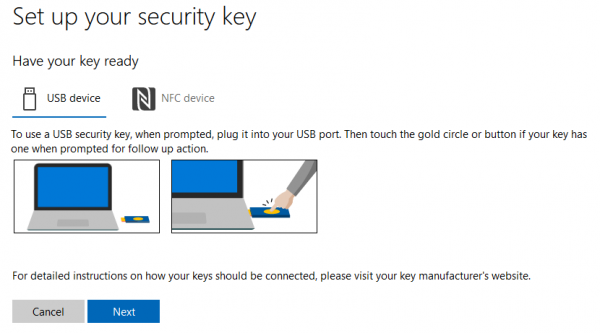
5. Read the instruction for your prefered method (USB or NFC) to register the security key. In this example USB was chosen.
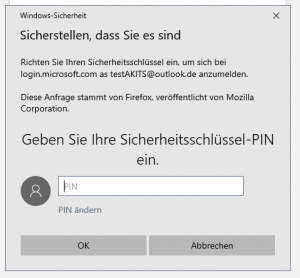
6. Enter the PIN.
7. Touch the button of the security key.
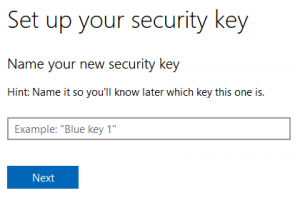
8. Name the added security key. It is recommended to add more than one security key. Naming the security keys helps to distinguish them.
9. The key is now registered.
No username and password are needed for the next login with the added key.
Login:
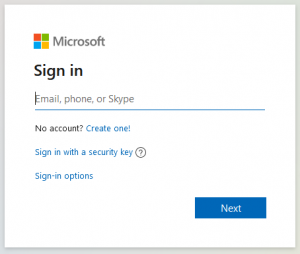
1. Select Sign in with a security key.
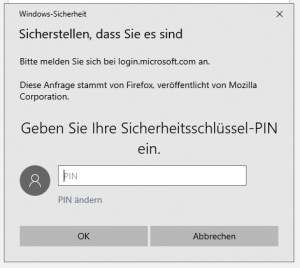
2. Enter the PIN.
3. Touch the button of the security key.
If these steps were successful, the user is logged in.
Second Factor Login
This example shows how to add a security key to the Google account and how to log in to the account with the second factor method.
The second factor login to the Google account was tested with the following in every possible combination (OS+Browser+Security Key):
| Operating System | Browser | Security Key | Successful |
|---|---|---|---|
| Windows 10 | Google Chrome Microsoft Edge Mozilla Firefox Opera |
Yubico Security Key Yubikey 5 C Yubikey 5 NFC Yubikey 5C NFC |
Yes |
| Android 9 | Google Chrome | Yubico Security Key (USB A and no NFC) |
No |
| Yubikey 5 C Yubikey 5 NFC Yubikey 5C NFC |
Yes | ||
| Microsoft Edge Mozilla Firefox Opera |
Security Keys are not supported on this device or in this browser |
No |
Assumption: one has a Google account but has not yet added a security key
1. Sign in with username and password.
2. Click on the profile on the top right and select Manage your Google Account.
3. Go to Security.
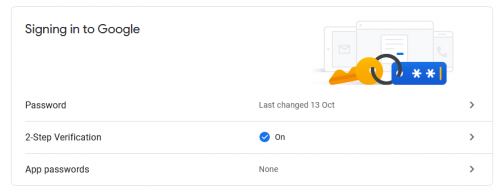
4. Select 2-Step Verification.
5. Enter your password.
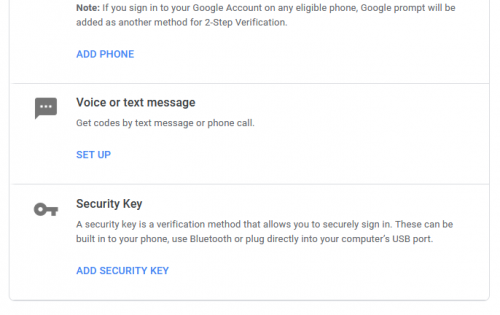
6. Google shows the options that can be used for the 2-Step Verification. Choose ADD SECURITY KEY.
7. Get your security key and select Next to continue the process.
8. Insert the security key into the USB port.
9. Tap on the button of the security key.
10. Name the security key (optional)
11. The key is registered now.
Login:
1. Enter your username.
2. Enter your password.
3. Tap on the security key.
4. Select Next to finish the process. Optionally, you can select if the security key on this device should no longer be used for logging in to the Google account.
Integrating the API
Create Credentials
- challenge: The challenge is a buffer of cryptographically random bytes generated on the server, necessary to prevent "replay attacks."
- rp: Short for “relying party,” it describes the organization responsible for registering and authenticating the user. The id must be a subset of the domain currently in the browser. For example, a valid id for this page is webauthn.guide.
- user: This contains information about the user currently registering. The authenticator uses the id to associate a credential with the user. It is advisable not to use personally identifying information as the id, as it may be stored in an authenticator.
- pubKeyCredParams: An array of objects describing acceptable public key types to a server. The alg is a number described in the COSE registry; for example, -7 indicates that the server accepts Elliptic Curve public keys using a SHA-256 signature algorithm.
- authenticatorSelection: This optional object aids relying parties in imposing additional restrictions on the type of authenticators allowed for registration. In this example, we indicate a preference for registering a cross-platform authenticator (like a Yubikey) instead of a platform authenticator like Windows Hello or Touch ID.
- timeout: The time (in milliseconds) that the user has to respond to a prompt for registration before an error is returned.
- attestation: The attestation data returned from the authenticator contains information that could be used to track users. This option allows servers to indicate the importance of the attestation data to this registration event. A value of "none" indicates that the server does not prioritize attestation. A value of "indirect" means that the server will allow anonymized attestation data. "Direct" means that the server wishes to receive attestation data directly from the authenticator.
The object obtained from the create() call, representing the credential, includes the public key and additional attributes essential for validating the registration event.
- id: An identifier for the recently generated credential, serving as a means to identify the credential during user authentication. The ID is presented here as a base64-encoded string.
- rawId: Once again, the identifier, now in binary form.
- clientDataJSON: This signifies the data transmitted from the browser to the authenticator, facilitating the association of the new credential with the server and browser. The authenticator provides it as a UTF-8 byte array.
- attestationObject: Containing the credential public key, an optional attestation certificate, and additional metadata for validating the registration event, this object is encoded in CBOR as binary data.
Authenticate the User
The API call is made by calling the navigator.credentials.get() method The API call has to meet a certain criteria. Some input parameters have to be set:
- challenge: This needs to be bytes generated cryptographically on the server.
- allowCredentials: This array informs the browser about the credentials the server wishes the user to authenticate with. The credentialId, obtained and stored during registration, is included here. Optionally, the server can specify preferred transports such as USB, NFC, and Bluetooth.
- timeout: Similar to the registration process, this can optionally specify the time (in milliseconds) allowed for the user to respond to an authentication prompt.
The object returned from the get() call is once more a PublicKeyCredential object. It differs slightly from the one received during registration; notably, it contains a signature member and omits the public key.
- id: Identifies the credential used to generate the authentication assertion.
- rawId: Represents the identifier in binary form.
- authenticatorData: Similar to the authData received during registration, excluding the public key. It serves as source bytes for generating the assertion signature during authentication.
- clientDataJSON: Like during registration, clientDataJSON is a set of data transmitted from the browser to the authenticator. It contributes as source bytes for generating the signature during authentication.
- signature: Generated by the private key linked to this credential, the signature is verified on the server using the public key.
- userHandle: Optionally provided by the authenticator, userHandle represents the user.id from registration. Encoded as a UTF-8 byte array, it aids in associating this assertion with the user on the server.
