Hak5 LAN Turtle
Summary

The LAN turtle is a tool for penetration testers and system administrators disguised as a simple USB Ethernet adapter. It provides possibilities to perform remote access, man-in-the-middle and information gathering attacks. These functions are provided by the turtle modules which are preinstalled on the LAN turtle. The modules are based on the OpenWRT platform which allow users to add customized modules. The turtle itself is covert by a generic USB to Ethernet adapter and can therefore be placed unnoticed in IT infrastructures.
Description
Setting up the LAN Turtle
- Plug the LAN turtle into one of the USB ports of your computer.
- Your computer will get an 172.16.84.x address as soon as the startup sequence of the turtle finished. If not, then you have to statically configure an IP out of the 172.16.84.0/24 range.
- Connect to the turtle with
ssh root@172.16.84.1and enter the passwordelvisLab(default password after factory reset issh3llz) - The simplistic graphical shell interface will prompt you to change the password but the old one is also allowed.
- The LAN turtle can be configured and modules can be installed within the interface.
- If you end the interface you will be greeted with an normal Linux shell but you can open it again with the
turtlecommand
Updating firmware (optional)
To ensure the best performance and compatability you should update the firmware regularly. This requires internet connection.
- Select
Configin the Main Menu and press select. - Go to
Check for updatesand press select to start the update process. - Wait till the update finishes.
Factory Reset (optional)
In the extreme case that a LAN Turtle has become permanently inaccessible or inoperative, there is a quick method for recovery using a special web interface.
- Download the latest LAN Turtle factory image from the official download center. Note: Choose the factory recovery image.
- Open the LAN Turtle carefully. There are 2 screws under the sticker.
- Now you need to find the reset button/jumper contact. You can find a video on how to locate here.
- Hold down the button/jumper while you're plugging the LAN Turtle in your PC and keep holding it for 5 more seconds.
- Go to http://192.168.1.1 for the firmware web recovery tool and upload the image to the LAN Turtle.
- Wait 5-10 minutes for the recovery to finish, the LAN Turtle will indicate it with a special LED blink pattern. Watch the video for the LED Pattern to know when the recovery has finished.
Using the turtle modules
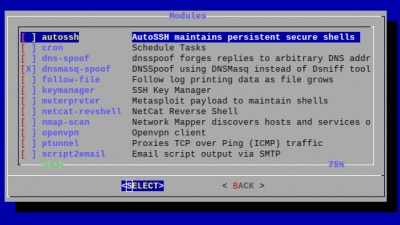
The LAN turtle comes packed with pre-installed tools. Furthermore it is possible to program your own or download them from the internet and configure them with the module manager as well.
Manually download turtle modules
If the module manager doesn't work you need to manually download turtle modules. You can do that in the console of the lan turtle, just exit the main menu. You can download modules from the official hak5 github.
- Change directory to
/etc/turtle/modules - Download modules with
wget <link> - Make the file an executeable
chmod +x <file>
AutoSSH
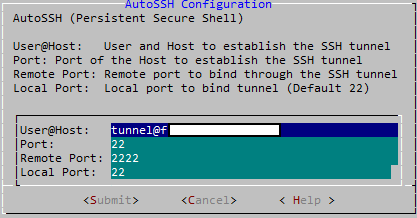
AutoSSH is a service which provides persistent SSH connections. When the LAN-Turtle starts up or if an SSH session drops, it will be quickly re-established by AutoSSH. This service is typically used to provide a convenient and persistent reverse shell into the LAN Turtle on the standard SSH port 22 - though it may be configured with any standard SSH parameters to forward any arbitrary port.
User@Host- The username and hostname (DNS or IP) separated by @ for which to establish the SSH connection.Port- The port number from which the remote server will bind.Remote Port- The port number to which the SSH tunnel will bind on the remote machine.Local Port- The port number to which the SSH Tunnel will terminate on the LAN Turtle.
Example: Per the defaults, the remote server will bind its local port 2222 back to the LAN Turtle port 22. In this scenario one may establish a persistent connection to their LAN Turtle from this reverse shell by first connecting to the public server, and then from there establishing an SSH connection to port 2222.
Clomac
Clomac clones the Client's MAC address into the WAN interface.
Cron
Cron is a job scheduler which can be used to start and stop modules at specific times or regular intervals using the 'start' and 'stop' commands.
DDNSC - Dynamic Domain Name Service Client
This service provides automatic Dynamic Domain Name updates.
DNSSpoof
DNSSpoof forges replies to arbitrary DNS address / pointer queries on the LAN. This is useful in bypassing hostname-based access controls, or in implementing a variety of man-in-the-middle attacks. For example, the IP address returned for a client lookup of the domain \"example.com\" can be replaced with that of the LAN Turtle itself, or a 3rd party server. In this scenario, the computer connected to the Internet through the LAN Turtle attempting to browse to this domain may be redirected to the spoofed IP.
DNSMasq-Spoof
The DNSMasq-Spoof works similar to the DNSSpoof module but uses DNSMasq instead of Dsniff tools.
Keymanager
With this tool you can create RSA keypairs and copy them to the public server. This is required in order to properly configure AutoSSH.
Meterpreter
This module deploys an persistent shell to the Metasploit Framework of an other Machine.
NetCat Reverse Shell
The netcat reverse shell provides you with remote access to the lan turtle. Even though it is not to be considered as persistent per default, its reliability can be increased with simple bash scripts on the server side.
Nmap-Scan
This module uses nmap for discovering running devices and their port of the current LAN network. The user is able to specify a target network range to scan, choose from different scan profiles and specify the directory to write the log file to.
OpenVPN
OpenVPN enables remote access the LAN Turtle and optionally the network on which it resides. It allows to send the captured data to your operating network.
QuickCreds
This module is used to retrieve login credentials from locked windows machines. The credentials are saved to /root/loot. The LAN turtle LED blinks while QuickCreds is running and lights solid when its done. Versions of the LAN turtle that do not support an SD card are not able to install it properly as it requires more space.+
Iodine
Establishes a DNS tunnel outbound to a server and domain name using iodine.
Responder
Responder is a LLMNR, NBT-NS and MDNS posioner. It answers to specific Name Service queries based on ther name suffix. By default, it only answers to File Server Service requests for SMB. It aims to be stealthier on the network and ensure that legitimate NBT-NS behavior is not broken with.
Script2Email
This module sends the output of a script as an email to a specified address. To do so, it uses SMTP and requires a mail account.
Script2Http
Sens the output of a script as HTTP post to a specified URL.
SSHFS
SSHFS (Secure SHell FileSystem) is a file system for Linux (and other operating systems with a FUSE implementation, such as Mac OS X or FreeBSD) capable of operating on files on a remote computer using just a secure shell login on the remote computer. On the local computer where the SSHFS is mounted, the implementation makes use of the FUSE (Filesystem in Userspace) kernel module. The practical effect of this is that the end user can seamlessly interact with remote files being securely served over SSH just as if they were local files on his/her computer. On the remote computer the SFTP subsystem of SSH is used.
Tortle
Tortle makes the turtle act as an TOR Gateway. It enables you to setup several services.
uPnP-Portfwd
This service provides automatic port forwarding when connected to some uPnP enabled routers. This way it is able to provide a persistend direct shell from the outside to the LAN turtle. This won't work in many cases but is useful in cases it does.
Uptime
Displays the uptime of the LAN Turtle as well as the load average.
URLSnarf
URLSnarf allows you to capture which websites were accessed by the plugged in computer. URLSnarf only works with HTTP webpages which are hard to find today. Even though it is displayed as downloadable via the modulemanager, it is depricated in Turtle Shell 6.2.
Use Cases
The LAN turtle can be deployed in various use cases, which can be divided into four categories:
- remote access attacks with AutoSSH or OpenVPN or NetCat Reverse Shell
- man-in-the-middle attacks with URLSnarf or DNSSpoof
- information gathering with Nmap-Scan
- deploy service with via TOR-network
Remote access attacks are used to gain access to a private network from a remote place in order to start further attacks from the inside network. This makes it a lot more easier because the attack itself does not have to bypass a router or firewall. All the attacker needs is the pre-configured LAN turtle inside the network and a remote server on the internet. To perform a remote access, the LAN turtle builds up a tunnel to the remote server so the firewall cannot capture the traffic. Finally the attacker can access the LAN turtle through the tunnel from the remote server. This attack can be performed with the modules AutoSSH or OpenVPN.
The LAN turtle also allows man-in-the-middle attacks, where the turtle can intercept the communication between two parties. To perform such an attack, the LAN turtle must be connected to an USB port of the victim host and to a network cable which connects the host to the internal LAN. Now the whole traffic of the victim host goes over the LAN turtle and can be logged or altered. An attacker can use URLSnarf or DNSSpoof to perform such an attack.
The third use case is information gathering. The aim of this attack is to receive information about the topology, the hosts and the protocols of an internal network in order to perform further attacks. This can be done with the modules like Nmap-Scan.
The following step-by-step instructions will outline how to configure the LAN turtle in order to perform the different types of attacks.
Remote access attacks with AutoSSH
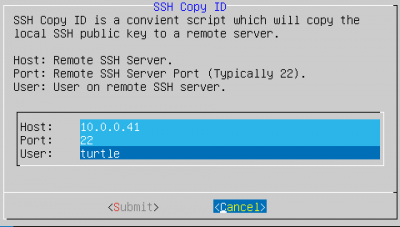
In this example consider an internal network which is secured by a firewall and a server in the internet controlled by the attacker. The server is using 10.0.0.41 and a user turtle was created on it in order to simplify depictions.
Step 1: Generate RSA keypairs with Keymanager
- Open the Keymanager module and select
generate_key - Select
copy_keyand inserthostremote SSH serverportremote SSH server port (typically 22)useruser on the remote SSH server
- A prompt will ask wether or not to confirm the fingerprint
- The password for the user on the host is requestes
- If no error occurs, the exchange was succesful
Step 2: Configure AutoSSH
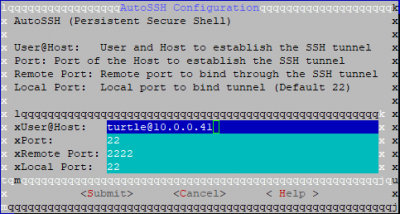
- Open AutoSSH and insert the following parameters:
user@hostuser and host to establish the SSH tunnelportthe port on the Host used to establish the SSH tunnelremote portremote port to bind through the SSH tunnel (default 2222)local portlocal port to bind tunnel (default 22)
- Submit the changes and start AutoSSH (or enable it for autostart)
Step 2: Access LAN turtle from remote server
- Connect to the remote server
- Connect locally to the remote port of the AutoSSH configuration by
ssh root@localhost:2222 - You are now on the LAN turtle, continue with further attacks
Remote access attacks with NetCat Reverse Shell
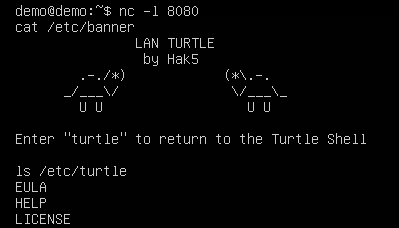
Step 1: Start NetCat server on your host machine
- First you need to setup a netcat connection on your host machine that listens to incoming connections. To start NetCat server execute
nc -l 8080
Step 2: Configure NetCat Reverse Shell
- Open the NetCat Reverse Shell module and go to "Configure"
- Enter your host machines ip address and the port of the nc server. In our case 4444.
- Start the module on the LAN Turtle.
Step 3: Exploit
When the reverse shell connected to your host machine you can execute commands on the lan turtle over the reverse shell.
Gather credentials of locked machines using QuickCreds
Step 1: Install an SD Card to an applicable Lan Turtle
- Carefully open the Lan Turtle Shell as described above, also mind the two screws hidden under the sticker to open it fully
- Turn the Lan Turtle around and fit an SD Card into the SD Card Slot
- Start the Lan Turtle and select the "Format SD Card" option. This is important to avoid any filesystem incompatibilities
Step 2: Install QuickCreds module
- Open the Module Manager, select QuickCreds and install it
- Go back to the installed modules and open QuickCreds
- Select configure and wait for a minute while QuickCreds installs all the necessary packages
Step 3: Arm QuickCreds
- Open QuickCreds and click "ENABLE", this will start QuickCreds when the Lan Turtle is plugged in
Step 4: Exploit
- Plug the armed Lan Turtle into any locked Windows machine
- The amber LED will flash very quickly while the attack is running, afterwards they will slow down while the files are saved and the attacks finishes. Lastly the amber LED will flash in a slow and steady pattern to signalize everything is finished up
- Remove the Lan Turtle
Step 5: Gather hashes
- Plug the Lan Turtle into your machine again and connect via SSH
- Navigate to "/root/loot/quickcreds"
- Every folder "Creds1" ... "CredsN" contains the log of QuickCreds attacks, aswell as the gathered NTLM hashes, if the attack was successful
- Windows devices that use a connected Microsoft Account are currently no susceptible for QuickCreds attacks
Man-in-the-middle attacks with DNSMasq-Spoof
Step 1: Configure the spoofhost file
- Open the DNSMasq-Spoof module and go to "Configure"
- Add the DNS entries that the LAN turtle should spoof by entering the host IP address and the spoofed DNS name
Step 2: Set up your server
- Create an index.html file by using the command
nano index.htmland fill it with the content you want to display to the target - Set up http. An easy way to do so is by issuing
sudo python3 -m http.server 8080on your server
Step 3: Place the LAN turtle in the network
After configuring the spoofed hosts, place the LAN turtle on the victim computer by simply plugging the turtle into an USB port of the computer and the network cable into the LAN turtle. When trying to access one of the spoofed DNS names, the target instead opens your pre-configured html file.
Information Gathering with nmap
As an example project we use the following modules:
- Cron to periodically start the attack
- SSHFS to save the caputred information in a file on the remote server
- Nmap-Scan to sniff the configuration and devices of the network
Step 1: Configure SSHFS
- Access the SSHFS module via the module manager
- Go to the configure tab and insert
hostIP address of the remote serverport22userthe usernamepathThis can be left blank if you want to use the users home directory
- Start SSHFS and enable it for start up
Step 2: nmap-scan
- Access the nmap-scan module via the module manager
- Go to the configure tab and insert
- target:
192.168.0.1-255(This may differ for our network) - logflie:
/sshfs/ - use the desired attack profile
- save the configuration with execute
- target:
Step 3: cron job
- add in the con config
*/15 * * * * start nmap-scan
This line start an nmap-scan every 15 minutes.
Deploy services via TOR with Tortle
Hidden Service
Onion Host sets up a hidden service inside the TOR network. By default it is a TORShell (SSH within TOR).
Proxy & Gateway configuration
TORGateway, if enabled, automatically and conveniently tunnels ALL eth0 traffic through TOR Transparent Proxy. TOR Proxy is just the regular SOCKS proxy through TOR.
Bridge configurtation
Bridges can be used to avoid blocking of the standard tor relays.
HTTP Proxy configuration
HTTP Proxy can be configured to control internet access.
HTTPS Proxy configuration
HTTPS Proxy can be configured to control internet access.
Firewall configuration
You can configure a firewall that restricts access to serveral ports.
