JavaScript Pentest Powerhouse (WFP1)
JavaScript Pentest Powerhouse
The source code for this project can be found on Gitlab!
Introduction
The goal of this project is to create an automated penetration testing platform capable of executing various attack methods, with a specific focus on man-in-the-middle attacks targeting the HTTP protocol. The main objective is to inject malicious JavaScript code into legitimate HTTP responses. Traditionally, performing such attacks has been a cumbersome process. However, our software streamlines these tasks by automating them, requiring users to input critical environmental variables (stored in a .env file).
To achieve this, we have developed a Python-based framework that utilizes additional libraries such as nmap and scapy. Notably, scapy plays an essential role in crafting customized packets to optimize the effectiveness of the attacks. Our project places a strong emphasis on performance and user convenience, relieving users from labor-intensive tasks by seamlessly handling complex aspects. We intend to continue working on this project beyond the current semester.
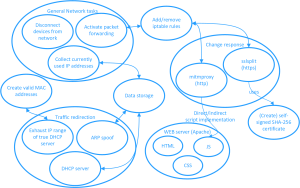
Specifically, the attack is designed to function in the following manner: - Establish MITM via ARP spoofing or rogue DHCP server - Intercept HTTP responses meant for legitimate clients and forward them to the proxy server using mitmproxy. The response can be modified by inserting (malicious) JavaScript into the HTTP head, causing the target browser to execute our chosen JavaScript - Alternatively, you can load the Beef framework (https://beefproject.com/) to take control of target browsers.
Dependencies/libraries used by Powerhouse:
- python-dotenv -> for loading the .env variables
- netifaces -> for enumerating network interfaces
- netaddr -> network address manipulation library
- python-nmap -> network scanning, host detection and monitoring
- scapy -> packet crafting
- dhcpkit -> dhcp
- mitmproxy -> intercepts HTTP responses and modifies them according to user parameters
- sslsplitter -> intercept HTTPS traffic
- beef -> a framework that offers an intuitive web GUI, enabling users to trigger events on a target browser through the injection of a hook.js file.
- pm2 -> a very useful process management tool within npm, we use it to start/stop processes
Setup guide (based on Kali Linux running on a Raspberry Pi)
- Install Kali Linux for Raspberry Pi.
- Run:
sudo apt update - Run:
sudo apt upgrade(optional) - Run:
sudo apt install npm - Run:
npm install pm2 -g-> needs to be installed globally (-g) - Run:
sudo apt install mitmproxy(if not already pre-installed with Kali Linux) - Run:
sudo apt install beef-xss - Run:
sudo apt install sslsplit - Run:
cd - Run:
wget http://standards-oui.ieee.org/oui.txt(for DHCP leasing record) - Run:
sudo mv oui.txt /usr/local/etc(folder can only be modified with sudo rights / file has “644” rights) - Switch to the “Code” directory
- Run:
sudo apt install python3.11-venv(may not be necessary) - Run:
python -m venv venv - Run:
source venv/bin/activate - Run:
venv/bin/pip install -r requirements.txt - To run the program:
sudo venv/bin/python main.py - Press
Ctrl + Cto exit the program - Run:
deactivate
The program assumes the username is “kali”. If your username is different, you might need to change that in the code. Refer to the error message logged to the console during the execution of the program!
Every system is different, therefore refer to any possible error messages/logging if something doesn’t work!
The .env file
Here is where things get interesting. In the .env file, you can change various settings related to the execution of the program.
General Settings:
METHOD: Here, you can specify which modules of the program shall be used.- Examples:
dhcp;webserver;proxy(use rogue DHCP server, web server to host all relevant files, (mitm)proxy to edit incoming HTTP responses)arp;webserver;proxy(use ARP spoofing instead of rogue DHCP)arp;webserver;beef(launch the BeEF framework -> this injects the hook.js needed to connect a target browser to the framework)
- Examples:
IGNORE_GATEWAY: When set to “YES”, the program will ignore the gateway (not spoof it).IGNORE_IPS: In this variable, you can list any IPs you don’t want to spoof.- Example:
IGNORE_IPS="192.168.1.1;192.168.1.2"
- Example:
IFACE: In case you need to tell the program which specific network interface to use, you can specify it here. Under Kali Linux running on a Raspberry Pi, the default interface iseth0.RESET_IPTABLES_RULES: Can be useful if any errors/problems arise regardingiptables.
METHOD options
arp: Causes the program to use ARP spoofing as the MITM method, ARP spoofing is the most reliable option - if that doesn't work, try DHCP spoofingdhcp: Causes the program to launch a rogue DHCP server, giving clients IP addresses after exhausting the actual DHCP servers resources, this enables the MITM attackwebserver: Launch a webserver that is used to for example host the JS files we want to insert into HTTP responsesssl: Launches an SSLSPLIT attack and also facilitates creating new certificatesproxy: This determines if mitmproxy is started (mitmproxy handles the injection of code into the HTTP responses)beef: This launches the beef framework, which can be a helpful tool
Proxy Settings:
INJECT_FILE: Here you can choose which JavaScript code you want to insert into HTTP responses intercepted by the program. These JavaScript files can be found inWFP1/Code/res_changer_www. If you have any custom JavaScript you want to sneak into other hosts’ HTTP responses, feel free to add JavaScript files to this directory and reference them in this parameter of the.envfile.
SSL Settings:
Here you can find some settings related to the SSL certificate creation process.
NEW_CERTIFICATE: if set toYESa new ssl certificate is created, used and stored in thecertsfolder. if set toNOa existing cert is read. Use theCERTIFICATEvariable to define the certificate. Uselatestor%Y_%m_%d__%H_%M_%S
Web Server Settings:
These parameters can be used in case you need to modify anything related to the webserver.
(In our Git repository, you can also find example .env files with some extra explanations.)
Contact
If you have any questions regarding this project, feel free to email us at: timothy.nicholson@stud.fh-campuswien.ac.at or valentin.kogard@stud.fh-campuswien.ac.at.
