Machine in the Middle (MitM) - General
Summary
This documentation aims to provide a general description of Machine-in-the-Middle (MitM) attacks and two examples of tools - Ettercap and Bettercap - are given. Note that MitM is a very broad term and a lot of aspects, methodologies, and tools will fall into this category. Especially in practice, people will often use the term "MitM" in a variety of contexts. Therefore, this article should give you just an overview: depending on your specific needs and goals a deeper dig into related documentation of the technologies and tools will be necessary. You might also firstly search here in the Elvis Wiki whether an article is already provided and you can start working with that.
What is a Machine-in-the-Middle (MitM) attack?
Formerly called “Man-in-the-Middle” attack this is nowadays deprecated as it is not gender-inclusive. Therefore, and to keep the commonly used abbreviation “MitM”, it is nowadays often called Machine-in-the-Middle or sometimes also “Person-in-the-Middle” (PitM).
NIST, the National Institute of Standards and Technology, a very well-known and in the information security industry high renown organization, has the following – compact, though meaningful – definition of what a MitM is: “An attack where the adversary positions themselves between the user and the system so that they can intercept and alter data traveling between them.” (https://csrc.nist.gov/glossary/term/mitm, accessed: 22.12.2023) Please note, that the quotation has been adapted to comply with a gender-neutral language (themselves instead of himself and they instead of he). The definition given above talks about “user” and “system”. In practice, the “user” is often a client (where the human user is working on an Internet-connected device), and the “system” is usually a server that provides services, processes requests, and delivers responses.
In cyber security, it is often the goal of the adversary (or another interested party like security researchers) to gain a MitM position, as it allows this entity to read data (depending on the scenario the data might be e.g., encrypted), modify data, drop data, do further unintended actions or a combination of them.
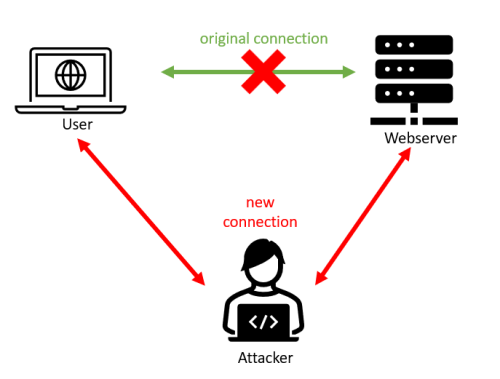
Think of a MitM attack like this:
In the picture, the MitM was between a client (user) and a web server providing a website.
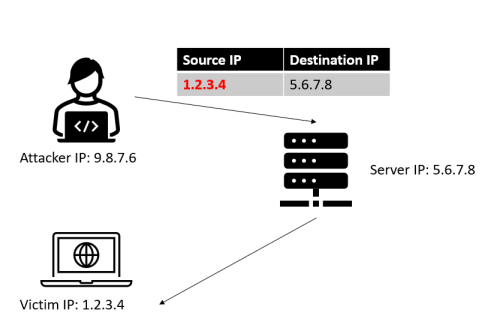
MitM is heavily connected to the concept of ‘spoofing’ where spoofing means, very basically speaking, the faking of the (source) parameter in a protocol to mimic another identity.
Think of spoofing like this:
How are Machine-in-the-Middle attack (Tools) working?
You have to know that MitM is a very general term and when going into more detail, it becomes clear that there exist several specific techniques to achieve a MitM position.
Below are some common techniques provided with a short description.
ARP Spoofing/Cache Poisoning
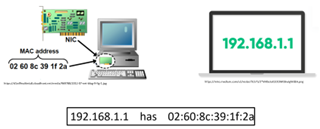
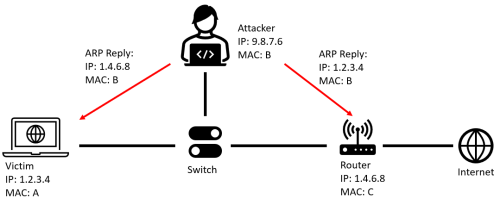
ARP (Address Resolution Protocol, a stateless protocol, which is responsible for translating IP addresses to MAC addresses and maintaining that in a so-called ARP table) Spoofing manipulates the ARP tables in network devices by sending fake ARP messages (works any time as ARP is stateless). The attacker's MAC address is associated with the IP address of a legitimate device then, redirecting traffic through the attacker's system. Cache Poisoning involves injecting false data into the caches of user machines, routers, and/or switches. ARP Spoofing just works when the attacker has access to the switched local network. A common goal for the attacker is to imitate the gateway the other devices are using to access the internet, as it is the most valuable connection from the perspective of the attacker.
Think of ARP like this:
The attacker now wants to change the mapping of the IP address to MAC. A very achievable goal for the attacker is to take the position between a client machine and the gateway as previously mentioned.
DNS Cache Poisoning
DNS Cache Poisoning exploits weaknesses in the DNS (Domain Name System which is used by network-capable devices to find the IP address to a given (human-readable) name (like a URI)) resolution process. Attackers inject malicious DNS records into the cache of DNS resolvers, leading to the resolution of incorrect IP addresses for domain names. By corrupting DNS data, attackers can redirect users to malicious websites without their knowledge. One famous example of this is the Kaminsky attack in 2008, which allowed to pretend as an attacker to be www.google.com – fortunately, its most serious flaws in DNS have been patched and it is not as easy anymore as in 2008 to become Google, Amazon, Facebook or any website you can think of.
IP Spoofing
IP Spoofing is forging the source IP address in packets to deceive the target about the origin of the communication. IP spoofing is often used in conjunction with other techniques for more sophisticated attacks. One example of an IP Spoofing attack would be the “Smurf attack”. Thereby the attacker sends a large number of Internet Control Message Protocol (ICMP) Echo Request (ping) packets with a spoofed source IP address to a network's broadcast address. This leads to a flood of ICMP Echo Reply packets being sent to the victim, overwhelming its network resources.
WiFi MitM
Similar to wired networks, MitM also works in wireless environments. To give you an understanding what this might be, we will focus on one specific attack, the “Evil Twin Access Point” attack. In this scenario, an attacker creates a rogue wireless access point (AP) with an SSID identical or closely resembling a legitimate/ trusted WiFi (using e.g., airgeddon). When a device (client) connects (when already connected with the legitime AP, the attacker will have to do a Deauthentication attack or Beacon Frame spoofing), the attacker gains the capability to intercept, monitor, or manipulate the data flowing between the victim's device and the network. Especially in public WiFi this is dangerous, so one should be careful when using the WiFi at a restaurant/café, airport, train etc.
How to prevent MitM?
Preventing a MitM is as diverse as the attacks and techniques are. Going into detail would go beyond the scope of this article, but just to mention a few ideas: use of encrypted protocols (HTTPS with TLS 1.3, WPA3 for WiFi), intrusion detection/prevention systems (monitoring of network traffic), specialized solutions to specific threats/attacks (e.g., block packets with spoofed source addresses), update systems to patch known vulnerabilities and (as always) education of users (especially in corporate environments) that they should not access sensitive data over the Internet from an insecure WiFi.
Tools
Taking two famous MitM Tools for demonstration: Ettercap and Bettercap There are many tools on the market that facilitate a MitM attack. Two well-known tools should be presented here.
Ettercap
From the Ettercap website: “Ettercap is a comprehensive suite for man in the middle attacks. It features sniffing of live connections, content filtering on the fly and many other interesting tricks. It supports active and passive dissection of many protocols and includes many features for network and host analysis.” (https://www.ettercap-project.org/index.html, accessed: 22.12.2023)
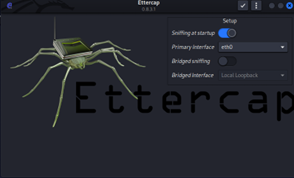
Ettercap has a GUI and is therefore easy/easier to use. In Kali Linux, it is preinstalled. When opening Ettercap-graphical, it shows a setup window, where you can change the primary (network) interface that should be used. In most cases (as in ours) the correct one will be selected automatically by Ettercap.
When clicking the ‘Accept’ symbol (upper right corner), it will show the main view of the tool. As can be seen in the screenshot below, Ettercap provides many options for MitM attacks.
In this case, we want to focus on ARP Spoofing/Cache Poisoning (first option).
In the following, a general step-by-step guide will be given on how one could do ARP Spoofing/Cache Poisoning.
1. Scan hosts on the network by clicking the three dots in the upper right corner Scan for Hosts 2. Select hosts by clicking on the three dots in the upper right corner Host List Select the victims (e.g., clients) and add them to Target 1. Select (e.g.,) the gateway and add them to Target 2. 3. Click on the “world-“symbol (see the screenshot above) and click ARP poisoning. 4. In the next opening window, click “OK”. 5. The ARP Spoofing attack should now be running. You can very that with e.g., Wireshark.
Further attacks are now possible, e.g., by intercepting encrypted web traffic (i.e., HTTPS/TLS).
Bettercap
Bettercap declares itself as “[t]he Swiss Army knife for WiFi, Bluetooth Low Energy, wireless HID hijacking and IPv4 and IPv6 networks reconnaissance and MITM attacks.” (https://www.bettercap.org/, accessed: 22.12.2023)
Also, here we want to do ARP Spoofing/Cache Poisoning.
Bettercap is not preinstalled in Kali Linux, but you can easily install it with:
sudo apt-get install bettercap
Use these commands for a basic ARP Spoofing attack:
sudo bettercap
net.probe on
net.show (optional)
set arp.spoof.targets <single IP-address or -range with “-“ in the last octet>
net.sniff on
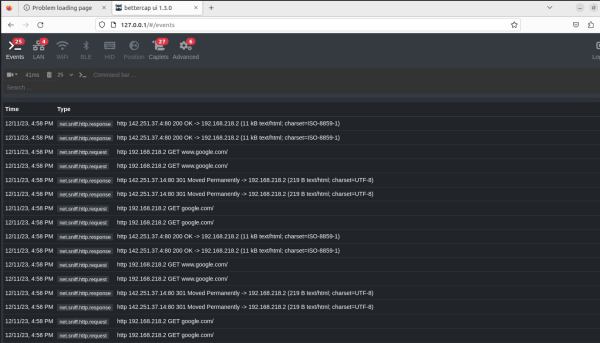
http-ui (if you want to see it graphically on 127.0.0.1:80 with user:pass)
arp.spoof on
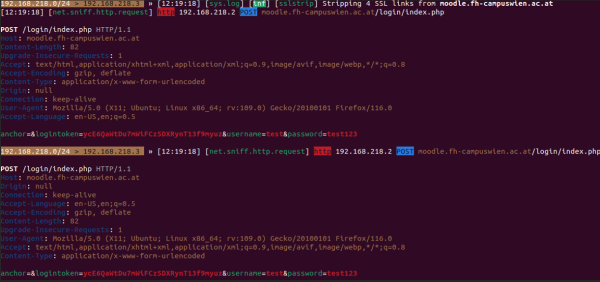
You can load in further “modules” (either in the UI or) in the terminal, for example, to also intercept HTTPS traffic (for websites that don’t have HSTS enabled):
set https.proxy.sslstrip true
https.proxy on
Note that with other modules you might get into trouble with the bettercap from apt-get. For troubleshooting, try e.g., bettercap from the Github. (https://github.com/bettercap/bettercap/issues/958, accessed: 22.12.2023) Therefore, follow these commands:
sudo apt install -y golang git libusb-1.0-0-dev libpcap-dev libnetfilter-queue-dev
git clone https://github.com/bettercap/bettercap.git
cd bettercap
go install
go build
sudo ./bettercap
If you e.g. want to sniff HTTPS traffic and websites enabled HSTS, try the following commands:
sudo ./bettercap
net.probe on
set arp.spoof.targets <single IP-address or -range with “-“ in the last octet>
set arp.spoof.fullduplex true
set arp.spoof.internal true
arp.spoof on
net.sniff on
https.proxy on
hstshijack/hstshijack
For further details, please note, that there is also a separate Elvis Wiki article: https://wiki.elvis.science/index.php?title=Bettercap
Further common tools you might try out
- mitmproxy
- HTTPS Proxy
- https://mitmproxy.org/
- hetty
- (aims to become) open source alternative to Burp Suite Pro
- https://hetty.xyz/
- proxy.py
- Provides many functionalities, including MitM for HTTPS (TLS Interception)
- https://github.com/abhinavsingh/proxy.py
- Burp Suite (Community Edition)
- Widely used penetration testing tool, especially for Web Applications
- Can be used as MitM e.g., TLS Interception
- https://portswigger.net/burp/releases
