MitM on Android App
Summary
The aim of this documentation is to test the certificate validation process of popular android apps. This will be done by a proxy which will intercept the traffic between the android app and the appropriate server. To simulate the Android smartphone an Android emulator was used. First the traffic will be intercepted without the root certificate of the proxy installed to check if a warning will prevent the user to continue to exchange data over an unencrypted channel. Then the root certificate of the proxy will be installed to be able to test if the https traffic can be decrypted. When targeting Android 7.0 (API level 24) or higher it shouldn't be possible to be able to see the decrypted HTTPS traffic, because the NSC settings should apply. All lower versions should accept the installed user certificates, which will allow the attacker to intercept the traffic in cleartext.
Background
Certificate validation in Android applications is a historically known problem. This validation process is a security feature that causes clients to verify the identity of a server before attempting to authenticate on a network.
The process is usually done by retrieving a sequence of certificates from the server, each of which has signed the next in the sequence. The root of the signing CA is the certificate that is bound to the server. The certificates in this chain are compared with the installed certificates in the client's operating system and then verified. If these are not found there, the client receives a certificate warning when surfing a website. If the client accepts the risk, it runs the risk of a third party listening in on the data traffic.
Developers tend to implement certificate validation incorrectly on mobile applications. Therefore Google designed its Google Safeguards and Network Setting Configurations (NSC). It turns out that even with these, there are serious flaws in the implementation that allow a machine-in-the-middle attack.
This project is intended to familiarize ourselves with the problem by testing whether mobile applications accept certificates such as those of a well-known proxy (Burp Suite) and thus allow HTTPS encryption to be broken. Results could therefore show whether there are underlying problems in the process of certificate validation in the apps, or whether the application works correctly.
Requirements
Description
Step 1 (Setting Up the Virtual Device)
1.Install Android Studio Emulator and start the software after installation.
2.Configure Android SDK (Android 6.0 Marshmallow was used for this project) with the SDK Manager of the Emulator, which can be found under More Actions > Virtual Device Manager.
3.Create a Virtual Device over the AVD Manager (Nexus 6 Phone was used for this project)
4.Select the “Marshmallow” system image. When using the first time, it must be first downloaded under “Other Images”.
5.In the next section you can set a name for the device and configure for example storage parameters or the CPU cores.
6.Then the Emulator can be launched. The device should work and be connected to the internet automatically.
When finished, it should look like in the figure.
Step 2 (Installing Apps with Android Debug Bridge)
Next, some APKs can be downloaded locally on the host, which will be then pushed in the next steps on the virtual Android device.
The APKs can be downloaded for example from here. To install the APK a tool named adb (Android Debug Bridge). This command-line tool can be used to install and uninstall applications on the device. Furthermore, files can be pushed to the device. But many other things can be also done. This can be looked up here here.
The Android Debug Bridge is located in the operating system at the following path:
- Mac: /Users/[your_user]/Library/Android/sdk/platform.tools/
- Windows: C:\Users\[user]\AppData\Local\Android\sdk\platform-tools\
- Linux: /usr/share/android-sdk/platform-tools/
After moving to the folder, you can check with “./adb devices” the list of devices attached to your system. Please pay attention that you have to be in adb folder to be able to execute adb.
When downloading APK, you can install the application onto your virtual Android device. Assumed the APK was downloaded in the “Downloads” folder, so then we can use the following command:
- “./adb install ~/Downloads/[your_downloaded_APK]
After some seconds it should be able to start the app on the smartphone.
Step 3 (Configuring Burp Proxy)
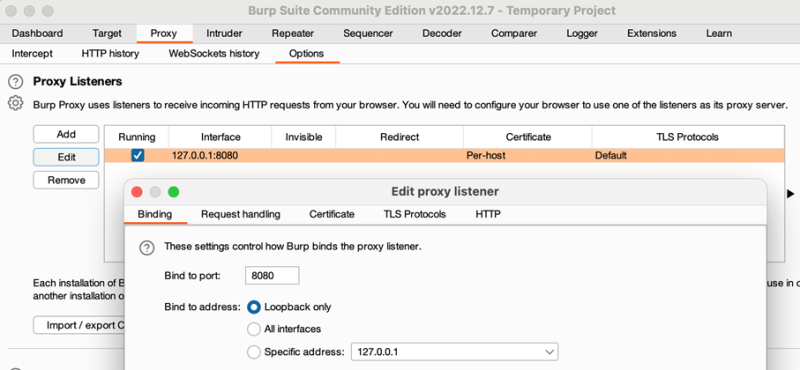
Burp can be configured under Options like it was shown in the Figure below. The listening interface and port can be defined by clicking on the “Edit” button. Also, it can be configured that on all interfaces should be listened. In this project it was configured to listen on localhost (127.0.0.1) on port 8080.
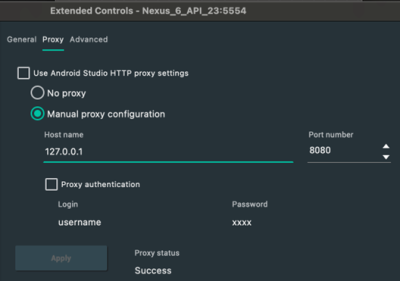
Now the Android device the proxy settings needs to be set. Go therefore to the Emulator > Settings > Proxy. Type in the proxy listener in the manual proxy settings and click on “Apply”.
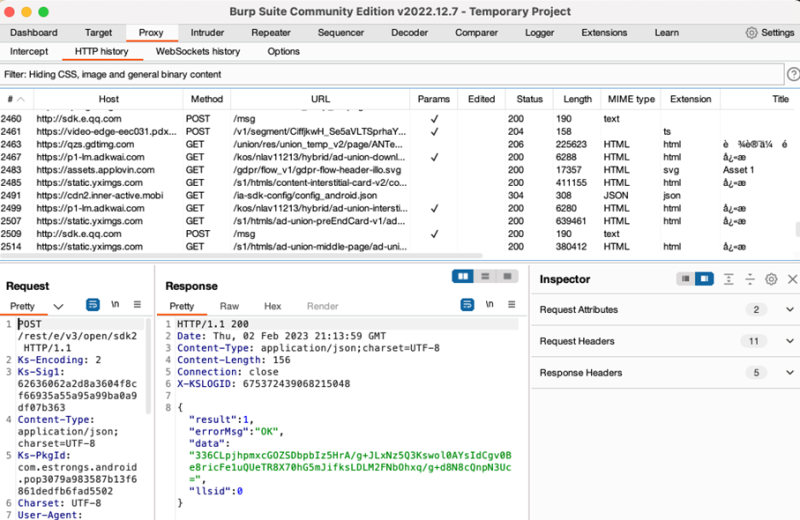
When you click in Burp Suite on “HTTP history” you should be able to intercept the HTTP traffic which you can create on the virtual device. To be able to intercept HTTPS traffic, the burp suite certificate needs to be installed on the Android device.
Step 4 (Installing Burp Suite Certificate)
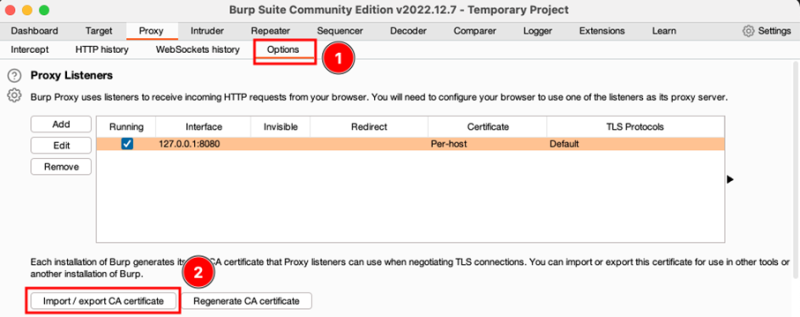
In Burp Suite switch to “Options” and click on “Import / export CA certificate”. Then export the certificate in DER format. Give the certificate a name and save it with a “.cer” extension.
Now the certificate can be pushed with following command into SD card on the emulator:
- ./adb push ~/Downloads/burpcert.cer /sdcard
With an interactive shell it can be checked now if the certificate is already persistent on the device:
- adb shell // Start the interactive shell
- cd sdcard/ // Switch to SD-card storage
- ls // Show all files in current directory
The certificate file should be now displayed in the directory. On the Android device the certificate can be installed under Settings > Security > Install from SD card > Internal storage > [your_certificate_name].cer
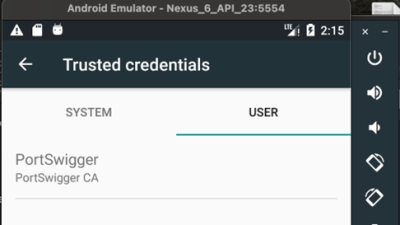
Follow the process straight away. After installing the certificate, the root certificate (PortSwigger CA) should be installed under Settings > Security > Trusted credentials > USER
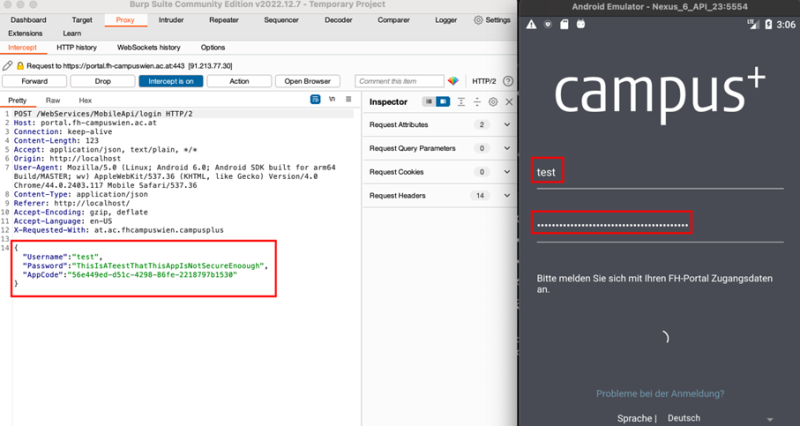
Now you should be also able to intercept HTTPS traffic. Intercept now individual POST requests over the “Intercept” option in Burp. Turn the interception on and enter some test credentials. Encrypted, hashed or cleartext passwords should be now caught. Also, it can be searched for sensitive data over the interactive shell:
- adb shell
- cd /
- cd data/data
Then you can search all the directories for some interesting data. Be careful, the device has to be rooted in order to be able to have access to these folders.
Step 5 (Certificate Validation Testing)
1.Self-signed certificate
- To see if your application accepts self-signed certificates, you should install a self-signed certificate and check if you can see the HTTPS traffic.
- In order to install the self-signed certificate in Burp go to:
- *the Proxy tab and select Options.
- *Go then to Proxy Listeners sections, choose your listener and click on Edit.
- *Click on Certificate tab, choose Use a self-signed certificate and confirm.
2.Accepting certificates with an untrusted CA
- The same procedure can be executed here in order to test the application for certificates with an untrusted CA.
- On the Certificate tab, check the Generate a CA-signed certificate with a specific hostname button and type in the backend server’s hostname.
- Again, if it is possible to see the decrypted HTTPS traffic, the application is accepting certificates with an untrusted CA.
3.Accepting incorrect hostname
- The third option is a test with an CA-sgined certificate with a specific hostname.
- For this option you have to choose the CA-signed certificate with a specific hostname button under the Certificate tab. Afterwards you need to type in a invalid hostname (e.g., test.com)
- If you were not able to see any decrypted HTTPS traffic the application most probably has certificate pinning implemented.
Results
Some popular apps which were downloaded millions of times, were tested within this project. Basically, we distinguish between three outputs:
1.There are apps which didn’t load anymore and therefore didn’t work if a proxy on the virtual device is configured, most probably because of an implementation of certificate pinning.
2.App does work correctly, but the credentials cannot be decrypted.
3.App does work and credentials can be decrypted.
Most of the apps do not work since they have most probably HPKP, certificate- or key pinning implemented, which didn’t allow to accept another certificate then configured.

