Pineapple Setup
Jump to navigation
Jump to search
Summary
Setup and Firmware upgrade [optional] of Wifi Pineapple Nano
Requirements
- Operating system: Ubuntu 18.04 bionic amd64
- Operating system: Windows 10
Description
Basic setup
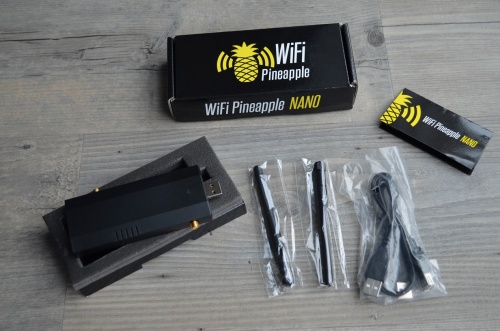
- Connect antennas and USB Y cable, WiFi Pineapple NANO needs a stable USB power supply capable of providing 9W for initial setup. Therefore plug both USB Ports of USB Y cable into the Laptop. After that he blue led should have solid light.
Provision Linux
- Use lusb to verify that pineapple ASIX Electronics is recognized by your laptop
  lsusb
  ...
  Bus 001 Device 004: ID 0b95:772a ASIX Electronics Corp. AX88772A Fast Ethernet
  ...
- Check networking interface and ip address
  sudo ifconfig
  enx00c0ca91b581: flags=4163<UP,BROADCAST,RUNNING,MULTICAST>  mtu 1500
       inet 172.16.42.107  netmask 255.255.255.0  broadcast 172.16.42.255
       inet6 fe80::d2b0:568c:b39b:4c44  prefixlen 64  scopeid 0x20<link>
       ether 00:c0:ca:91:b5:81  txqueuelen 1000  (Ethernet)
       RX packets 15  bytes 1589 (1.5 KiB)
       RX errors 0  dropped 0  overruns 0  frame 0
       TX packets 40  bytes 5589 (5.4 KiB)
       TX errors 0  dropped 0 overruns 0  carrier 0  collisions 0
Setup Windows/Linux
- Browse to the determined IP address 172.16.42.1:1471
The Web interface should appear. The interface then appearing is the main User Interface (UI) where the user is able to work with the WiFi Pineapple Nano. This UI is further described in: https://wiki.elvis.science/index.php?title=Wifi_Pineapple_Nano
Internet connection Linux
- Download wp6 script
  wget wifipinapple.com/wp6.sh
  ...
  2015-12-22 20:09:43 (4.69 MB/s) - 'wp6.sh' saved [6112]
- Make it executable
chmod +x wp6.sh
- Execute it to set up connection. The predefined settings might work without alteration, if not, the settings are easily changed by answering some questions.
sudo ./wp6.sh
Internet connection Windows
- Got to network connections via the change adapter settings. A new ASIX USB Fast Ethernet adapter should have appeared here, which is the pineapple interface.
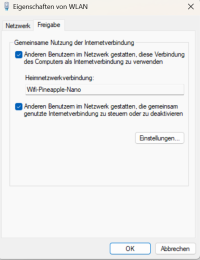
- In the settings of the interface that is responsible for the Internet connection, in the sharing tab, allow other users to connect through this computer's internet connection. Also use the drop down menu to select the interface of the Pineapple Nano and click OK.
- In the settings of the Pineapple Nano Interface, select the settings of the Internet Protocol Version 4. There you change the IP address to '172.16.42.42' and confirm with OK.
User Interface
After connecting the Pineapple Nano to your device correctly as can be seen above, a User Interface (UI) opens under the IP address 172.16.42.1:1471
The User Interface is the main working space for the penetration tester. The UI includes:
- Dashboard - shows the uptime of the device, the clients connected and the SSIDs in the pool
- Recon - scanning the Network
- Clients - List of Clients connected
- Tracking
- Modules - List of downloadable Modules
- Filters - Filtering Clients and connections
- PineAP - Main part of creating a new WiFi where youc an see the SSID pool, add and remove them and start it in order for the SSIDs to be public
- Logging
- Reporting
- Networking
- Configuration
- Advances
- Notes
- Help
Upgrade to newest firmware version 2.7.0 [optional]
- Download newest firmware from https://www.wifipineapple.com/downloads and verify shasum:
  sha256sum upgrade-2.7.0.bin
  c69629ef90c715600e09f22ef12732c593f886db3b0ed145f549de551c48f79d upgrade-2.7.0.bin
- Select file with newest firmware upgrade-2.7.0.bin in the Web interface
- press reset button
- wait until firmware upgrade successfully verified appears
- After upgrade connect again to 172.16.42.107:1471 and get into Device Configuration
- Set root password for ssh and web interface access
- pwd: <ask for>
- Management AP Setup
- Management SSID:
- WPA2 pwd: <ask for>
- check Hide Management AP
- Open AP Setup
is used for the target to connect to: f.e. **netlab**
Troubleshooting
Error when trying to start module e.g. tcpdump:
- Start a ssh connection to the Wifi Pineapple
- Enter the commands
- opkg update
- opkg install libpcap
No internet connection from the PC when plugging in the WIFI Pineapple on Linux
- Ip route
- Ip route del default via 172.16.42.1
Factory reset
- Unplug the WiFi Pineapple completely from all power sources.
- Begin holding the RESET button on the device.
- With the RESET button held, power on the device.
- Continue holding the RESET button for 10 seconds, then release.
- NANO: The blue LED will remain solid
- Connect the host PC to the WiFi Pineapple via the USB Ethernet Port
- NANO: The male USB A plug
- From the host PC, configure a static IP address on the WiFi Pineapple facing Ethernet interface to 192.168.1.2 with netmask 255.255.255.0
- For example, in Linux run ifconfig eth1 192.168.1.2 netmask 255.255.255.0 up (where eth1 is the interface name of the WiFi Pineapple).
- From the host PC, browse to http://192.168.1.1
- Click Choose File and select the factory firmware image downloaded above.
- Click Update Firmware.
- This process will take several minutes. Do not interrupt the power supply while the firmware is updating. Once complete, the WiFi Pineapple will restart.
- Reset the WiFi Pineapple facing USB Ethernet interface back to DHCP or 172.16.42.42 with netmask 255.255.255.0
Used Hardware
Courses
- Campus Cyber Security Team WiFi Hacking 21.06.2019


