Secure Boot Zynq-7000 SoC Family
Summary
The Secure Boot process for the Zynq 7000 SoC family is an important securiy features which is designed to protect the integrity and authenticity of the system´s software. This documentation contains a tutorial and basic information on how to implement the Secure Boot technology onto the Zybo Z7 development board.
Hardware and Software
Required Hardware and Software:
- Software: Vitis(2023.2), Vivado(2023.2)
- Hardware: Zybo Z7 Zynq-7020 Development Board
The implementation of the Secure Boot works the same as on other Zynq-7000 development boards, as long as they are available in the Vitis and Vivado software. The used software to configure the boards and implement the technology is provided by Xilinx. The used board is provided by the ELVIS Embedded Lab Vienna for IoT & Security at FH Campus Vienna.
Requirements
In order to fulfill the task, the board has to be configured and set up correctly. The setup and configuration of certain hardware features can be done with the Vivado 2023.2 software which is provided by Xilinx. The configuration inside the Vivado 2023.2 creates an output which can be used to create a platform project. A platform project offers the configuration of certain libraries and templates which can be used inside the Vitis 2023.2 IDE. The configuration of the platform project enables the creation of application projects which are used to program the board.
The implementation of the Secure Boot process requires the project to be configured to the point where the application project can be coded and programmed onto the board.
Description
The implementation of the Secure Boot technology requires the developer to create a boot image which is secure. The Vitis IDE offers an "Create Boot Image" tool which enables the creation of different boot images of an application.
Step 1
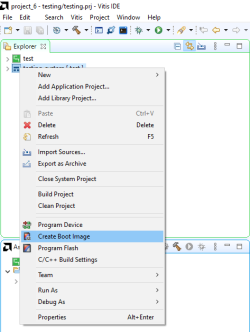
Right click on the application, which is supposed to have the Secure Boot implemented, in the explorer folder and choose the option "Create Boot Image".
Step 2
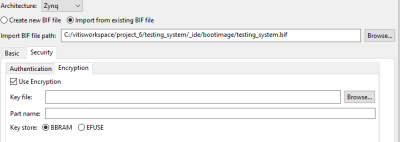
After the "Create Boot Image" window opens, the window offers 2 different tabs. One being labeled "Basic" and one being labeled "Security".
The Security tab offers 2 more tabs which are labeled "Authentication" and "Encryption". Both of these options offer a checkbox to enable either authentication or/and encryption of the boot process.
Step 3
In this example, the encryption of the boot process is used. In order to encrypt the boot process, the "Use Encryption" check box has to be checked and an part name has to be given in order to auto generate a key file.
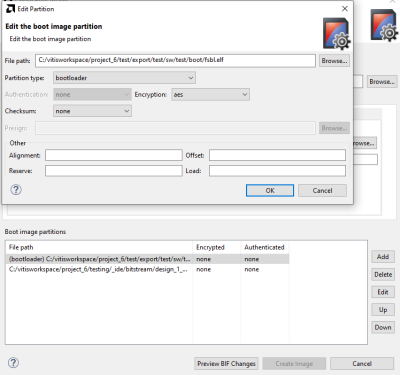
The "Create Boot Image" window previews the different Boot image partitions in the lower half. After the enabling the use of encryption, different boot image partitions can be encrypted.
To encrypt the different partitions, the partitions have to be marked in the window and than the "Edit" button has to be pressed.
After pressing the "Edit" button, an "Edit Partition" window opens and the partition can be encrypted by choosing an encryption type in the encryption menu.
After choosing the encryption types for the different partitions, the image can be created by pressing the "Create Image" button.
- NOTE: In order to encrypt the partitions, the bootloader has to be encrypted.
Step 4
This step requires the device to be connected to the computer.
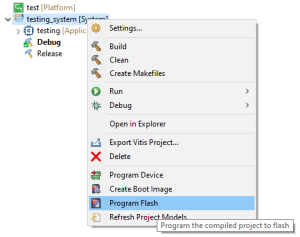
The boot image that was just created can now be flashed onto the device. To flash the boot image onto the device, right click onto the application and choose "Program Flash".
A "Program Flash Memory" window opens. In order to flash the just created encrypted boot image, it has to be chosen as the "Image File".
NOTE:
- In order to be able to flash the boot image onto the device, the "QSPI" pins have to be enabled. On the ZYBO Z7 development board, a jumper placement onto the 2 QSPI pins is required.
Step 5
After confirming the flash onto the device, the device will load the boot image that was just created and boot it. The flashing of a different boot image is now disabled as long as the encryption is not decrypted.
Resetting the device
In order to use the development board for its further development purposes, the flashing of other boot images still has to be an option. The JTAG ports, which can be either disabled or enabled are a way to boot or flash different boot images onto the board. This requires, as long as the JTAG ports are enabled, a jumper connection onto the 2 JTAG pins. Now the consumer is able to flash other images onto the device.


