Difference between revisions of "USB Armory"
FPaschinger (talk | contribs) |
|||
| Line 1: | Line 1: | ||
== Introduction == | == Introduction == | ||
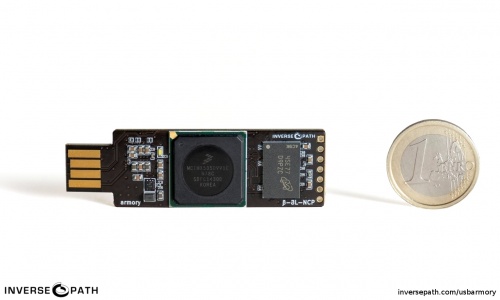
Launched in 2014, USB Armory is a small and portable USB-sized personal computer created by Andrea Barisani <ref>Andrea Barisani. Forging the USB armory, https://www.youtube.com/watch?v=bE5licRHMFs ,2014.</ref>. Originally intended to be produced as a secure data store, USB Armory | Launched in 2014, USB Armory is a small and portable USB-sized personal computer created by Andrea Barisani <ref>Andrea Barisani. Forging the USB armory, https://www.youtube.com/watch?v=bE5licRHMFs ,2014.</ref>. Originally intended to be produced as a secure data store, USB Armory became a versatile device to be used as a full-scale computer for developing, running different applications, storing information safely and testing security. With its hardware sufficient as a computer, it can be configured on an installed Linux system that boots and thus powers up when plugged into any computer, for example, so that data not only ends up on an encrypted partition but is automatically re-encrypted when transferred <ref>NXP Community, Introducing USB armory, an Open Source Hardware Freescale i.MX53 Dongle | ||
, https://community.nxp.com/t5/i-MX-Solutions-Knowledge-Base/Introducing-USB-armory-an-Open-Source-Hardware-Freescale-i-MX53/ta-p/1126823, 2014</ref> . | , https://community.nxp.com/t5/i-MX-Solutions-Knowledge-Base/Introducing-USB-armory-an-Open-Source-Hardware-Freescale-i-MX53/ta-p/1126823, 2014</ref> . | ||
[[File:Usbarmory coin.jpeg|Firmware|thumb|center|500px|link=https://inversepath.com/usbarmory_mark-one.html|OPEN SOURCE FLASH-DRIVE SIZED COMPUTER <ref>Inverse Path, OPEN SOURCE FLASH-DRIVE SIZED COMPUTER, https://inversepath.com/usbarmory_mark-one.html</ref> ]] | [[File:Usbarmory coin.jpeg|Firmware|thumb|center|500px|link=https://inversepath.com/usbarmory_mark-one.html|OPEN SOURCE FLASH-DRIVE SIZED COMPUTER <ref>Inverse Path, OPEN SOURCE FLASH-DRIVE SIZED COMPUTER, https://inversepath.com/usbarmory_mark-one.html</ref> ]] | ||
=== Hardware === | === USB Armory MK I Hardware === | ||
* NXP i.MX53 ARM® Cortex™-A8 800MHz, 512MB DDR3 RAM | * NXP i.MX53 ARM® Cortex™-A8 800MHz, 512MB DDR3 RAM | ||
* USB host powered (<500 mA) device with compact form factor (65 x 19 x 6 mm) | * USB host powered (<500 mA) device with compact form factor (65 x 19 x 6 mm) | ||
| Line 15: | Line 15: | ||
* Open Hardware & Software <ref>Inverse Path, Hardware, https://inversepath.com/usbarmory_mark-one.html </ref> | * Open Hardware & Software <ref>Inverse Path, Hardware, https://inversepath.com/usbarmory_mark-one.html </ref> | ||
===Software === | === Software === | ||
* Native Linux support – creating boot images is easy | * Native Linux support – creating boot images is easy | ||
| Line 21: | Line 21: | ||
* USB device emulation (CDC Ethernet, mass storage, HID, etc.) <ref>Andrea Barisani, MK II Introduction, https://github.com/f-secure-foundry/usbarmory/wiki/Mk-II-Introduction#software</ref> | * USB device emulation (CDC Ethernet, mass storage, HID, etc.) <ref>Andrea Barisani, MK II Introduction, https://github.com/f-secure-foundry/usbarmory/wiki/Mk-II-Introduction#software</ref> | ||
=== How to | === How to connect === | ||
* HS USB 2.0 On-The-Go (OTG) with device emulation | * HS USB 2.0 On-The-Go (OTG) with device emulation | ||
* TCP/IP communication via CDC Ethernet emulation | * TCP/IP communication via CDC Ethernet emulation | ||
| Line 28: | Line 28: | ||
* stand-alone mode with dedicated host adapter <ref> Inverse Path, How to Connect, https://inversepath.com/usbarmory_mark-one.html </ref> | * stand-alone mode with dedicated host adapter <ref> Inverse Path, How to Connect, https://inversepath.com/usbarmory_mark-one.html </ref> | ||
== Application | == Scopes Of Application == | ||
* Hardware Security Module (HSM) | * Hardware Security Module (HSM) | ||
* | * File storage with advanced features such as automatic encryption, virus scanning, host authentication, and data self-destruct | ||
* OpenSSH client and agent for untrusted hosts (kiosk) | * OpenSSH client and agent for untrusted hosts (kiosk) | ||
* | * Router for end-to-end VPN tunneling, Tor | ||
* | * Password manager with integrated web server | ||
* | * Electronic wallet (e.g. pocket Bitcoin wallet) | ||
* | * Authentication token | ||
* | * Portable penetration testing platform | ||
* | * Low level USB security testing <ref>Inverse Path, Applications, https://inversepath.com/usbarmory_mark-one.html</ref> | ||
== Getting Started == | == Getting Started == | ||
=== Boot Mechanisms === | === Boot Mechanisms === | ||
For USB Armory to work in a certain operating system, either the microSD card is inserted. <ref>Getting started, https://github.com/f-secure-foundry/usbarmory/wiki/Starting#getting-started</ref>: | |||
USB Armory has a valid Pre-Image file for each operating system on its own page. Optionally, booting can be done either manually or by downloading the appropriate file and flashing the microSD card (before it is inserted into the USB Armory) with balenaEtcher software. | USB Armory has a valid Pre-Image file for each operating system on its own page. Optionally, booting can be done either manually or by downloading the appropriate file and flashing the microSD card (before it is inserted into the USB Armory) with balenaEtcher software. | ||
| Line 55: | Line 55: | ||
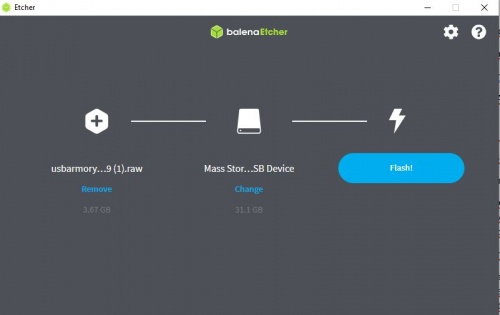
You can download the following software here: https://www.balena.io/etcher/ | You can download the following software here: https://www.balena.io/etcher/ | ||
After downloading Balena, insert the MicroSD in the computer and flash the downloaded pre-image. | |||
[[File:balenaET.jpeg||thumb|center|500px|link=https://www.balena.io/etcher/|Flash OS images to SD cards & USB drives, safely and easily <ref>balenaEtcher, https://www.balena.io/etcher/</ref>]] | [[File:balenaET.jpeg||thumb|center|500px|link=https://www.balena.io/etcher/|Flash OS images to SD cards & USB drives, safely and easily <ref>balenaEtcher, https://www.balena.io/etcher/</ref>]] | ||
| Line 60: | Line 61: | ||
=== Host communication === | === Host communication === | ||
Since the booted microSD card is ready in the operating system, Host communication can be started <ref>Andrea Barisani, Setup & Connection Sharing: Linux , https://github.com/f-secure-foundry/usbarmory/wiki/Host-communication#setup--connection-sharing-linux</ref>. | Since the booted microSD card is ready in the operating system, Host communication can be started <ref>Andrea Barisani, Setup & Connection Sharing: Linux , https://github.com/f-secure-foundry/usbarmory/wiki/Host-communication#setup--connection-sharing-linux</ref>. | ||
On Linux devices or VM with Linux: | |||
# look up the name of the USB virtual Ethernet interface which was created by the USB Armory | # look up the name of the USB virtual Ethernet interface which was created by the USB Armory | ||
| Line 79: | Line 81: | ||
ssh usbarmory@10.0.0.1 | ssh usbarmory@10.0.0.1 | ||
== Armory Pass == | |||
Armory Pass is a password manager for USB Armory, that function as a web-based password manager. To configure it: | |||
== Hardware Used == | == Hardware Used == | ||
Revision as of 17:04, 6 January 2023
Introduction
Launched in 2014, USB Armory is a small and portable USB-sized personal computer created by Andrea Barisani [1]. Originally intended to be produced as a secure data store, USB Armory became a versatile device to be used as a full-scale computer for developing, running different applications, storing information safely and testing security. With its hardware sufficient as a computer, it can be configured on an installed Linux system that boots and thus powers up when plugged into any computer, for example, so that data not only ends up on an encrypted partition but is automatically re-encrypted when transferred [2] .
USB Armory MK I Hardware
- NXP i.MX53 ARM® Cortex™-A8 800MHz, 512MB DDR3 RAM
- USB host powered (<500 mA) device with compact form factor (65 x 19 x 6 mm)
- ARM® TrustZone®, secure boot + storage + RAM
- microSD card slot
- 5-pin breakout header with GPIOs and UART
- customizable LED, including secure mode detection
- excellent native support (Android, Debian, Ubuntu, Arch Linux)
- USB device emulation (CDC Ethernet, mass storage, HID, etc.)
- Open Hardware & Software [4]
Software
- Native Linux support – creating boot images is easy
- Precompiled images are available for Debian 9 (Stretch) and Arch Linux, with more on the way
- USB device emulation (CDC Ethernet, mass storage, HID, etc.) [5]
How to connect
- HS USB 2.0 On-The-Go (OTG) with device emulation
- TCP/IP communication via CDC Ethernet emulation
- flash drive functionality via mass storage device emulation
- serial communication over USB or physical UART
- stand-alone mode with dedicated host adapter [6]
Scopes Of Application
- Hardware Security Module (HSM)
- File storage with advanced features such as automatic encryption, virus scanning, host authentication, and data self-destruct
- OpenSSH client and agent for untrusted hosts (kiosk)
- Router for end-to-end VPN tunneling, Tor
- Password manager with integrated web server
- Electronic wallet (e.g. pocket Bitcoin wallet)
- Authentication token
- Portable penetration testing platform
- Low level USB security testing [7]
Getting Started
Boot Mechanisms
For USB Armory to work in a certain operating system, either the microSD card is inserted. [8]:
USB Armory has a valid Pre-Image file for each operating system on its own page. Optionally, booting can be done either manually or by downloading the appropriate file and flashing the microSD card (before it is inserted into the USB Armory) with balenaEtcher software.
1. Step
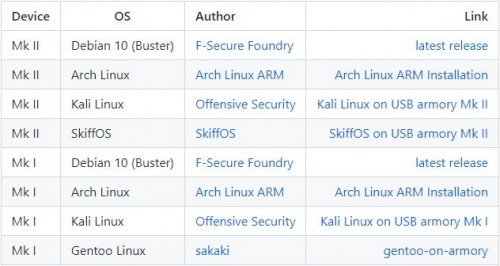
You can find the following Pre-Image files at this link: https://github.com/f-secure-foundry/usbarmory/wiki/Available-images
2. Step
You can download the following software here: https://www.balena.io/etcher/ After downloading Balena, insert the MicroSD in the computer and flash the downloaded pre-image.
Host communication
Since the booted microSD card is ready in the operating system, Host communication can be started [11]. On Linux devices or VM with Linux:
# look up the name of the USB virtual Ethernet interface which was created by the USB Armory
ifconfig
# bring the USB virtual Ethernet interface up
/sbin/ip link set usb0 up
# set the host IP address
/sbin/ip addr add 10.0.0.2/24 dev usb0
# enable masquerading for outgoing connections towards wireless interface
/sbin/iptables -t nat -A POSTROUTING -s 10.0.0.1/32 -o wlan0 -j MASQUERADE
# enable IP forwarding
sudo sysctl -w net.ipv4.ip_forward=1
#connect to USB Armory via ssh - password: USB armory
ssh usbarmory@10.0.0.1
Armory Pass
Armory Pass is a password manager for USB Armory, that function as a web-based password manager. To configure it:
Hardware Used
References
- ↑ Andrea Barisani. Forging the USB armory, https://www.youtube.com/watch?v=bE5licRHMFs ,2014.
- ↑ NXP Community, Introducing USB armory, an Open Source Hardware Freescale i.MX53 Dongle , https://community.nxp.com/t5/i-MX-Solutions-Knowledge-Base/Introducing-USB-armory-an-Open-Source-Hardware-Freescale-i-MX53/ta-p/1126823, 2014
- ↑ Inverse Path, OPEN SOURCE FLASH-DRIVE SIZED COMPUTER, https://inversepath.com/usbarmory_mark-one.html
- ↑ Inverse Path, Hardware, https://inversepath.com/usbarmory_mark-one.html
- ↑ Andrea Barisani, MK II Introduction, https://github.com/f-secure-foundry/usbarmory/wiki/Mk-II-Introduction#software
- ↑ Inverse Path, How to Connect, https://inversepath.com/usbarmory_mark-one.html
- ↑ Inverse Path, Applications, https://inversepath.com/usbarmory_mark-one.html
- ↑ Getting started, https://github.com/f-secure-foundry/usbarmory/wiki/Starting#getting-started
- ↑ Andrea Barisani, Available images, https://github.com/f-secure-foundry/usbarmory/wiki/Available-images
- ↑ balenaEtcher, https://www.balena.io/etcher/
- ↑ Andrea Barisani, Setup & Connection Sharing: Linux , https://github.com/f-secure-foundry/usbarmory/wiki/Host-communication#setup--connection-sharing-linux